

Sometimes, to feel a bit of magic, you don’t need to hike into the woods or wait for a dramatic sunset. All it takes is stepping into your garden… and seeing a tiny bench perched on the edge of a tree stump, with moss glistening nearby like someone just gently fluffed it.
In this article, I’ve gathered 10 spellbinding DIY fairy garden projects for outdoor spaces that will stir your inner child and your love for the land. Whether it’s an old stump or a cracked pot — every garden corner has a story to tell.
1. Transform a Tree Stump Into a Magical Gnome Village
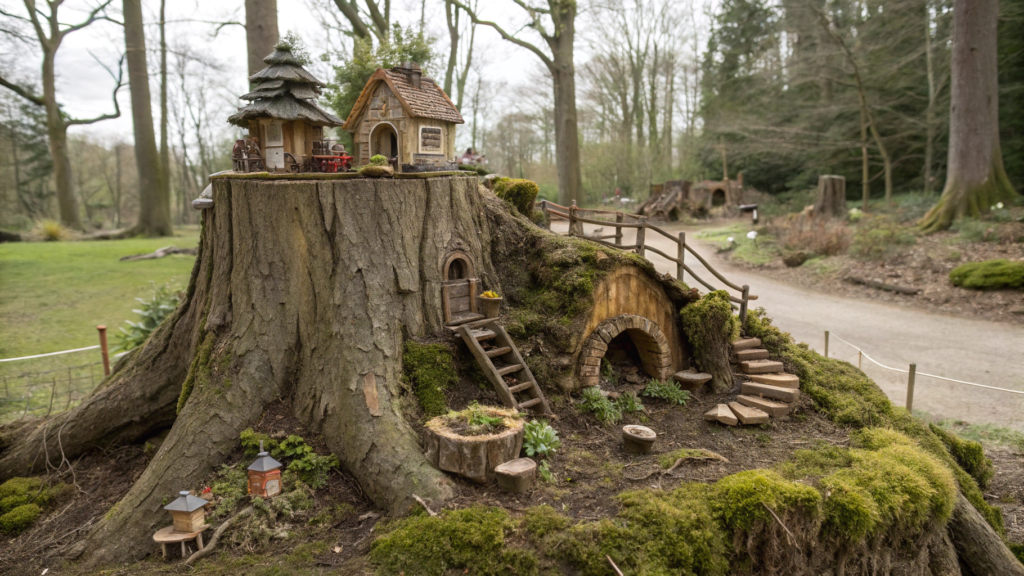
When we first moved to our land in Idaho, there was a half-rotted stump right in the middle of what would become our herb spiral. You can probably guess how that ended.
Why a stump?
Tree stumps are a perfect natural canvas. They already have:
- A sturdy base that doesn’t need extra support
- Natural character and texture — bark, growth rings, moss
- Built-in height that gives your scene visual interest
And reusing the stump instead of pulling it out is such a permaculture move — use what’s already there instead of burning resources on something new.
What you’ll need to create a gnome village:
- A clean, stable tree stump
- Miniature gnome and fairy figurines (we used this set from Amazon)
- Small sticks, pebbles, bark chips, acorns
- Moss (live or preserved)
- Twigs and wood rounds for doors and windows
- Waterproof glue or a hot glue gun
- Optional: battery-powered string lights or solar garden lights
- And of course, imagination. The more, the better.
Step-by-step magic (with honest moments)
- Clean the stump (but keep its charm!). Use a stiff brush to clear dirt, bugs, and loose moss. We kept a bit of moss — I mean, c’mon, fairies love that damp forest vibe.
- Plan your village layout. One big hut? A collection of mini houses? Ours ended up with a main “gnome hall” in the center and three little “outposts” around it — for the gnome council, obviously.
- Build tiny doors and windows. Use twigs, bark, wood slices. For doorknobs? Acorns. And if you’re not in the mood to DIY, pre-made fairy door sets work just fine!
- Add moss, pebbles, and life. Moss instantly brings magic. Place it near doors, in cracks, along the base. Use pebbles to lay little paths. We even made a “gnome veggie bed” with thyme and chickweed.
- Place your gnomes and fairies. Don’t overcrowd. One gnome near the herb patch, one napping by a mushroom “table,” another lounging on a bark bench. Very chill. Very gnome-core.
- Lighting — totally optional, highly recommended. Wrap a string of lights around the stump or set a solar lantern behind it for that nighttime glow.
A few pro tips:
- Use what you have on hand. Pinecones? Dried blooms? Broken tiles? They all work.
- Secure everything. If you’ve got strong winds or curious chickens (looking at you, Bertha!), glue stuff down or pin with floral wire.
- Check for bugs. Especially if you’re using live moss or bark — nobody wants unwanted tenants.
This one little project completely changed how we saw that corner of the garden. That stump? It’s not just leftover wood anymore. It’s where the neighbor’s kid runs to play. Where I drink tea sometimes. Where we’ve had some of our warmest sunset chats.
2. How to Turn Broken Pots Into Enchanted Fairy Garden Layers

The first time one of our clay pots cracked, I was… well, not thrilled. But it didn’t take long to realize: broken pots are perfect for creating tiered fairy gardens that look like miniature terraced worlds.
They’re beautiful, practical — and they let you turn potential trash into a layered masterpiece that fits perfectly in small garden spaces.
Why this works:
- Natural contours. The chips and cracks form organic levels, like tiny hills.
- Space-saving. You can plant multiple types of greenery in one pot — each on its own “tier.”
- Reuse is key. It’s permaculture 101: don’t toss it — transform it.
- Fairy vibes. The layered shape is ideal for adding ladders, bridges, homes, and magical figurines.
What you’ll need:
- A broken clay or ceramic pot (bigger = more creative freedom!)
- Soil and drainage material (gravel, for example)
- Small plants: moss, succulents, thyme, sedum
- Pebbles, mini planks, twigs
- Fairy figurines, gnomes, or miniature homes
- A pinch of patience — especially during setup
How to build your magical layered pot garden:
- Prep the drainage and soil. Add gravel at the bottom of your pot (or what’s left of it), to keep things well-drained. Layer your soil over that — we mixed compost, sand, and a bit of wood ash.
- Insert large shards into the soil to create levels. You’re literally building “terraces” from the broken pot pieces. The steeper the angle, the cooler it looks. One shard we used stood upright — became a “fairy wall” covered in moss with a tiny door.
- Start planting! Smaller plants work best. Our go-to’s:
Creeping thyme (and it smells divine!)
Kamchatka sedum
Java moss
Irish moss — perfect for little grassy patches
- Add magical details. Build a twig staircase. Place a tiny bench next to a “window.” We even made a bark bridge connecting two tiers — and yep, butterflies actually land there.
- Water gently and place in a cozy spot. Use a small watering can or spoon to avoid washing everything out. We tucked a solar fairy light right into the pot — at night, it glows like something out of a storybook.
Tips:
- Stick with clay pots. Plastic just doesn’t give the same vibe or feel right for this kind of setup.
- Mix and match shards. Combine broken bits from multiple pots! The result? A beautiful mosaic of magical ruins.
- Perfection isn’t the goal. A chip here, a curve there — that’s what makes it charming. This isn’t a catalog scene. It’s a fairy tale.
My first fairy pot still lives on the edge of our porch. I pass it every morning with my coffee — and every time, I think: This is that kind of magic you can’t buy at any garden center.
3. This Fairy Garden Bird Bath Will Be the Talk of the Neighborhood

One day after a rainstorm, I went out to check the garden and saw two hummingbirds sipping water from an old pedestal bowl we had turned into a miniature fairy bird bath.
And from that day on… First, one neighbor with her dog stopped to ask about it. Then another with his grandkids.
“What is this little wonder? Feels like someone from a story moved in!” That’s when I realized — we had accidentally created the most talked-about feature in our whole yard.
Why a bird bath?
It’s a visual centerpiece — it draws the eye.
Birds, butterflies, even bees love it (and fairies, obviously).
It’s super easy to make with materials you already have.
And let’s be honest — it’s just plain beautiful.
What you’ll need:
- Base: old basin, bowl, or shallow dish
- Stand: wood stump, bricks, logs, or a broken table leg
- Small pebbles and flat stones
- Moss (live or faux)
- Miniature figurines, shells, glass bits, fairy-style accessories
- Optional: solar light or string lights
How to build your fairy bird bath:
- Choose the location. Ideally, somewhere in partial shade and near flowers or bushes. Birds need to feel safe.
- Set the base. Place the bowl or dish on the stand. We used an old bar stool leg. The key is: stability!
- Add cozy layers.
Sprinkle small pebbles at the bottom — gives birds a place to perch
Add moss and smooth stones around the edges
Pop in mini bridges, houses, arches — like a fairy spa day setup.
- Add water. No more than 2 inches deep! And make sure to refresh it often — standing water is a no-go.
- Decorate the surroundings. Plant thyme, sage, or nasturtiums nearby. They’ll add fragrance and that lush fairy vibe.
Some things we’ve learned:
Fairy details are a must.
We once added a tiny bench and a mini book (yep, a book!), and it became a magnet for kids and adults.
Make a path.
Lay out a stone walkway leading up to it. Or just arrange some tiles and moss — it’s all about the feel.
Change the decor with the seasons.
In fall — pinecones and dried flowers. In spring — petals and beads. Think of it as a mini celebration that evolves.
Last June, we spent the whole day decorating around the bird bath. It was hot, the mosquitoes were ruthless, but we stuck with it.
The next morning? I looked out and saw three tits and a sparrow, taking turns (!!) sitting on the edge, splashing, chirping, fluffing their wings.
It honestly felt like they’d just checked into a fairy hotel.
4. DIY Fairy Garden Clay Pots

Last year, Lindy and I spent nearly the whole summer playing with miniature setups — and clay pots quickly became our favorite.
Why? Because they’re convenient, budget-friendly, and… let’s be real — ridiculously cute.
Why use clay pots for a fairy garden?
There’s something super homey about clay pots. They don’t just look charming — they “breathe”, letting moisture escape slowly and helping plants stay comfy. They’re sturdy, too, so you’re not stressing over every gust of wind or the cat knocking it over.
Plus, they have that vintage feel, like you dug them up on an old forgotten homestead and they’ve got stories to tell. A bit of patina, a sprinkle of time — and suddenly, it really feels like a fairy named Foxy Mint lives inside.
What you’ll need:
- One or more clay pots (any size you like)
- Soil and drainage material
- Plants: moss, sedum, thyme, edelweiss, saxifrage
- Mini decorations — this Amazon set is great!
- Small stones, beads, twigs, dried flowers
- Small paintbrush and glue (if you’re fixing things in place)
How to build a fairy garden in a pot — step by step:
- Create a story. Yep, like in a book. Ours included:
- A fairy chef’s home with a kitchen herb garden
- A forest healer’s cottage with moss and dried flowers
- A bridge over a “river” made from glass beads
Why a story? Because then you’re not just plopping in a house and a gnome — you’re building a whole vibe.
- Fill the pot with drainage and soil. Classic layering: gravel or clay shards on the bottom, then soil on top. Add compost if you want your plants to thrive longer.
- Set your “architecture.” Mini houses, bridges, arches. They look best slightly buried in the soil — like they belong there.
- Add the plants. Go for slow-growing, drought-tolerant, and small-scale ones.
Our faves:
- Irish moss
- Creeping thyme
- Tiny spurge
- Sedum
- Dwarf ferns. Plant in “patches” — like little forest clearings.
- Add the details. This is where it gets fun:
- Stones become a walkway
- Beads turn into a stream
- An old jar lid = pond
- A vintage button = a doorknob
- Water it and pick a good spot. These look great anywhere: on the porch, a stump, in a flowerbed, or hanging in a macrame holder. Just don’t forget to water — especially if your plants are real!
You can totally create a whole fairy pot village — one with a pond and bridge, another with a thyme garden and stairs, another that’s just a mossy forest patch with a sleeping gnome.
Mix different sizes.
Put a large pot in the center, with two smaller ones flanking it — looks lush and balanced, like you totally planned it (even if you were just winging it with a cup of tea in hand).
Change up the decor seasonally: tiny pumpkins and pinecones in fall, beads and fir sprigs in winter, early blooms in spring.
I’ve noticed we’ve started seeing the little things differently.
We’ve learned to pause.
To appreciate the tiny moments. To find beauty in the smallest details.
And honestly? That’s the real magic.
5. Create a Giant Fairy Garden in a Whiskey Barrel

When Lindy brought home a huge whiskey barrel she’d traded to a neighbor for three jars of raspberry jam, I looked at her with slight panic: “A barrel? Where are we going to put this?”
Why a barrel?
First off, it’s a massive space to play with — you’ve got room for plants, decor, even a little “hill” of soil in the middle.
Second, the round, chunky shape feels like it was designed just for fairy life to bloom inside.
And finally — atmosphere. An old barrel always has a story. Even if you don’t know it — you feel it.
What you’ll need for a giant fairy garden:
- The barrel itself. Wooden, with drainage holes. Or drill your own if it doesn’t have them.
- Drainage materials — large rocks, gravel, or broken bricks for the bottom
- Rich, fertile soil — we mix compost with coco coir and sand
- Miniature plants: moss, creeping thyme, sedum, sempervivum, tiny ferns
- Fairy garden elements: bridges, houses, mini benches, ponds, doors
- Lighting: solar string lights or garden lamps to make it glow at night
How to build the magic:
- Start by choosing the orientation of the barrel: upright like a classic planter, or on its side — which turns it into a stage set, like a theater scene.
We tilted ours slightly upward on its side, and boom — instant “fairy meadow in a barrel.” - Create a “landscape” inside.
Layer the soil in waves: higher here, lower there. Add a hill, dig a dip — get some texture going! Ours became a “woodland slope” where a fairy musician lived in a mushroom house. - Add the plants.
We used creeping thyme around the edges — like grassy borders. In the center, we planted sempervivum as our “rose guardian.” Mosses went near the homes, and ferns tucked into the corners. - Add the magical details.
- A tiny “pond” made from a jar lid ringed with pebbles
- A bark bridge that leads to… well, nowhere in particular
- A stone path from broken tiles, with moss creeping through the cracks
- A mini bench with a carved book made from bark
Tips from the garden:
Try to “hide” your details. Not everything should be visible at first glance — magic reveals itself when you lean in.
Add fragrance. Thyme, lavender, sage — it’s not just pretty, it smells amazing.
Leave space for life. A bare patch of soil or a few scattered leaves makes the whole thing feel alive.
Last fall, we placed our barrel at the entrance to the garden. One day, while I was picking basil, I saw two kids from next door whispering near it.
I eavesdropped:
— “I saw it glowing at night!”
— “It’s the fairy with the violin. Mom said she plays when everyone’s asleep.”
And here’s what I’ll tell you: if your garden inspires kids to make up stories — you’ve done something right.
6. Stone Pathways That Glow: The Secret Trick to Nighttime Magic

I’ve always believed a garden should be just as magical at night as it is during the day.
And then, completely by accident, I scattered a handful of glow-in-the-dark stones near our fairy pond. That night, we stepped outside… and just froze.
They were glowing.
No wires, outlets, string lights.
Just a soft shimmer — like someone had left behind fairy footprints.
Why it works:
First off, it doesn’t need electricity. These stones charge from sunlight during the day and release their glow after dark.
Second, they’re nearly invisible in daylight, but at night the garden looks like it’s glowing from within.
And lastly — it’s just fun! Lindy and I even move the stones around sometimes to give our fairy a “new route.”
(Yes, we have a fairy named Zhoo-Zhoo, and she’s picky. Needs variety.)
What you’ll need:
- Glow-in-the-dark stones — these ones from Amazon actually work!
- Gravel, flat stones, or pavers to create the main path
- Clear waterproof adhesive (if you want to secure stones in place)
- Moss, mini plants, bark, wood chips — to finish the edges
How we made our glowing path:
- Chose the path. We picked a route from our porch to the fairy nook by the stump. Laid it out with string and walked it a few times — you’ve got to feel how the magic flows.
- Prepped the base. We dug a shallow trench (about 2–3 inches deep), poured in small gravel, and packed it down well. This keeps it from shifting after rain.
- Laid down the main stones. Flat stones made up the foundation. We spaced them just a bit apart to leave gaps — the future home of the glow magic.
- Added the glowing pebbles. We scattered the luminous stones in the cracks — thick in some spots, sparse in others. Random = magical.
- Framed the edges. We added moss, bark chips, and short plants along the sides. It made the path feel like part of the garden, not something dropped on top of it.
- Waited for night — and admired the glow. Once the sun disappeared behind the trees, the stones started to sparkle. No wires, switches. Just… that fairy feeling.
And what is especially pleasant – to make such a path is easier than it seems, and the result does not cease to please neither day nor night.
7. How to Make a Gnome Home with Moss, Pebbles & Dreams
Sometimes what a garden really needs isn’t another border or flower bed — but a tiny house.
A little home that looks like someone just stepped out for a minute. A house where that one gnome lives — the one who helps root your cuttings, protects your strawberries from slugs, and somehow drops bursts of inspiration into your boots.
Why it matters
A gnome house in the garden isn’t just decor. It’s a sign of life. A quiet story. A little whisper that says, “Even the tiniest corner can hold a tale.”
And trust me — even if you’re a full-grown, serious adult, you’ll catch yourself smiling at a spot like this.
What you’ll need:
- Base for the house: an old mug, half a coconut shell, broken jug, or wood block
- Moss — live or preserved
- Pebbles, tiny stones, bark
- A hot glue gun or waterproof glue
- Mini features: tiny door, window, chimney (DIY or get a small fairy garden set)
- Dreams. You can’t buy them. They show up during garden walks, in the scent of fresh thyme, and in that little flicker of childlike wonder.
How we made our gnome home:
- Picked the base. We had an old wooden salt shaker shaped like a tower (weird, but it totally worked). Other options: a mug, half of a clay pot, a rusty old tin.
- Covered the roof in moss. Just like shingles! We glued tufts of moss in overlapping rows, starting from the bottom and working our way up to make it look real.
- Lined the walls with stones and bark. We glued the pebbles close together, then filled in gaps with thin twigs and bark — looked just like a forest stone cottage.
- Added the door and window. We made ours from scraps of a veggie crate. Door handle? A tiny acorn. Behind the window, we glued a little yellow bead — looked like the light was on inside.
- Sprinkled in the details. A little bark ladder. A stump “reading nook.” And a sign that read:
“Shhh… gnome sleeping.” (Yep, even gnomes need naps.)
Tips we swear by:
Let the house blend into the garden. Don’t just set it on the ground — tuck it in, surround it with moss and plants. Like it’s always been there.
Imperfections are perfect. Crooked walls? Uneven stones? That’s the charm. This isn’t IKEA — it’s a fairytale.
Add a bit of mystery. We once glued a tiny key next to the door. Just a key. No one walks past without asking: “What’s it for?”
8. Use Tree Roots as Natural Fairy Garden Backdrops

When we cleared out an overgrown garden corner, we found this whole tangled maze of tree roots between two old apple trees — thick, twisted, moss-covered.
Now? It’s one of the most magical spots on our land — where the roots became the scenery, not the problem.
Why tree roots work
First, they’re already beautiful. Look closely — the texture, the bends, the shadows, that touch of age — no designer can replicate that.
Second, they’re completely natural. No plastic. No fake finishes. Just wood, moss, and a bit of imagination.
And third — they’re solid structures that can shift and grow with the seasons.
What you’ll need (and maybe want to skip):
- Tree roots emerging from the ground (alive or dead — just stable)
- Moss, pebbles, bark
- Mini houses, figures, doors
- Glow-in-the-dark stones or clip-on solar lights
- Patience — especially if your terrain’s uneven
- A scene idea: gnome forge? tea under the roots? open-air library?
How we turned roots into a fairy scene:
- Cleared the space. We gently removed the grass, leaves, and debris — left the moss untouched. (If fairies like it, we like it.)
- Created a “story.” We went with “The Old Gnome Forge.” We added a mini door between two roots, a bark “dome” to one side as a workshop, a pile of “logs” (twig pieces), and even a tiny anvil made from a rusted bolt.
- Planted the setting. In between the roots: Irish moss, creeping thyme, a bit of heather. Between them — stones, mini beds, little faux lawns.
- Lit it up. We hung mini lights on the branches above. Under one root, we placed a tiny solar lamp — glowed from below like true woodland magic.
A few things we learned:
Roots are your frame. Don’t overcrowd them. Let them anchor the scene, not get lost in it.
Let the scene grow over time. Plant ivy, strawberries, or thyme nearby — let them creep and claim.
Add sound. A tiny wind chime or bell adds that subtle layer that makes it feel alive.
And just like that — the garden comes to life.
Not because of the flowers. But because of the imagination you plant in it.
9. DIY Fairy Village on a Budget Using Only Dollar Store Items

Let’s be real: not every garden project has to be a major investment.
Especially when what you’re craving is a little fun. Something playful. Something made with heart.
Like, say… an entire fairy village built entirely with dollar store finds.
Why this idea rocks:
First — it’s cheap. Second — it’s accessible. Third — it’s just plain fun.
There’s no fear of ruining anything expensive. You can glue, paint, remix, improvise.
And best of all — it’s a chance to create something with kids or friends, without turning it into a Serious Gardening Mission™.
What we found at the dollar store (and what to look for):
- Mini buckets (we turned one into a well)
- Animal and human figurines (a little paint = instant village residents)
- Tiny wooden crates or compartments — perfect as houses
- Plastic plants (some actually look great!)
- Pebbles, shells, colored sand, glass beads
- Bits of fabric and lace — perfect for “curtains”
- Toy accessories — doll strollers, bridges, ladders, toy cars
How we built our budget fairy village:
- Picked a “plot.” We chose a flat patch by a currant bush. Laid some gravel, leveled it, and edged it with bark strips — instant “main street” vibes.
- Built the houses. We turned mini wooden crates into cottages: added cardboard roofs, painted them with acrylic, glued on windows made from clear plastic. One even got a “weather antenna” made from a bent paperclip. Because how else do fairies check the forecast?
- Added figurines and details. We gave plastic fairies a pastel makeover and placed them throughout the village. One sat on a popsicle stick bench. Another stood in a “greenhouse” made from a cotton swab box.
- Decorated and brought it to life. A tiny laundry setup with a bucket and string. A cork “mailbox.” A campfire circle from beads and pebbles. A “Welcome” sign made from a toothpick and scrap cardboard.
And on the “central square” – a jar of sand and shells. Because every fairy dreams of a sea vacation.
Tips from our fairy planners:
Glue is your bestie. Hot glue, wood glue, craft glue — use what fits the job.
Repaint everything. Even the weirdest figurines can become adorable with a fresh coat of paint.
Add shadows. Darker paint around edges adds depth and dimension.
Check the toy aisle. Kids’ items are often the perfect size!
Imagination isn’t about money.
It’s about seeing a librarian in a plastic fairy, a pond in a jar lid, a tree in an old paintbrush.
This village has been living under our bush for three seasons now.
Sometimes bits fall off — we fix them. Sometimes we add a new home.
And sometimes… we just go sit there.
Quietly.
10. Design an Outdoor Fairy Pond Using Leftover Garden Materials
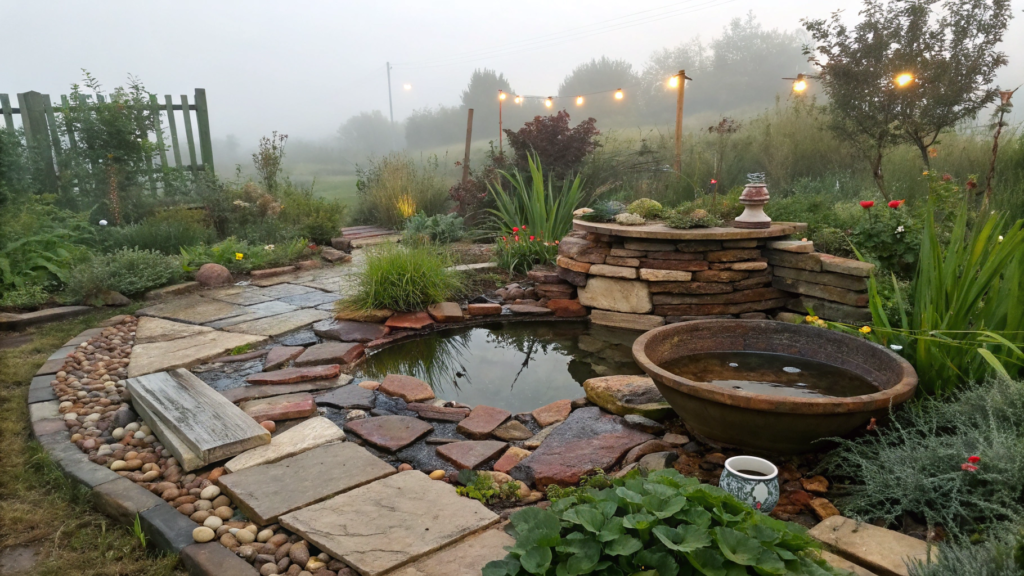
You know that one corner where all your “someday” scraps are piled — broken tiles, random boards, a weird old bowl, mystery plastic?
We had one, too.
And sometimes, the most magical garden spots are born not from shopping… but from chaos.
That’s how we built our fairy water feature. From literally nothing.
Now? It’s one of the coziest places in our entire garden.
Why a fairy pond is easy (and budget-friendly):
You’re not building a koi pond. You’re not hiring contractors.
A fairy pond is a tiny element — about 4–6 inches deep — that can fit inside an old soup pot.
And if you let your imagination lead the way, you’ll end up with something that reflects sunlight, mirrors your plants, and brings joy all season long.
What we used (all leftover stuff!):
- An old enamel basin (cracked, but still holds water)
- Plastic sheeting from an old greenhouse
- Rocks from an old garden bed
- Broken tiles, bits of glass
- Wood scraps, bricks
- Moss, gravel, dried twigs
- A solar-powered mini fountain — the one thing we bought, and so worth it!
How we built our pond — step by step:
- Dug the space. We leveled the area, dug a shallow hole (about 6 inches), lined it with the greenhouse plastic, and secured the edges with stones.
- Set the “bowl.” We placed the old basin in the middle, then ringed it with bricks and tile chunks to form a shoreline. Around it, we added soil, moss, and gravel.
- Designed the edges. We added board scraps to act as “piers,” set down a couple of large flat stones, and even made a “dock” from a broken windowsill. Moss in the cracks made it look perfectly aged.
- Added water. Filled it up, dropped in a few stones — and turned on our solar fountain. It pulses gently, wire-free. Total wow moment.
- Sprinkled in the fairy charm. We lined the rim with little stick railings. Made a walnut-shell boat. And placed a sign that said:
“Please do not feed the mermaid.”
A few tricks that worked:
Use unevenness — a pond with islands, dips, and edges feels more natural.
Add reflections — glass beads, mirrors, bits of polished rock.
Make a “walkway” — we angled some old tiles and filled the gaps with gravel. Instant path!
Water draws in life. First came the bees. Then lizards. Then a moth with wings like gemstones.
And suddenly, you’re sitting beside it with a cup of tea, not wanting to leave.
Even the tiniest pond becomes a magnet for stillness.
Especially when it’s built with soul.
Whispers From the Fairy Garden
So here we are — a whole fairyverse: from stump villages to ponds made of scraps.
All of it built from what was already lying around.
And sure, we could call it “garden décor.” But you and I both know it’s more than that.
These are little beacons of joy. Miniature places of power. Corners of the world you want to come back to.Have you made something fairy-inspired in your garden yet?
Write me. Leave a comment. Tell me: are you more into gnomes with pickaxes or fairies with teapots?
Honestly, I’d love to know — what kind of magic lives in your garden?


I have just begun my journey into the fairy realm. I have been making little fairy houses and placing them through out my garden.
Rebecca, that’s absolutely magical. I love that you’re creating fairy houses in your garden — what a beautiful way to bring enchantment into everyday life. Wishing you joy and wonder on your journey into the fairy realm ✨