
Sometimes, your garden doesn’t need another flower bed — it needs a story. A story with fairies, gnomes, tiny bridges, glowing trails, and warm breezes rustling through moss.
A place to escape the chaos without ever leaving home. And that’s exactly how our fairy worlds were born — right between the compost pile and the herb bed. In old planters, under trees, in a forgotten sandbox. And with every new project, they just kept getting prettier and more alive. In this post, I’ve gathered 10 magical fairy garden ideas you can create in your backyard. Each one comes with its own story, its own spark, and its own way to slow down and reconnect with that tiny dreamer still living inside you.
1. Mini Fairy Garden With a Working Drawbridge
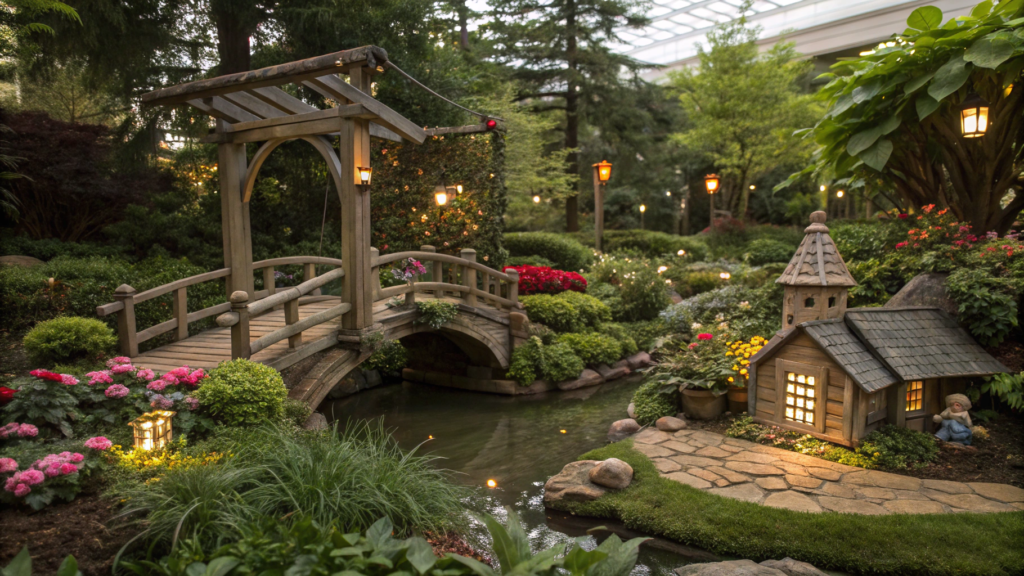
I’ve always had a thing for bridges. Not the big scary kind over rivers — but the storybook kind. So when we started making fairy gardens in our yard, I knew right away: we needed a bridge. A real one. Not just for show. One that moves. One that feels like it’s guarding a secret little kingdom.
Why even bother with a working drawbridge?
Because interactive play changes everything. The garden stops being just decor and becomes a place to engage.
Last summer, my niece sat for an entire hour just lifting and lowering the bridge for acorn deliveries. One whole hour! We even made up a story: the fairies had opened a tiny trading port.
What you’ll need:
- A small bridge made from popsicle sticks (or twigs — even better for that rustic vibe)
- Two mini spools or wood blocks (as support posts)
- Twine or a mini chain for the “lift” mechanism
- A few toothpicks or bamboo skewers
- Hot glue or wood glue
- A shallow planter or container
- Soil, moss, and whatever decor your fairy world needs
Not up for DIY? You can always grab a miniature drawbridge garden kit on Amazon — it’s got everything prepped and ready.
How to build it
- Build the bridge base from popsicle sticks and glue. Let it fully dry.
- Attach it to the posts. These are your “castle walls.” Use toothpicks as axles if needed.
- Set up the lift mechanism. Run the twine through holes at the top of the bridge, loop it over the posts, and tie the ends to a little button (we used a wooden bead).
- Assemble it in the planter. Add moss, soil, and a “moat” using glass pebbles or aquarium stones.
Pro tip. Add some bark or mossy rocks on the sides for that ancient-ruin look.
Fairy gardens thrive on imagination. So give your bridge a purpose. Maybe it guards the patch where Moon Mushrooms grow. Or maybe it leads to the Winter Cottage of the Fairy Queen.
I’ve built this bridge three times. First one melted in the rain. Second? Caught fire (don’t ask). But the third — it still stands beneath our lavender spiral. And yes, the bridge still works. I pull it up every time it rains.
Give yours a name. Every little kingdom deserves one.
2. Fairy Garden Treehouse That Fits in a Clay Pot

Treehouses — they’re every kid’s dream, right?
Well, now you can build one… inside a clay pot that fits in your palm. And trust me, even the grown-ups freeze in wonder when they see it.
Why a clay pot?
First — it’s cheap and easy to find.
Second — it’s the perfect ready-made base. The shape is ideal, and the edges give you plenty to work with. We used an 8-inch pot (about 20 cm), but feel free to go bigger if you’re dreaming of a full-blown fairy villa with a terrace.
What you’ll need:
- Clay pot (8–12 inches)
- A mini branch or forked twig (we used an old rosemary stem!)
- Popsicle sticks or wooden skewers
- Moss (real or fake)
- Tiny ladder made from twine and sticks
- Little door and windows (store-bought or DIY from cardboard)
- Hot glue gun
- Tiny decor pieces: stools, flower pots, flags
- Optional but magical: mini string lights on batteries
How we built it (and how you can too)
- Insert your “tree” in the center. Use a branch or shrub stem, secured with glue or pebbles.
- Build the platform. Popsicle sticks make a great treehouse floor. Glue them to the branch.
- Add a ladder. Ours was made of jute twine and toothpicks — totally cartoon-vibes.
- Decorate. Tiny door, windows, pots with succulents, even flags. This is where the fun kicks in.
- Fill with moss and details. Cover the soil with moss, sprinkle in mini “beds,” pebble paths — let your creativity run wild.
Tips we swear by:
- Don’t be afraid to go all-natural — bark, pinecones, moss. They look so much more real than plastic.
- Leave a little messiness. Fairy worlds aren’t perfect. That’s their charm.
Our very first treehouse still sits on the porch. And sometimes, when the wind picks up at night, that little string of lights swings back and forth…
And I swear, it feels like the fairies have just come home from their evening walk and flipped the lights on in their living room.
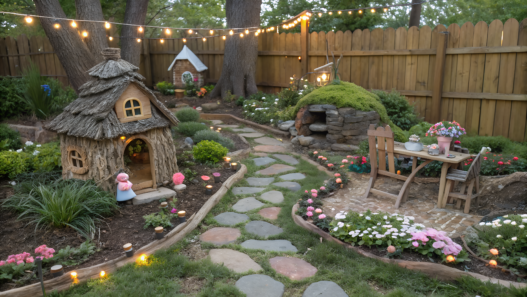
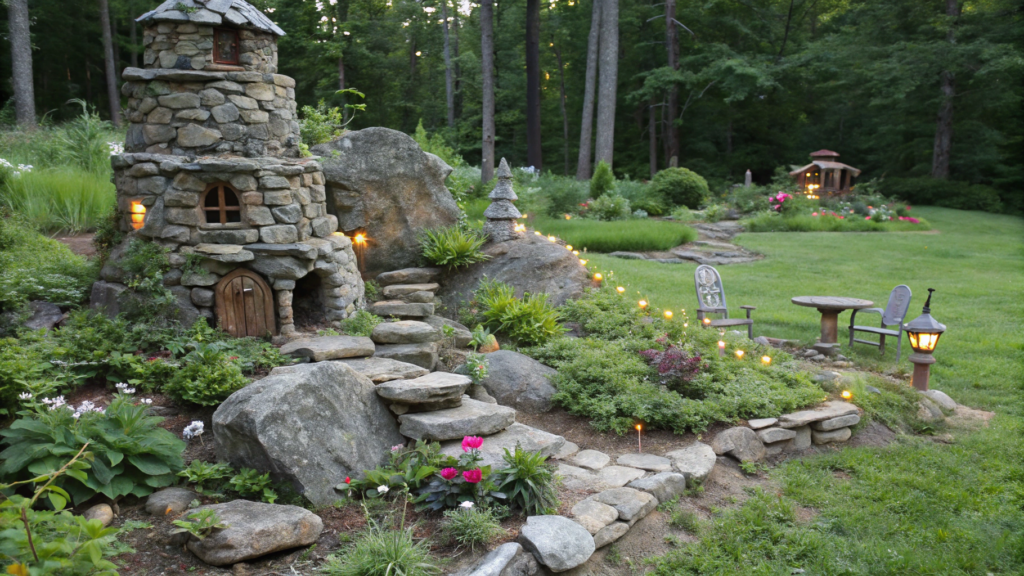
3. How to Make a Giant Fairy Garden From Old Landscaping Rocks
When we first moved onto our land, there were… let’s say, a lot of rocks. A lot. The whole thing looked like an abandoned quarry. And then came the idea:
What if we could turn those rocks into a giant fairy garden?
Not a tiny one in a flower pot. A real one. A full-blown fantasy scape, where every rock becomes a tower, a home, or a secret den.
And why not? Rocks are free, natural, and they honestly look better than any store-bought decor. Weathered stones have this sense of age to them — like you just uncovered some forgotten woodland village.
Plus, they’re heavy — which means stable. And with a few tricks, you can build a whole miniature landscape out of them.
What You’ll Need:
- A bunch of large and medium-sized rocks with interesting shapes
- A few flat stones for building “levels” or little bridges
- Moss (real or dried)
- Soil, gravel, and sand
- Mini decor: tiny doors, stairs, signs, mushrooms
- Dwarf plants or succulents (sedum, thyme, hens and chicks work great)
- Optional: a miniature door and sign set, pre-made
How to Build Your Stone Fairy Garden
- Pick your spot. A garden corner works great — especially one visible from the house. We love placing them along pathways where they “coexist” with regular beds.
- Lay the foundation. Start with flat stones — think streets or plaza spaces. Then stack your bigger rocks around the edge like homes or hills.
- Add texture and height. Use soil and gravel to create elevation. Tuck moss or ground covers into the cracks between stones.
- Create pathways. Lay down sand or gravel trails. Add tiny bridges or stepping stones. Heck, carve out a “mine entrance” or “hidden tunnel” if you’re feeling it.
- Move in the residents. Add gnome or fairy figures, tiny doors at the base of stones, little signs.
Trust me, your inner child will thank you.
I started building our stone garden in May. It was messy, uncomfortable, and I kept smacking my shovel on rocks that just would not budge. But by mid-June, it had a life of its own.
One morning, I stepped out and saw wild thyme growing next to a flat-stone “tower.” A snail was making its way toward a tiny door I’d glued there the week before.
And I, a grown woman with a permaculture certificate, just stood there for five minutes — open-mouthed, heart full.
No, it doesn’t need to be perfect. That’s the whole point. Some old tiles, broken stones, a bit of sand — and suddenly, you’re building a world where even the rain sounds different.
4. Pot, Moss, and Pebbles: The Easiest Fairy World You’ll Ever Make

Sometimes, you don’t need elaborate builds, gnomes with LED hats, or mini waterfalls to create magic.
Sometimes, all it takes is an old flower pot, a handful of moss, and some stones from your walkway.
And somehow, it still looks like a complete world you want to lean down and peek into.
What You’ll Need (and likely already have):
- A small flower pot (ceramic or plastic — anything works)
- Soil or sand
- Some moss — you can grab some at the store or forage on a walk
- Pebbles — river rocks, aquarium gravel, or anything from your yard
- Mini decor: a little door, bench, or a “Do Not Disturb — Fairies Sleeping” sign
- Optional: grab a starter fairy garden kit to make things easier
How to Build It
- Add soil to the pot. Not packed down too hard — leave a little air. Like the world is just now waking up.
- Place the moss. Don’t go for symmetry. Use clumps. A little heavier here, a bit loose on the edges — that randomness gives it life.
- Lay the pebbles. You can build paths, loops, even tiny “ponds.” One time we made an entire maze!
- Add the story bits. A twig bench, a snail figure, maybe a tiny window on the pot’s side. It’s the details that turn this from a setup into a fairy tale scene.
Where We’ve Built These:
- By the front steps, where you can stop and stare into it as you come and go
- On the kitchen windowsill, especially sweet near your herb pots
- On the summer porch, as a fun gift for guests (or just for yourself)
A Tiny Secret
If you add just one bold little detail — a red mushroom cap or a blue teacup — the whole thing comes alive. A small visual pop in a simple setup makes the whole garden sing.
And yes, you really can make it in 10 minutes.
But anyone who sees it will think you’re a fairy tale genius. And honestly? They’re probably right.
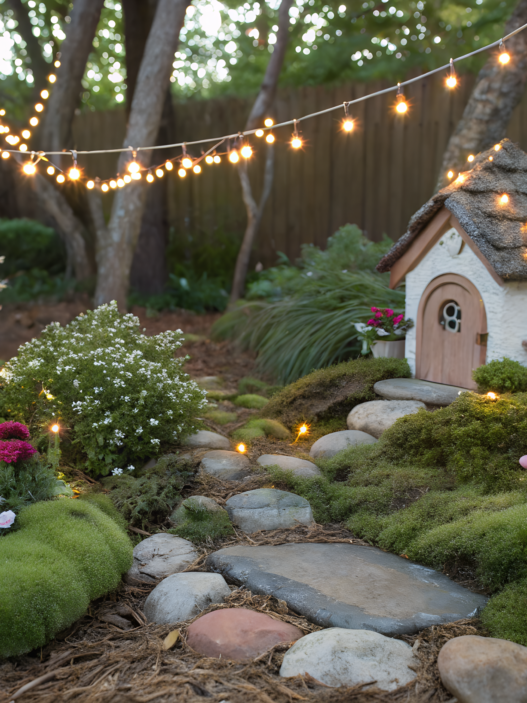
5. Glow-in-the-Dark Fairy Garden Trail for Kids’ Nighttime Fun

As the evening settles in, our fairy garden lights up. A tiny trail glows softly through the ornamental grass, like it’s whispering some kind of secret.
Real magic, honestly.
The path lights up, and the garden turns into a stage — full of shadows, shimmer, and stories.
Why create a glow-in-the-dark trail?
Because kids need a little wonder after sunset. And honestly, so do we adults.
It’s the easiest way to breathe new life into your fairy garden — making it not just a daytime activity, but a nighttime adventure.
Especially in summer, when the air is warm and no one’s in a rush to go inside.
What You’ll Need for a Nighttime Trail:
- Glow-in-the-dark pebbles or stones
- Clear glue or sealant (if using natural stones that need coating)
- Miniature solar-powered garden lights
- Optional: grab a glow-in-the-dark garden stone kit on Amazon — one set is enough for a decent-sized path
How We Built Ours
- Map the route. It can lead from your walkway to a fairy door, wrap around a tree, or sneak between lavender bushes.
- Lay your base. We used a thin line of sand — it holds shape well and makes it easier to press stones in, especially on slopes.
- Place the glowing stones. They don’t need to be close together. Even scattered, they create that dreamy sparkle effect.
- Add your trail markers. Mini solar lights, tiny signs (“Fairy Crossing” or “No Trolls Allowed”), even wind chimes on a stick — all those little details bring it to life.
Fun “Story Ideas” for the Trail:
- A crossroads where one trail leads to a “cottage,” the other to a “lake” made of glass marbles
- A hidden surprise at the end (ours was a little jar with cookies!)
- Or just keep it on as a gentle garden nightlight — perfect if there’s a kid’s tent or swing nearby
What Makes This Idea Special
We’ve noticed that glow-in-the-dark paths don’t just decorate the garden — they bring people together.
Kids call each other over to look, adults sit down nearby, and suddenly stories are being made between the stones.
And that’s kind of the whole point.
Fairy tales don’t die — they just wait for someone to turn on the path.
6. Fairy Garden Kit With a Real Waterfall

When I say “waterfall in a fairy garden,” people usually picture something huge, complicated… and loud. But the truth is — you can build a real miniature waterfall right inside a planter. And yes — it really works. It drips, flows, trickles.
We built ours during a pretty rough summer.
No travel. Too much going on.
And this tiny waterfall became our little pocket of peace. We’d sit near it after long days and just breathe.
What Is a Mini Fairy Waterfall, Really?
It’s a simple water loop — either circulating or trickling — hidden inside your setup.
You can DIY it or grab a ready-to-go kit where everything’s sized and matched.
No plumbing needed — it runs like a mini fountain.
- We used this Fairy Garden Waterfall Kit from Amazon — it includes a pump and light, and we placed it inside an old wooden tub.
What You’ll Need (If Building It Yourself):
- Mini water pump (aquarium or tabletop fountain style)
- Flat and sloped stones
- Water container (bowl, insert, small bucket)
- A small tube for water flow (usually comes with the pump)
- Moss, gravel, driftwood — for covering the tech
- Mini houses, bridges, benches
- An outlet nearby (or an extension cord)
How to Set It Up
- Choose your base. A deep planter or tub works best. Pump goes on the bottom, and the rock cascade builds upward.
- Run your tubing. Hide it under rocks and route it upward. When turned on, water will flow back down like a real waterfall.
- Cover the tech. Use moss, bark, and chunky gravel to hide wires and gear. Just make sure you can still access the pump to clean it.
- Add the magic. Place a mini house nearby, hang a stick bridge, plant sedum or baby’s tears for texture. The water and greenery provide absolute tranquility.
Where to Place Your Fairy Waterfall:
- On the porch or near your seating spot — the sound of water makes the perfect tea-time soundtrack
- In the kids’ garden area — they’ll love watching the flow
- Near a mint or lemon balm patch — adds that herbal scent = garden aromatherapy
Tips:
Change the water every couple days, especially in hot weather
Use a timer to avoid running the pump 24/7
If it’s dusty out, cover it at night — otherwise, you’ll wake up to mystery gunk.
You don’t need to travel far to feel like you’ve had a break.
Sometimes, all it takes is a bucket, a pump… and the sound of water you built yourself.
7. Giant Gnome Playground Built from a 5-Gallon Planter

We had this old 5-gallon plastic pot from an olive tree just sitting around. And no, we didn’t throw it out.
Instead, we turned it into a gnome-sized amusement park — with swings, ladders, bridges, and even a slide made from an old scrap of wood.
Since then? It’s been the heart of our fairy yard. And no kid passes by without stopping to peek inside.
Why use a big pot?
Because it gives you room to create. It’s like trading a studio apartment for a three-story house.
You can build layers, slopes, even tiny “rooms” inside. And it’s easy to move or rebuild.
If you flip the pot upside down, it becomes a sturdy base for your entire miniature build. That’s exactly what we did.
What You’ll Need to Build Your Gnome Playground:
- A large plastic or ceramic planter (5 gallons or bigger)
- Scrap wood, sticks, and twigs
- Toothpicks, skewers, string
- Hot glue gun, wire, awl
- Tiny pieces: swings, ladders, tunnels
- Moss, little beds of sedum or succulents
- Optional: a gnome playground mini accessory kit— great for adding detail
How to Build a “Play Park” for Your Fairy Friends
- Flip the pot. It becomes a hill or mountain that supports everything else.
- Build levels. Glue on wooden “terraces” and add stairs between them. We used old crate wood, trimmed and secured with skewers.
- Add swings and a slide. Make swings from twine and sticks, slides from bark or plastic scraps. Let them move! (Yes, we once had a swing snap… the gnome survived)
- Decorate. Add greenery, gravel paths, and hang little flags. Place benches or mini signs. It should feel like a real little park — just fairy-sized.
Where to Put It?
- At the garden entrance — a whimsical welcome
- Near the kids’ play area — they’ll spend hours watching and playing
- In the middle of a garden bed — let the gnomes “guard” your veggies
The Detail Everyone Talks About
We glued a tiny sign to the pot, written as if from the gnomes:
“Open from sunrise to sunset. Mushroom soup break — 1 PM.”
Every adult who walks by? Stops. Smiles. Tells someone to come look.
It’s a tiny touch — but it brings the whole thing to life.
And hey — if you ever feel weird building ladders for imaginary gnomes, just know you’re not alone.
I’m right there with you. And so are our gnomes.
8. Use a Bird Bath as a Fairy Lake

You’ve probably seen that old bird bath a hundred times — tucked under a tree, filled with rain, maybe visited by a few birds now and then…
But one spring, Lindi and I had a thought:
What if we turned it into a real, magical fairy lake?
Not just water. A whole world. With a little dock. A walnut-shell boat. A tiny sign that says “Swimming on Fridays.”
Lavender-stem reeds. Mossy shores. And a little sparkle when the sun hits just right.
Why a Bird Bath Is the Perfect Base for a Fairy Lake:
- It already holds water — no need to reinvent anything
- Most are low and flat — perfect for building out a miniature landscape
- Easy to move, decorate, and update seasonally
- And it’s already part of the ecosystem — birds, bugs, even squirrels may stop by
What You’ll Need:
- A bird bath (stone, plastic, ceramic — all work)
- Water (obviously)
- Flat stones for the “shoreline”
- Moss, gravel, sand
- Fairy-size items: boats, mushrooms, benches
- Twigs to mimic reeds or rushes
How to Turn a Bird Bath into a Fairy Lake
- Clean it up and fill it with fresh water. A little over halfway full is perfect — makes it easier to anchor decorations on the edge.
- Build out the shoreline. Use stones, bits of bark, and moss. Make the shape uneven — curves and inlets make it feel real.
- Add small details. Plank “docks” made from sticks, a folded cloth for a fairy picnic blanket, a couple duck or boat figurines.
- Decorate the edges. Stick in sprigs of lavender or thyme to look like reeds. Plant thyme — it honestly looks like it was designed for fairy lakes.
This stuff isn’t just for decoration. It’s about the feeling of water in the garden, reflections, movement.
And yes, the fairies will definitely be pleased.
9. DIY Floating Fairy Garden in a Hanging Basket

A floating fairy island… swaying from a chain, catching the wind, and hovering above your garden beds.
Sounds dreamy, right?
All you need is an old wire hanging basket — and a bit of imagination.
Why a Hanging Basket Makes the Perfect Base:
- You can raise it up to eye level — which changes everything. It’s not just “on the ground” anymore, it’s floating in space.
- Super easy to move — hang it under a tree, or bring it up to the porch
- Low-maintenance — watering, switching out plants, and decorating is all within reach
- And best of all — it swings gently. Which adds movement and that feeling of life
What You’ll Need:
- A hanging basket (wire or one with a coco liner)
- Lightweight soil or a peat-based mix
- Moss (live, dry, or decorative)
- Groundcover plants like sedum, thyme, hens and chicks
- Mini decor: little houses, signs, arches, bridges
- A few tall decorations on “sticks” — like flags, glowing fireflies, or tiny mushrooms
How We Built Our Floating Island
- Fill with lightweight soil. We used peat and vermiculite — keeps it airy and not too heavy for the hanger.
- Add moss. Not just for looks — it holds moisture and gives that “soft forest floor” vibe. Plus, it hides the soil edges.
- Plant it up. We stuck to sedum and thyme — low maintenance, compact, and look great from above.
- Decorate. Ours had a mini door at the “base,” a little arch made from skewers, a few mushrooms, a couple pebbles, and a flag that said “Welcome Home.”
- Hang it up. Best spot? Somewhere with morning sun and afternoon shade, like under a porch roof or pergola.
A floating fairy garden isn’t just cute. It’s a tiny story you can hang right at eye level.
It doesn’t need ground space, barely takes time, and every time it sways in the breeze — you’ll feel a little flutter of joy.
10. Backyard Sandbox Turned Fairy Forest

If your kids have outgrown the sandbox but you’re not ready to toss it… give it a second life.
Turn it into a miniature fairy forest, full of winding trails, little meadows, tiny houses, and real, living plants.
Why a Sandbox Is the Perfect Starting Point:
- The size gives you clear boundaries — perfect for shaping your imagination
- The sand holds form easily — ideal for creating hills, paths, and ponds
- Most sandboxes are in partial shade — just right for moss, thyme, and other groundcovers
- And let’s be honest — it’s fun to turn something ordinary into something magical
What You’ll Need
- A sandbox (built-in or portable, either works)
- Some of the original sand + nutrient-rich soil
- Moss (real or faux), gravel, mulch
- Mini plants: thyme, sedum, Irish moss, mini ferns
- Tiny figurines: woodland animals, fairy houses, campfires, benches
- Decorative elements on sticks — flags, signs
- Optional: a fairy forest miniatures kit — trees, critters, campfire ring, and more
How We Turned Ours into a Fairy Forest:
- Removed some of the sand and replaced it with a fluffy soil mix.
We left a bit of the original sand — it became our “meadows” and “paths.”
Shaped the terrain. We built small hills, winding trails, a pond area, and even a little “den” made from a clay pot laid on its side.- Planted the forest. Irish moss and thyme in the corners, mini ferns in the center. Pebbles and bark lined the trails.
- Brought it to life. Tiny homes, stump benches, a fire pit made of twigs, a treehouse (okay, it’s a stick), and a bridge over our “dry creek bed.”
Tips From Experience:
- Use different levels — hills, dips, tall vs. low plants — it gives the whole thing dimension
- Create a “power spot” — ours is an old teacup buried in the center, holding water (it’s technically a fairy watering hole)
- Add things over time. Don’t rush it. Let your fairy forest grow like a story
Now our sandbox isn’t just a box — it’s a living, breathing tiny forest.
There’s morning mist (okay, a spray bottle), evening fires (LED candle in a jar), and changing seasons — in fall, we even tuck in tiny acorn pumpkins.
If you still have a sandbox, don’t be in a hurry to say goodbye to it. It can be a portal to your childhood.
Just add a little moss… and imagination.
The fairy world is open!
I’ve told you about our little fairy corners — now I want to hear about yours.
Do you already have a magical garden? Which of these ideas would you like to try?
Or maybe you’ve dreamed up something completely your own?
Leave a comment, share your story — and let’s keep filling our gardens not just with plants, but with fairy tales.


Do you have a book out..??
Hi Pamela! No book just yet — but you’re the first to ask, and that seriously means a lot. Maybe it’s time to start one 🙂 Thank you so much for the kind words!
Great Ideas
Thanks!