The front yard is often left “for later.” And in the end, this is exactly the area that looks the most random — a couple of bushes, some flowers, something left from the previous owner… and no feeling that it’s thought through.
Here are 10 ideas that solve specific situations. Where it’s too hot and everything burns out. Where there’s shade and nothing blooms. Water stands after rain. Where there’s just an empty corner and it’s unclear what to do with it. These are not abstract examples — we either did these solutions ourselves or saw them at someone else’s place and then repeated them.
The most interesting thing — almost everywhere the same logic works. Not more plants, but a clear arrangement of them. Not more complex, but more precise.
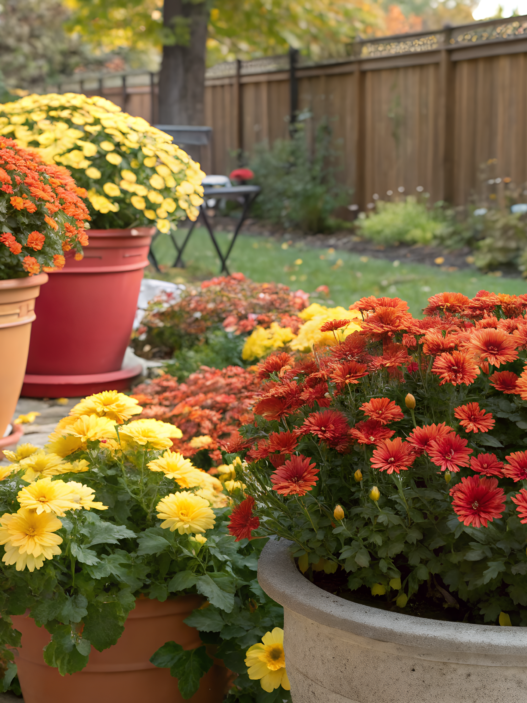
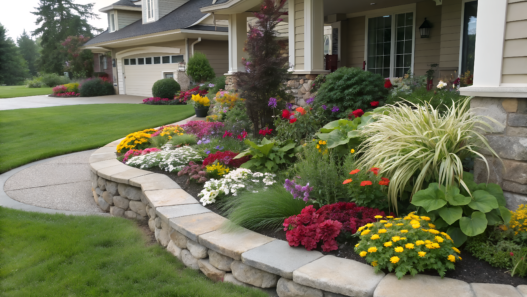
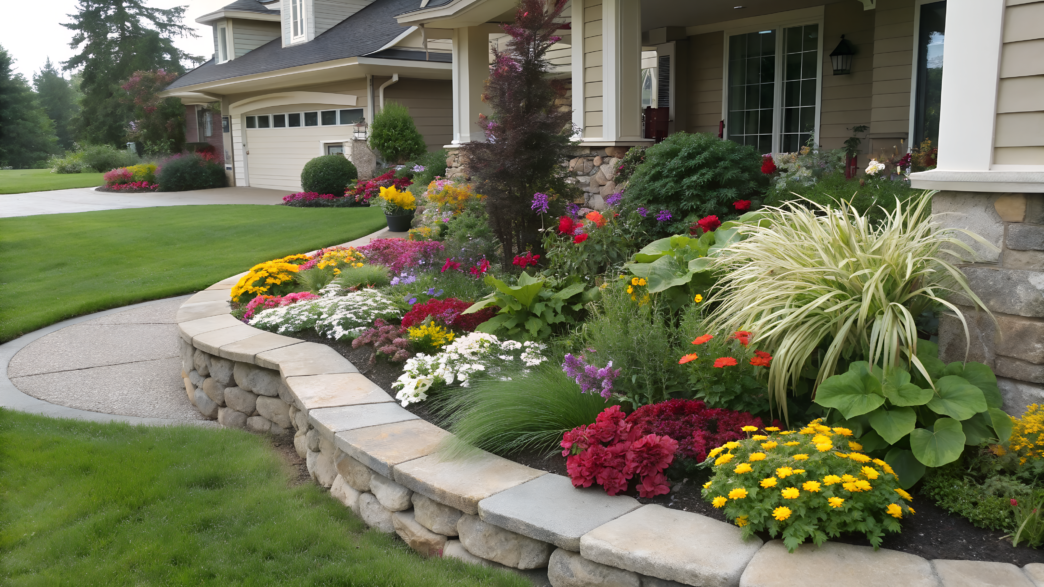
1. Painter’s Palette Perennial Border for Full Sun
Painter’s palette perennial border for full sun gives the effect of a well-thought-out yard. This idea combines color, height, and repetition.
We saw this idea implemented at friends’ place in a nearby town. They have a small plot, but in front of the house there was a flower bed you couldn’t stop looking at. Everything was simple there. But the colors repeated. Purple, yellow, white. And again purple; again yellow; again white.
Which plants work for this idea
It’s better to keep 5–7 types in mind right away and not scatter your focus. It’s important that they love full sun and handle heat well.
Suitable options:
- lavender — stable purple and fragrance
- salvia — adds vertical structure and насыщенный цвет
- coneflower — large accents, blooms for a long time
- coreopsis — yellow spots, add light
- black-eyed Susan — bright “sunny” centers
- yarrow — soft texture and resilience
- ornamental grasses (for example, fountain grass) — for background and movement
You can build a palette, for example, from purple, yellow, and white, and build the whole composition around that. Limiting colors really simplifies the choice.
What you’ll need
- 5–7 types of full sun perennials
- a chosen color palette (2–3 main colors and a neutral)
- quality soil (for example, Miracle-Gro Raised Bed Soil)
- mulch 2–3 inches (5–7 cm) thick
- basic set of tools
- hose or simple watering system
How to create a painter’s palette flower bed
- Choose a color palette
Pick two or three main colors and one neutral. This will become the base of the whole bed and won’t let it visually fall apart. A clear color palette makes everything look intentional. - Pick plants for these colors
Look not only at color, but also at shape — combine large blooms and lighter ones so there’s contrast. The mix of forms creates a more dynamic composition. - Arrange plants by height
Place tall ones at the back, medium in the center, low ones at the front edge. This creates depth and makes the bed look neat and structured. A proper layered layout always looks more finished. - Plant in groups
Not one plant at a time, but in groups of three, five, or seven. Repeat these groups along the whole bed so it looks cohesive and balanced. This repetition builds a cohesive look. - Add neutral elements
Ornamental grasses or plants with silvery leaves help “relieve” bright colors and balance the palette. They act as visual pauses inside the flower bed design. - Mulch the surface
This keeps moisture and instantly makes the bed look more finished. Mulch also helps maintain a clean and polished garden appearance. - Organize watering
Water less often, but deeper, so roots go down and plants become more heat-resistant. This approach improves overall plant resilience.
Tip
Don’t try to fill all the space at once. In the first season, the bed may look a bit empty, and that’s normal. Plants grow, and after a few months the composition starts to work as intended. If you start “adding just a little more,” it’s very easy to lose the whole idea.
This flower bed has one nice quality — it doesn’t get outdated in a season. Colors echo each other, plants replace one another, and all of this looks alive, not random. After a year, it only gets better, because the groups grow and start to look cohesive. And you keep admiring the flower bed. Because you just like it.
2. Black Mulch Contrast Bed With White Blooms
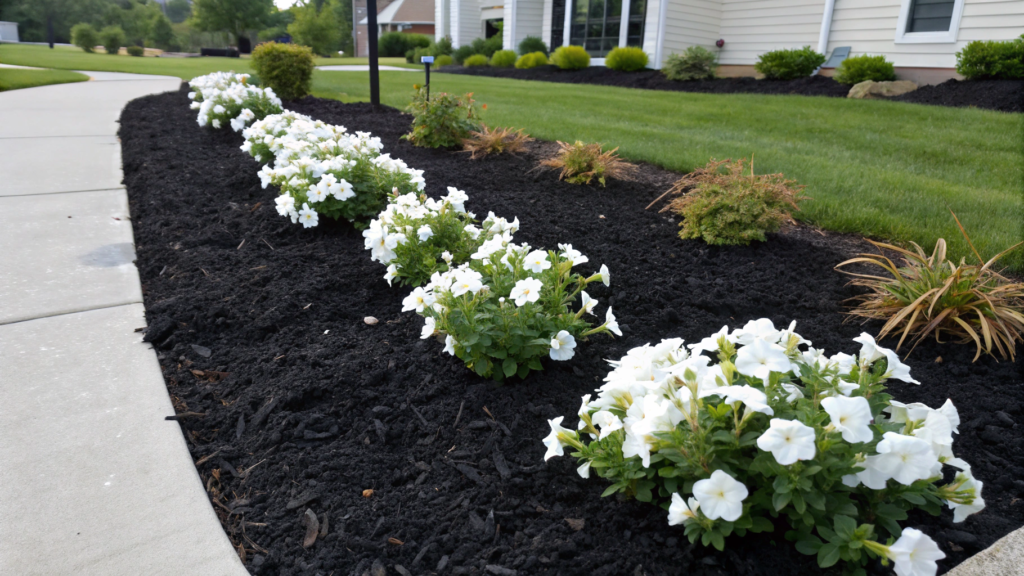
In a black mulch contrast bed with white blooms, everything is built on contrast — a dark background and light flowers. Because of this, even simple plants start to look neat and expressive.
While traveling through small towns in Oregon, at one ordinary house we saw along the walkway — black mulch and white flowers. And that’s it. No complex compositions. Lindy then said: “Too simple not to try.” And we tried.
Which plants work for this idea
White flowers and a clean bush shape are already enough.
- white hydrangea — large accents
- alyssum — low, dense edge
- white petunia — adds volume and softness
- candytuft — dense white “caps”
- white coneflower — structure and height
- gaura — lightness and movement
You can add a bit of green shrubs for the background, but the main thing — don’t drift into color. Keeping a minimal color scheme is what makes this idea work.
What you’ll need
- 3–5 types of plants with white blooms
- black mulch (2–3 inches / 5–7 cm)
- quality soil (for example, Miracle-Gro Raised Bed Soil)
- edging or border (optional)
- basic tools
- watering
How to create a black mulch flower bed with white blooms
- Prepare the area
Remove weeds and level the surface so there are no dips or bumps. If the soil is heavy, add a loose top layer about 2–3 inches (5–7 cm) so roots establish easier. This step sets the base for a clean garden foundation. - Plan plant placement in advance
Place plants in their pots directly on the area and look from a distance. Leave spacing based on growth, usually 12–24 inches (30–60 cm). If planted too close, it will look good at first, but later plants will compete. Proper spacing supports healthy plant growth. - Arrange plants by height
Place taller ones closer to the house or back line, lower ones at the edge. This creates a smooth transition and makes the bed readable even from the road. A clear structure improves overall visual balance. - Plant in groups
Use three or five of the same plant together. This creates repetition and makes the bed feel intentional. One plant looks random, a group looks like a decision. This builds a cohesive design. - Define a clean edge
If possible, add edging or shape a straight line with a shovel. A sharp border strengthens the contrast between mulch and lawn. A defined edge enhances the curb appeal instantly. - Spread mulch evenly
Keep a consistent layer of about 2–3 inches (5–7 cm), without gaps. Don’t cover the plant base — leave a small space around stems to avoid excess moisture. Even mulch creates a polished finished look. - Water deeply after planting
Not just wet the top layer, but soak it well so water goes down. This helps plants root faster and reduces stress. Deep watering improves root development.
Tip
Keep the color clean. White flowers on dark mulch work exactly because of contrast. If too many bright colors appear nearby, the effect disappears. It’s better to add more white or keep some greenery than to “mix” the palette. Maintaining strong contrast is key here.
This flower bed looks neat almost the whole season. Especially in the evening, when the light becomes softer — white flowers start to literally glow against the dark ground. And it looks really beautiful.
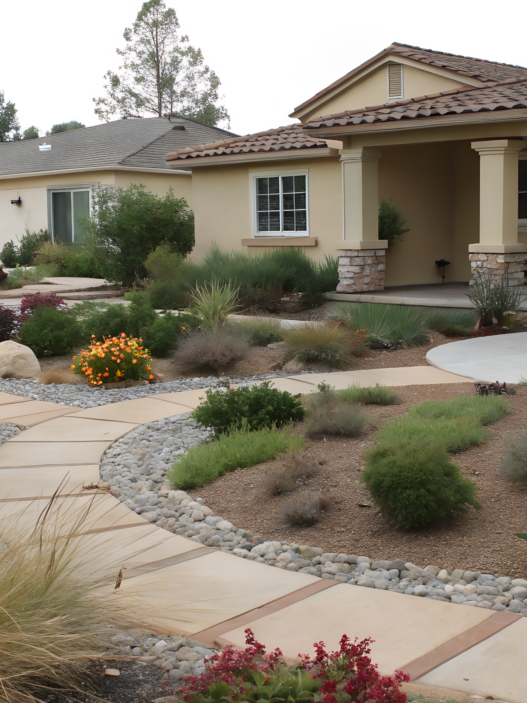
3. Rock Riverbed Flower Bed With Drought Tolerant Perennials
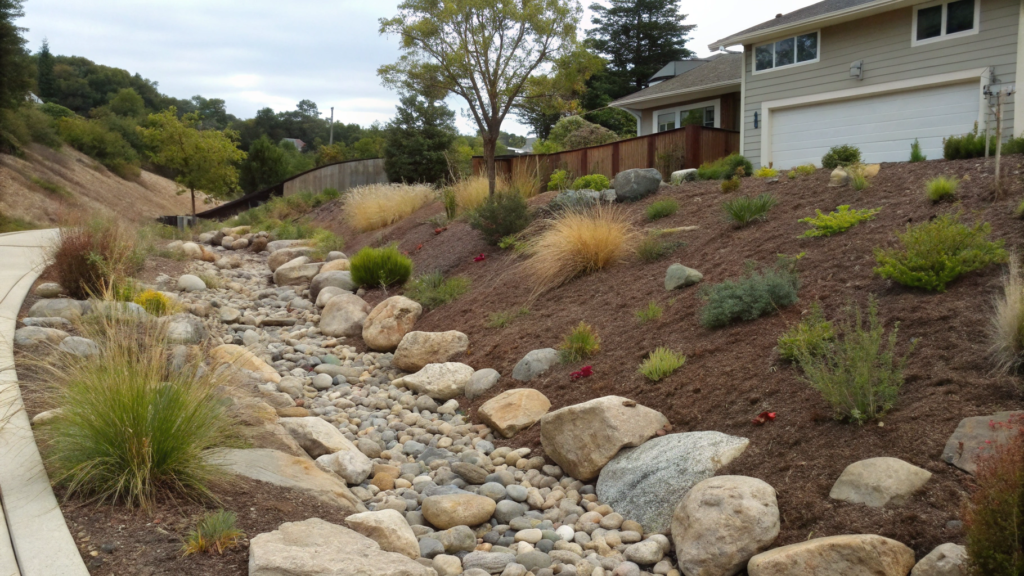
A rock riverbed flower bed with drought tolerant perennials is an imitation of a dry stream that looks natural and at the same time works as drainage.
In Arizona, these “dry creeks” can be found at almost every second house. But a similar version exists at our neighbors’ place in Idaho.
Their участок was on a slope, and after rain water was constantly flowing toward the house. Instead of fighting it, they made a stone riverbed and planted drought tolerant plants along the edges. It looked like it had always been there.
Suitable plants
Here, heat tolerance and minimal watering are important. These plants don’t require constant attention and feel good in a rocky environment.
- lavender — keeps shape and color even in heat
- sedum (sedum / stonecrop) — grows отлично among rocks
- coneflower — resilient and adds vertical structure
- yarrow — soft texture, handles drought well
- salvia — rich color and structure
- ornamental grasses (blue fescue, fountain grass) — add movement
- gazania — low bright accents
What you’ll need
- pebbles or river rocks of different sizes
- landscape fabric or плотная ткань as a base
- 4–6 types of drought tolerant plants
- quality soil for planting zones
- shovel, rake
- watering system (optional)
How to create a rock riverbed flower bed
- Mark the shape of the riverbed
Don’t make a straight line. Use soft curves like a real stream. Width can be around 24–36 inches (60–90 cm), but small widenings make it look more natural. This creates a more natural layout. - Remove the top layer of soil
Take off about 2–4 inches (5–10 cm) so rocks don’t sit on top but slightly “sink in.” This makes everything look cleaner and more stable. It improves the overall ground structure. - Lay the base (landscape fabric)
It holds back weeds and prevents rocks from sinking into the soil. If you skip this step, you’ll constantly need to pull things out later. A proper base reduces long-term maintenance. - Arrange rocks in layers
Place larger stones along the edges, medium and small ones closer to the center. This creates the feeling of a real riverbed, not just scattered rocks. This layering builds a realistic stone composition. - Leave pockets for plants
Don’t cover everything completely. Create soil “pockets” between rocks where plants will go. Usually leave 12–24 inches (30–60 cm) so they have room to grow. This supports healthy plant spacing. - Plant in groups
Place three or five identical plants together. Even here, it matters — groups look natural and don’t get lost among the stones. This keeps a cohesive design. - Create a slight slope
If water actually flows through this area, guide it. Even a small slope helps water move where needed instead of pooling. This improves drainage efficiency. - Water deeply after planting
The first watering should be deep so roots go down immediately. After that, you can gradually reduce watering. This supports strong root establishment.
Tip
Add a few large stones as accents. Just a couple, 2–3 pieces. They set the scale and make the composition more realistic. Without them, the bed can look flat. This adds a strong visual anchor.
Where this works best
This type of bed works best not where everything is already fine, but in problem areas.
- Sloped areas. If water flows somewhere after rain — perfect, let it flow through rocks instead of washing away soil. Even a small slope can be used.
- Places where puddles constantly form. Instead of trying to fix it every time, turn it into a drainage bed. It looks good and works.
- Dry zones where everything burns out. Near pathways, parking areas, or on the sunny side of the house. Regular flowers struggle there, but rocks and resilient plants stay stable.
- Narrow strips along the house or fence. It’s usually hard to do something complex there, but this option requires almost no care once established.
These “difficult” spots often end up looking the best. Simply because you stop fighting them and start working with them.
In hot months, rocks don’t fade, plants don’t need frequent watering, and everything looks calm and natural. Over time, it only gets better — plants root deeper and softly “weave” into the stones, creating a more natural integration.
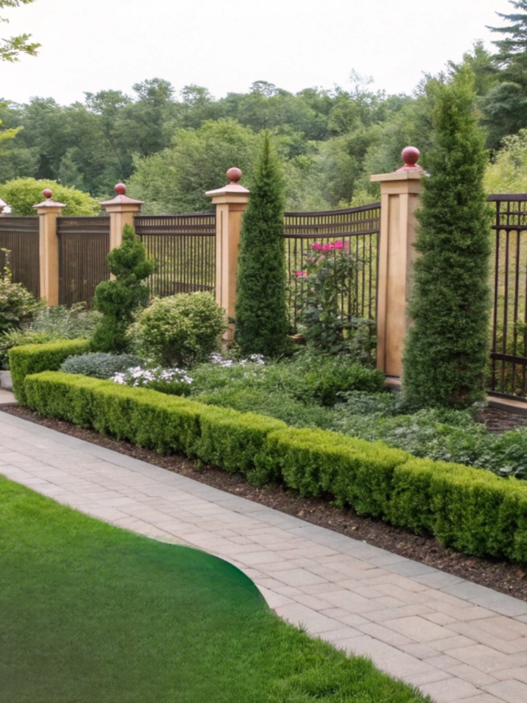
4. Under Window Layered Bed With Tall to Short Planting
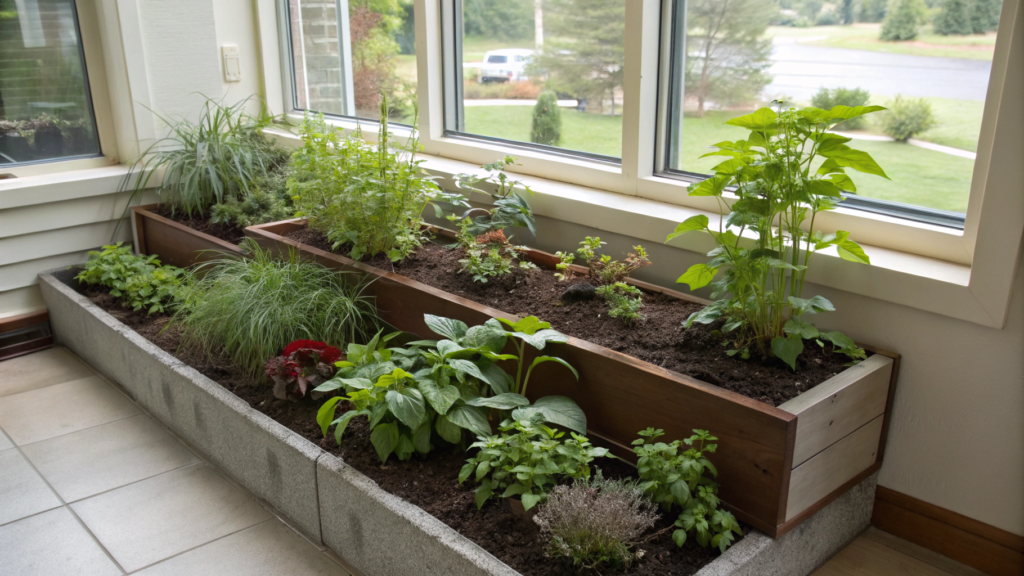
Here everything is simple — arrange plants by height, from taller near the wall to lower at the edge. Because of this, the bed looks neat and doesn’t block the windows.
Here it’s important not only sun or shade, but that plants fit well into layered planting levels.
Suitable plant options
- back row: hydrangea, roses (shrubs), ornamental grasses
- middle row: lavender, salvia, hosta (hosta for shade)
- front edge: alyssum (alyssum), vinca (vinca), creeping thyme (creeping thyme)
You can adapt for sun or shade, but the principle stays the same. This structure creates a balanced garden composition.
What you’ll need
- 4–6 types of plants of different heights
- quality soil (for example, Miracle-Gro Raised Bed Soil)
- mulch (2–3 inches / 5–7 cm)
- shovel, rake
- hose or watering
You can add edging for a cleaner finished look.
How to create a layered flower bed under windows
- Check window height
This matters. Plants shouldn’t block the windowsill or light. Usually, the back row stays within 24–36 inches (60–90 cm), depending on window height. This keeps proper light access. - Mark the bed depth
Minimum 24 inches (60 cm), better 36 inches (90 cm), so there’s space for three levels. A narrow bed won’t create a proper height transition. Enough depth ensures a clear layered structure. - Place plants before planting
Set them in pots and look from a distance. This helps you see where something feels too low or too dominant. It improves the overall layout planning. - Build the back row
Place taller plants closer to the wall. Leave spacing so they don’t merge into one mass over time. This keeps a clean background structure. - Add the middle layer
These plants connect top and bottom. Usually, these are the main “working” plants that create volume. They form the core visual transition. - Finish the front edge
Low or creeping plants make the edge neat and cover the soil. Without them, the bed looks unfinished. This step defines the front border. - Mulch the surface
A 2–3 inch (5–7 cm) layer helps retain moisture and instantly makes everything look cleaner. Mulch improves overall soil moisture retention. - Water after planting
Deep watering helps plants adapt faster. After that, you can switch to a less frequent schedule. This supports healthy plant establishment.
Mistake that’s easy to make
The most common mistake here is planting one by one and not thinking about how plants will grow. At planting time, everything looks fine, even neat.
But after a season, bushes start overlapping, lower plants get lost, and the whole structure disappears. It’s better to leave more space from the start, even if it feels a bit empty at first. This helps preserve the plant spacing balance.
This type of bed affects the look of the house. It’s like a frame under the window — it makes everything feel more clean and complete. Over time, it only gets better, because plants fill the space and start working as one cohesive landscape design.
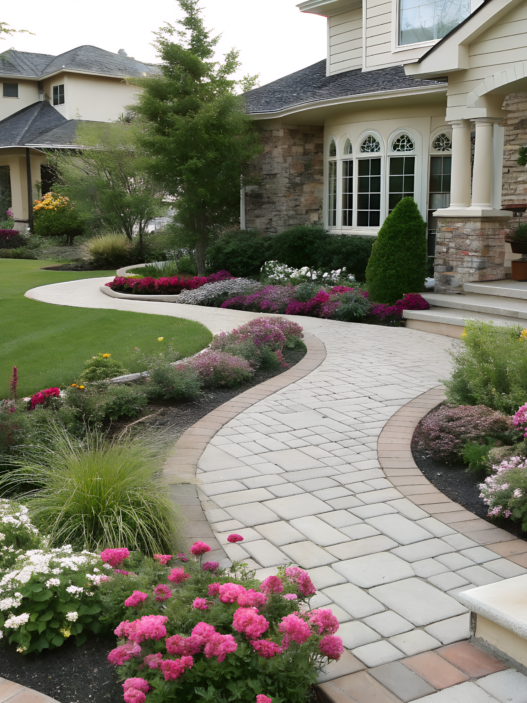
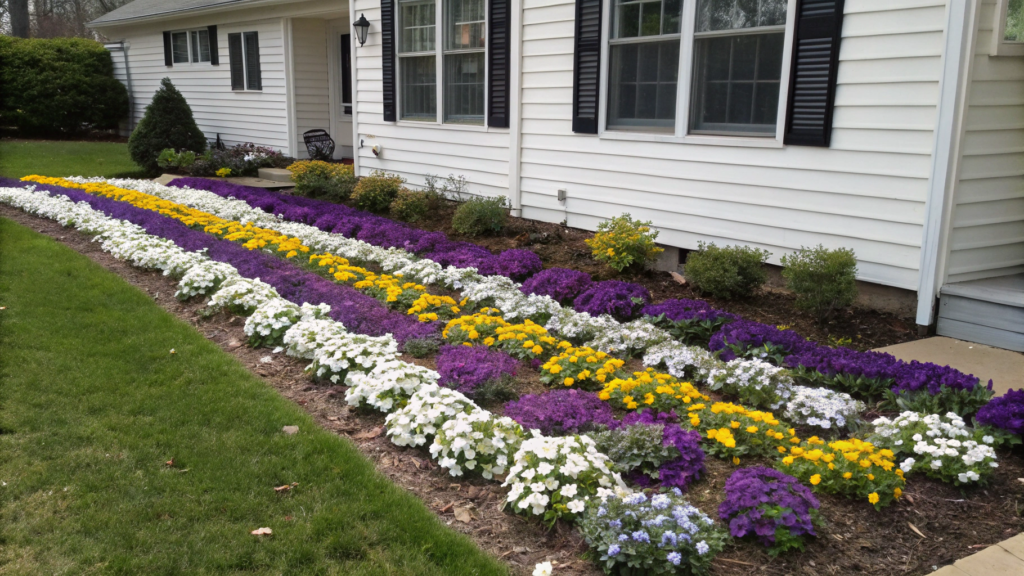
5. Brick Edging Cottage Strip With Repeating Color Blocks
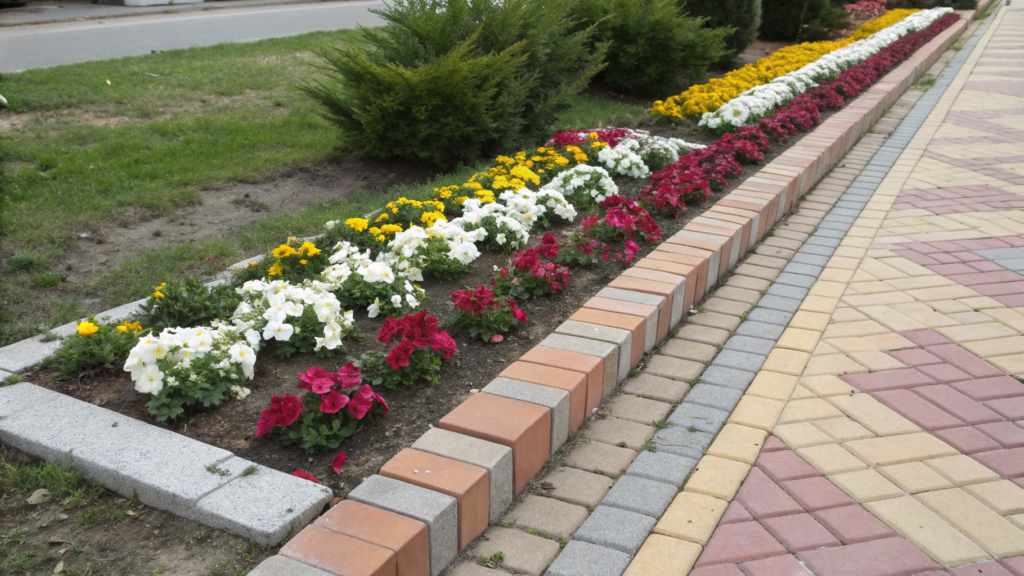
A brick edging cottage strip with repeating color blocks is simply a narrow flower bed, a clean brick edge, and repeating color blocks. And here, repetition really makes the difference.
Suitable plants
Here it’s not so much about the plants themselves, but about the color blocks that can be repeated. This approach builds a strong color rhythm.
- lavender — purple blocks
- salvia — rich color and vertical structure
- alyssum — dense white edges
- marigold — bright yellow or orange spots
- geranium — stable pink or red accents
- catmint — soft purple background
It’s better to choose 2–3 colors and repeat them along the whole strip. No “I’ll just add one more thing” — that breaks the entire design consistency.
What you’ll need
- regular строительный brick or clinker
- 3–5 types of plants
- quality soil (for example, Miracle-Gro Raised Bed Soil)
- mulch (2–3 inches / 5–7 cm)
- shovel, level (optional)
- hose or watering
How to create a brick edging flower bed with repeating blocks
- Mark the bed line
It’s better to make it slightly curved rather than perfectly straight. This adds softness and makes the bed feel less rigid. A gentle curve improves the visual flow. - Prepare the base for bricks
Remove the top soil layer about 2–3 inches (5–7 cm) so bricks don’t “float.” If you want a clean line, add some sand and level it. This creates a stable brick foundation. - Lay the bricks
Place them tightly together, checking the line. It doesn’t have to be perfectly level, but big differences are immediately noticeable. A clean edge defines the border structure. - Fill the bed with soil
Add a layer of quality soil so plants establish faster. This is especially important if the original soil is dense or poor. Good soil supports healthy root growth. - Divide space into color blocks
Imagine the bed split into sections of 12–24 inches (30–60 cm), each with one color. These blocks will repeat later. This creates a clear planting pattern. - Plant in groups
In each block, plant several of the same plants so the color reads as a mass, not as scattered dots. This builds strong color impact. - Repeat blocks along the bed
For example: purple → white → yellow → again purple. This repetition makes the bed cohesive and easy to read. It creates a unified design rhythm. - Mulch the surface
A 2–3 inch (5–7 cm) layer keeps moisture and makes the bed look neat. Choose a neutral color so it doesn’t compete with flowers. This keeps a clean finished look. - Water after planting
Deep watering helps plants adapt faster and start growing. This improves overall plant establishment.
Where this works best
This idea works especially well where you want to add clear lines and order. It doesn’t overload the space but instantly makes it look more organized.
- Along pathways. Brick highlights the line and makes the path feel neat. This improves overall curb appeal.
- At the house entrance. Repeating colors create a sense of order from the first steps. This enhances first impression.
- In narrow spaces. Where there’s no room for a wide bed, this format works especially well. This suits compact layouts.
- Along fences or walls. The brick edge separates the bed and makes it a самостоятельный элемент. This creates a defined garden boundary.
This type of bed is strong because it immediately creates structure. Brick sets the boundary, color blocks create a clear order, and even simple plants start to look intentional. Over time, as plants grow, these blocks become even more noticeable. And you can’t get this effect with random planting — only with a clear repetition system.
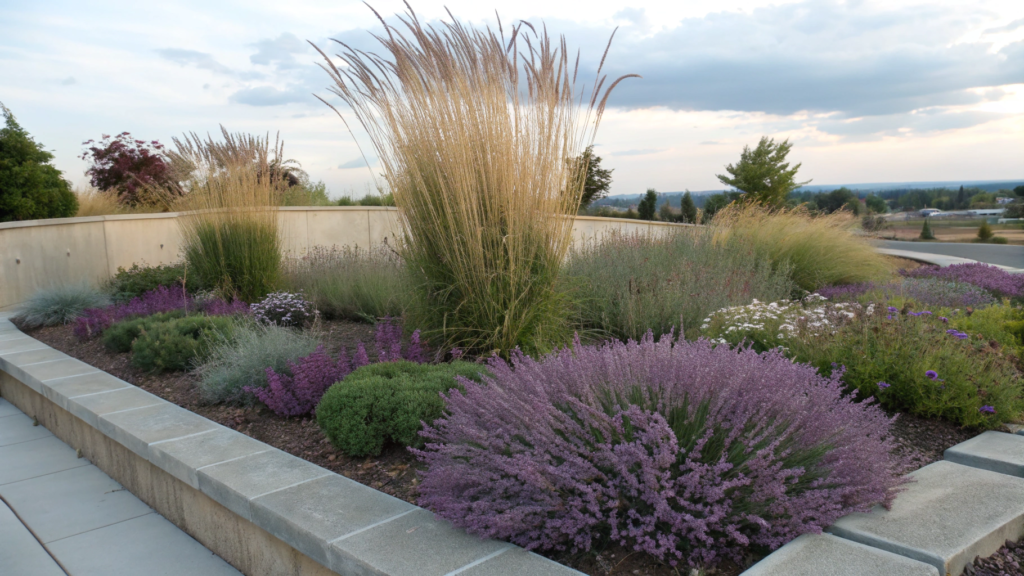
6. Simple Texas Full Sun Bed With Heat Proof Perennials
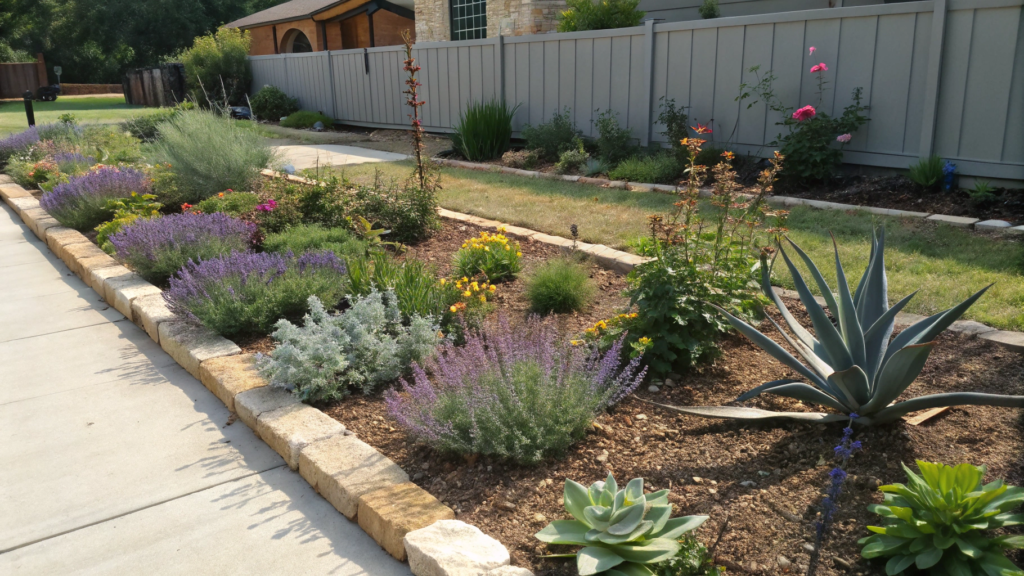
A simple Texas full sun bed with heat proof perennials — here we don’t fight the heat. On the contrary, we choose plants that are comfortable in these conditions.
We adapted this idea for the sunniest side of our yard — where everything else just couldn’t survive. This approach is all about working with extreme sun exposure.
Suitable plants
- lavender — keeps shape and isn’t afraid of heat
- salvia — bright color and stability
- coneflower — handles sun and adds structure
- gaura — lightness and movement
- black-eyed Susan — rich yellow accents
- yarrow — tolerates dry soil well
- ornamental grasses (switchgrass, fountain grass) — add volume
There are studies from Texas A&M AgriLife Extension showing that some drought tolerant plants can even go without additional watering after they establish. This makes them ideal for low water gardening.
What you’ll need
- 4–6 types of heat-tolerant perennials
- quality soil with good drainage
- mulch (2–3 inches / 5–7 cm)
- shovel, rake
- hose or drip irrigation
We used Black Kow Composted Cow Manure to improve the soil — it makes it looser and helps retain moisture. This improves overall soil structure.
How to create a full sun flower bed
- Choose the sunniest spot
Pick an area where the sun stays most of the day — south or west side of the house, open space without shade. This is exactly where plants that don’t “give up” in heat are needed. This ensures proper sun exposure planning. - Prepare well-draining soil
If the soil is heavy, add compost or some sand so water doesn’t stagnate. In heat, this is critical — roots feel better in loose soil. Good drainage supports root health. - Plan spacing with room to grow
Leave about 18–24 inches (45–60 cm) between plants. For example, coneflower and rudbeckia expand a lot over time and need space. Proper spacing prevents plant overcrowding. - Plant in groups
Use groups of 3–5 identical plants. For example, a group of salvia, then coneflower, then salvia again. This makes the bed look more cohesive. This creates a clear plant repetition pattern. - Add ornamental grasses
For example, fountain grass or blue fescue — they hold shape well and add movement, especially when everything else is static. This adds subtle visual movement. - Mulch the surface
A 2–3 inch (5–7 cm) layer helps retain moisture and protects the soil from overheating. This noticeably reduces drying out. Mulch improves moisture retention. - Water deeply after planting
In the first weeks, water well, then you can reduce frequency but avoid shallow watering. Deep watering builds strong root systems.
Possible mistakes
It’s easy to make one mistake here — choosing plants that aren’t designed for constant heat. At first everything looks fine, especially right after planting, but after a couple of weeks it becomes clear: leaves wilt, blooming weakens, and constant watering is needed. In the end, the bed requires more attention than expected. It’s better to choose species that handle sun and dry soil — then everything becomes much easier. This avoids unnecessary maintenance stress.
Where this works best
This type of bed is especially good in areas where sun is not a bonus, but a constant condition you have to work with.
- South side of the house. Where the sun stays almost all day. This maximizes sun utilization.
- Open areas without shade. For example, along roads or fences. This suits exposed locations.
- Near concrete or stone surfaces. They add extra heat to the air. This increases heat intensity zones.
- Areas where frequent watering is difficult. When there’s no desire or ability to water every day. This supports low maintenance gardening.
Plants don’t require constant control, don’t look tired, and don’t demand extra attention.
Even in peak heat, the space stays alive and neat. Over time, you start to value exactly this — when you don’t have to “save” anything every day, but can just watch everything grow well in the right conditions. That’s the beauty of heat resilient landscaping.
7. Shade Friendly Front Bed With Texture Forward Foliage
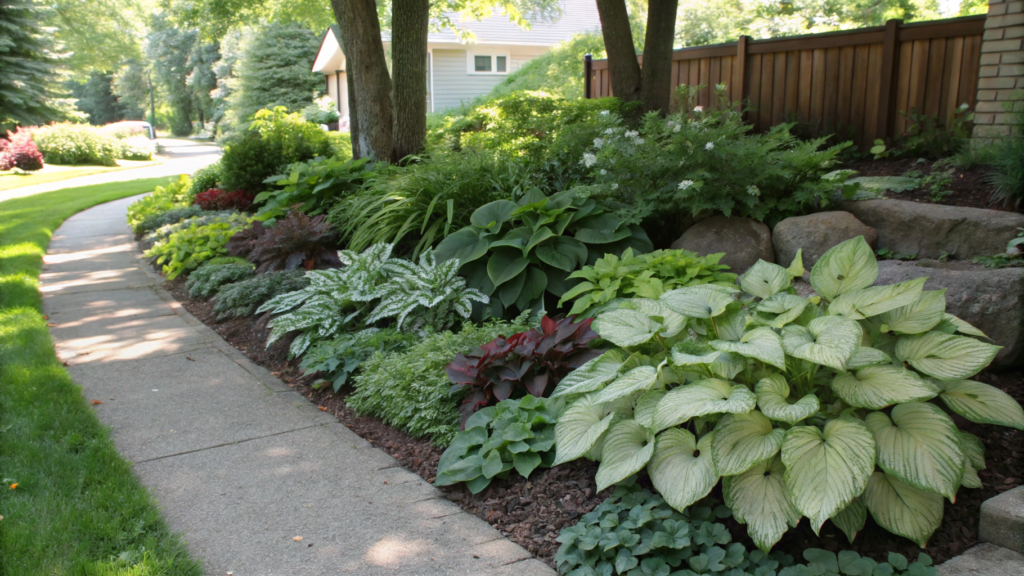
In many homes, there is an area where the sun almost never reaches, and a shade friendly front bed with texture forward foliage works perfectly there.
Here the main focus is different leaf textures and shapes, not flowers. This creates a calm but rich foliage contrast effect.
Suitable plant options
- hosta — large leaves, different shades
- fern — lightness and “airiness”
- heuchera — adds burgundy and bronze tones
- brunnera — silvery leaves
- astilbe — soft texture and a bit of bloom
- vinca — covers the ground
- hakone grass (hakone grass) — soft flowing forms
The stronger the contrast in leaf shape, the more interesting the bed looks. This builds a layered texture-driven design.
What you’ll need
- 4–6 types of shade-loving plants
- loose, moisture-retaining soil
- mulch (2–3 inches / 5–7 cm)
- shovel, rake
- hose or watering
To improve soil, you can add leaf mold compost — it holds moisture well and makes soil looser. This supports better soil moisture balance.
How to create a shade flower bed focused on foliage
- Evaluate the level of shade
This can be partial shade (a few hours of sun) or deep shade under trees. Plant choice depends on this — for example, hostas and ferns can easily live even in deep shade. This helps with proper plant selection. - Prepare the soil
In shade, soil is often either dry because of tree roots or наоборот dense. Add compost so it holds moisture better and stays рыхлой. Good soil improves overall root conditions. - Arrange plants by contrast
Place large leaves (hosta) next to smaller or more detailed ones (fern, heuchera). This creates depth even without flowers. This builds strong visual depth. - Plant in groups
Repeat the same plants in groups of 3–5 so the bed looks cohesive, not like a mix of random bushes. Grouping creates a cohesive planting pattern. - Add ground cover plants
For example, vinca or creeping Jenny — they cover the soil and make the bed look finished. This improves overall ground coverage. - Mulch the surface
A 2–3 inch (5–7 cm) layer helps retain moisture, which is especially important in shade under trees. Mulch supports moisture retention. - Water after planting
Even in shade, plants need a good start. Later you can water less often, but make sure the soil doesn’t fully dry out. This ensures stable plant establishment.
Where this works best
This type of bed is especially useful where there is little sun and regular flowers look weak.
- Under trees. Where there is dense shade most of the day. This fits deep shade areas.
- North side of the house. Minimal direct sunlight. This supports low light zones.
- Between buildings or fences. Where light is limited. This works for confined spaces.
- Along shaded pathways. To make them feel more alive. This enhances garden pathways.
These areas often feel difficult, but exactly there you can create one of the most calm and pleasant spaces.
Being near this kind of bed feels good. It gives a sense of coolness and calm, especially on hot days. Over time, it only gets better, because plants grow and softly fill the space, creating a natural lush foliage effect.
8. Easy Corner Bed Using Three Plant Rule
An easy corner bed using three plant rule — just three types, and everything starts working the way it should. This approach relies on simplicity and a clear planting structure.
Suitable plants
Here it’s not about quantity, but about contrast and repetition.
- one taller plant — for example, ornamental grass or hydrangea
- one medium — lavender, salvia, or coneflower
- one low or creeping — thyme, alyssum, or vinca
The key is that they differ in height and shape. Then even three plants create a complete balanced composition.
What you’ll need
- 3 types of plants
- quality soil (for example, Miracle-Gro Raised Bed Soil)
- mulch (2–3 inches / 5–7 cm)
- shovel
- watering
How to create a corner flower bed using the three plant rule
- Define the corner shape
A soft triangle or curved line usually works better than a sharp angle. You can lay it out with a hose or rope and look from the side. If the corner is near a path, make the line softer so it doesn’t “cut” the space. This improves the overall layout flow. - Place the main focal plant
Position the tallest plant deeper in the corner or closer to the wall. This could be fountain grass or a compact hydrangea. It sets the height and makes the composition feel complete. This creates a strong visual anchor. - Add the middle layer
Place the second plant nearby, but not strictly centered — slightly offset works better. For example, lavender or salvia. It fills the space between high and low levels and gives main volume. This builds a smooth height transition. - Finish the front edge
Low or creeping plants go closer to the edge of the bed. This could be creeping thyme or alyssum. They cover the soil and make the edge look clean, without emptiness. This defines the front border. - Repeat the plants
Even though it’s the “rule of three,” it doesn’t mean one plant each. It’s better to plant 2–3 of each type if there’s space. For example, two lavender plants and two thyme patches — this makes the composition more stable. This strengthens plant repetition. - Keep proper spacing
Don’t plant too close. Leave about 12–18 inches (30–45 cm) between plants so they don’t interfere later. At first it may feel empty — that’s normal. This prevents overcrowding. - Mulch the surface
A 2–3 inch (5–7 cm) layer helps retain moisture and instantly makes the bed look neat. It also reduces weeds, making maintenance easier. This supports low maintenance care. - Water after planting
Give a deep watering so moisture reaches the roots. In the first weeks, make sure the soil doesn’t fully dry out, especially in sunny spots. This helps with proper plant establishment.
Where this works best
This type of bed is ideal for small and “awkward” areas where you don’t want to overcomplicate things.
- House corners. Where the facade ends and empty space begins. This improves corner design.
- Path intersections. To soften hard lines. This enhances space transitions.
- Small areas. Where there’s no room for large compositions. This suits compact spaces.
- Near the entrance. To add a clean accent without overload. This boosts entry appeal.
These corners often get ignored, but they strongly affect the overall impression.
Don’t add extra plants. The three plant rule disappears, and with it the whole idea. When there are too many plants, the corner turns back into a random mix.
9. Rocks and Perennials Bed With Built In Drainage Slope
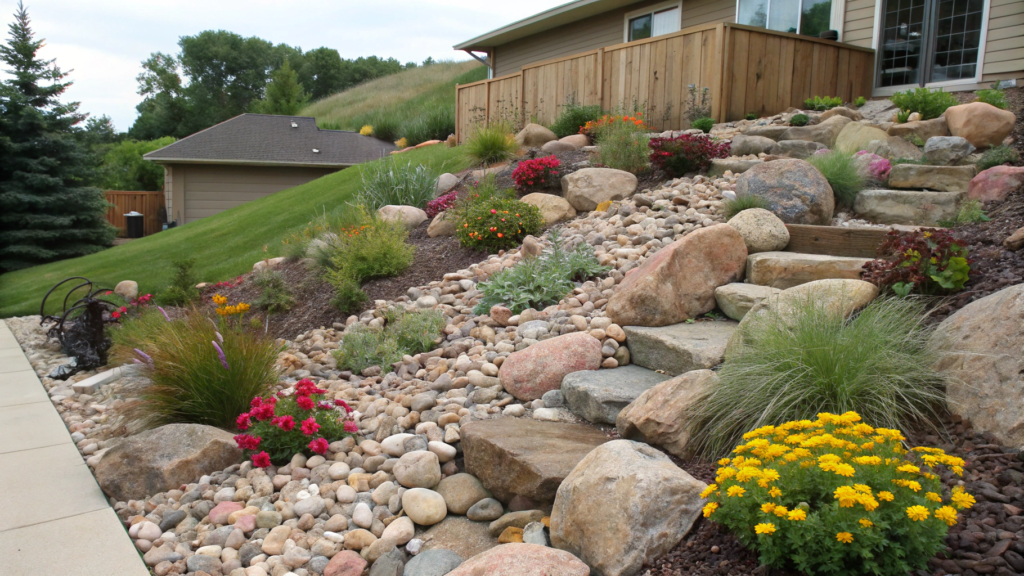
A rocks and perennials bed with built in drainage slope is not just a flower bed, but both drainage and a strong visual element at the same time. It combines function and landscape practicality.
Which plants work best
Here it’s important that plants спокойно handle both moisture after rain and dry periods. This creates a resilient adaptive planting mix.
- coneflower — устойчивa to both sun and temporary moisture
- sedum — grows well among rocks
- yarrow — not afraid of drying out
- salvia — adds structure and color
- ornamental grasses (switchgrass, blue fescue) — add movement
- lavender — works well if drainage is good
The idea is that plants don’t “suffer” from changing conditions. This ensures stable plant performance.
What you’ll need
- stones of different sizes (pebbles, gravel, larger accents)
- landscape fabric (optional, but better to use)
- 4–6 types of plants
- quality soil for planting zones
- shovel, rake
- mulch (if there are open soil areas)
For the base, you can use Aquascape Decorative River Pebbles — different stone sizes create a more natural look and improve overall natural texture.
How to create a drainage slope flower bed
- Identify water direction
Look where water already flows after rain. No need to invent a new path — better to slightly adjust the existing one. This supports natural water flow control. - Create a gentle slope
Even a small incline works. The height difference can be just 1–2 inches over several feet (2–5 cm per 1–2 m), but that’s enough for water to move. This improves drainage performance. - Remove the top soil layer
Take off about 2–4 inches (5–10 cm) so stones don’t sit on top but are slightly embedded. This makes everything more stable and visually clean. This strengthens the base structure. - Lay the base layer
Landscape fabric helps hold stones and reduces weeds. If skipped, you’ll need more maintenance later. This reduces weed growth. - Arrange the stones
Large ones as accents, medium and small as the main layer. Don’t aim for perfect symmetry — slight randomness looks more natural. This creates a realistic stone layout. - Leave planting pockets
Create soil pockets between stones. No need to plant everything — let stones also “work” visually. This balances plants and hardscape elements. - Plant in groups
Use 2–3 plants of the same type together. This prevents them from getting lost among the stones. This keeps a clear plant grouping. - Test water flow
After the first rain, observe how water behaves. Sometimes small adjustments in stone placement improve the flow. This fine-tunes the drainage system.
Where this really helps
This type of bed is especially useful where water problems usually appear.
- Areas sloping toward the house. So water doesn’t go directly to the foundation. This protects the home structure.
- Places where water collects after rain. Instead of puddles — a clean drainage solution. This solves standing water issues.
- Zones between pathways and lawn. Water often accumulates there. This improves surface drainage.
- Narrow strips along the house. Where complex solutions are hard to build, but the problem needs fixing. This fits tight spaces.
In these areas, it works not just as decoration, but as a real solution.
A common mistake is underestimating the slope. The surface is made almost flat, and water continues to stand. Visually everything looks fine, but the problem remains. It’s better to create a small but clear slope from the start. This ensures effective water management.
Over time, stones only look better, plants establish and start connecting everything together. In the end, it feels like a natural part of the yard, not a forced solution — a true integrated landscape design.
10. Curb Appeal Foundation Bed With Year Round Structure
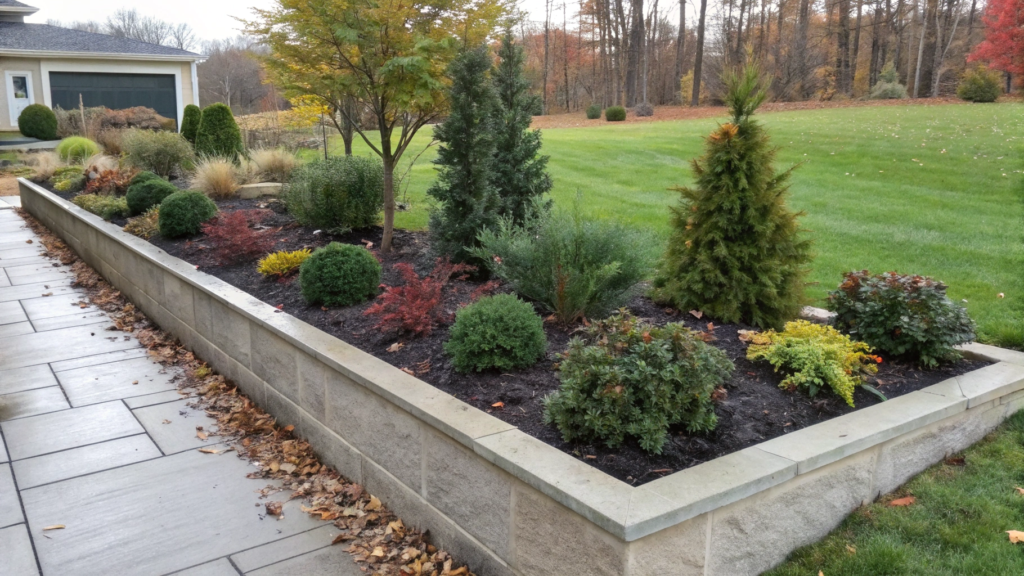
In fall and winter, you start to see how important it is for a bed to look good without flowers. Here you don’t need bright blooms, but plants with form and a stable appearance. This creates a strong year round structure.
Suitable plant options
- evergreen shrubs (boxwood, juniper) — the base
- dwarf conifers (dwarf spruce, pine) — add height
- ornamental grasses (switchgrass, blue fescue) — keep shape even in winter
- perennials with dense foliage (heuchera, hosta) — fill the space
- ground covers (vinca, creeping thyme) — cover the soil
Flowers can be added, but they shouldn’t be the base. The focus stays on structural planting.
What you’ll need
- 3–5 types of structural plants
- quality soil (for example, Miracle-Gro Raised Bed Soil)
- mulch (2–3 inches / 5–7 cm)
- shovel, rake
- watering
How to create a foundation bed with year round structure
- Define the shape along the house
Usually it’s a soft line, not strictly straight. Gentle curves make the bed feel softer and look better from the street. This improves the overall visual flow. - Place evergreen plants
This is the base. Arrange them along the wall with 24–36 inches (60–90 cm) spacing so they don’t merge into one mass. This builds a strong foundation layer. - Add vertical accents
Small conifers or taller shrubs can be placed at key points — near corners or by the entrance. This adds structure and creates height variation. - Fill the middle layer
Use plants with dense foliage that keep their shape most of the year. They connect the composition together. This creates a smooth visual transition. - Finish the front edge
Ground cover plants make the edge neat and remove empty soil. This defines the front border. - Repeat plants
Even here, repetition matters. Several identical shrubs along the line create order and rhythm. This strengthens design consistency. - Mulch the surface
A 2–3 inch (5–7 cm) layer makes the bed look clean and protects the soil. This improves soil protection. - Water after planting
Deep watering helps plants establish faster and adapt better. This supports strong root establishment.
Where it’s most noticeable
This type of bed affects the overall perception of the house more than it seems.
- In front of the facade. It’s the first thing people see. This boosts curb appeal.
- Along the entrance. It creates a sense of order immediately. This improves first impression.
- Under windows. It makes the house line look cleaner. This enhances architectural framing.
- At building corners. It helps “pull together” the shape of the house. This supports visual structure.
Even without flowers, the house looks well cared for.
This type of bed doesn’t give a dramatic effect on the first day. But it stays attractive every month of the year. Even in winter, when almost nothing is happening, it holds its shape and decorates the house. This is the power of timeless landscaping.
Your space
When you start applying these ideas, it doesn’t become perfect right away, but step by step it becomes clearer what actually works and fits your space. Somewhere you want to add more color, somewhere less, somewhere you get the idea to redo a part that didn’t feel right before.
And that’s part of the process — not to do it once and forget, but to gradually adapt the space to yourself. We still change things, replant, simplify. Sometimes it gets better, sometimes you realize the previous version was stronger — and that’s normal.If you already have experience with front yard beds, share what worked and what didn’t. For us, that’s really valuable.