If you think that rock art for gardens just means painting a rock red and putting a dot on it… well, you’re exactly like we were a few years ago.
And then we got hooked. First came one ladybug, then a “sunflower that never wilts”. Then a little path of footprints. And that’s when we realized — the garden had changed. It felt alive. Personal. Not just because of the flowers, but because of the little things.
In this post, we’re sharing 10 tried-and-true ideas you can make in just a day — with a paintbrush, a bucket of water, and a couple of inspired thoughts.
We’ll show you what you can do with a rock if you come at it with an idea instead of a checklist. And the best part — you don’t need art school or expensive tools. Just the desire to make your garden feel a little more you.
1. Sunflower Painted Rock for Flower Beds

Sometimes a flower bed just looks… dull. Not because anything’s wrong with it, but because it’s missing something. A little color. A little sun.
That’s why one day Lindy and I decided to try sunflower painted rock art. It was late summer, and the real sunflowers had already bowed their heads. And, as usual, I couldn’t quite let go of the season.
So I painted the first rock — bright yellow with a warm brown center. And since then, I paint another one every year. It’s kind of a tradition now — a little sunshine in every season.
What you’ll need:
- 1 flat oval rock, around 4–6 inches (10–15 cm) in size
- Yellow, brown, and orange acrylic paint
- Paintbrushes of various sizes — make sure you have a fine one for details
- Outdoor clear sealant, like Rust-Oleum Clear Enamel Spray
- Optional: white paint marker for writing messages like “Sunshine lives here”
How we do it:
- Wash the rock. Even if it looks clean — always wash it. Dust and oil will mess with your paint.
- Paint the center. A warm brown circle — doesn’t need to be perfect. We don’t even use a stencil — just a brush and a steady hand.
- Add the petals. Broad, bright yellow petals radiating from the center. Sometimes I add a bit of orange at the base to give it depth.
- Refine the details. Use the fine brush to outline, add little lines and veins.
- Let it dry. Overnight is best.
- Seal it with clear coat. Two coats, 30 minutes apart. Makes the paint last through the season and protects it from rain.
Tips from experience:
- The shape of the rock can vary, but ovals work best for keeping the petal layout balanced.
- Don’t worry about “imperfect” petals — they make the piece feel alive, not overly polished.
- A few rocks grouped together (in different sizes) look better than just one. We often place them in clusters along garden paths or at the edge of raised beds.
Sunflower painted rocks are a simple way to bring in bright, lasting light.
Even when the sky’s grey, your garden can still feel like summer.
2. Glow-in-the-dark Constellation Rock Art
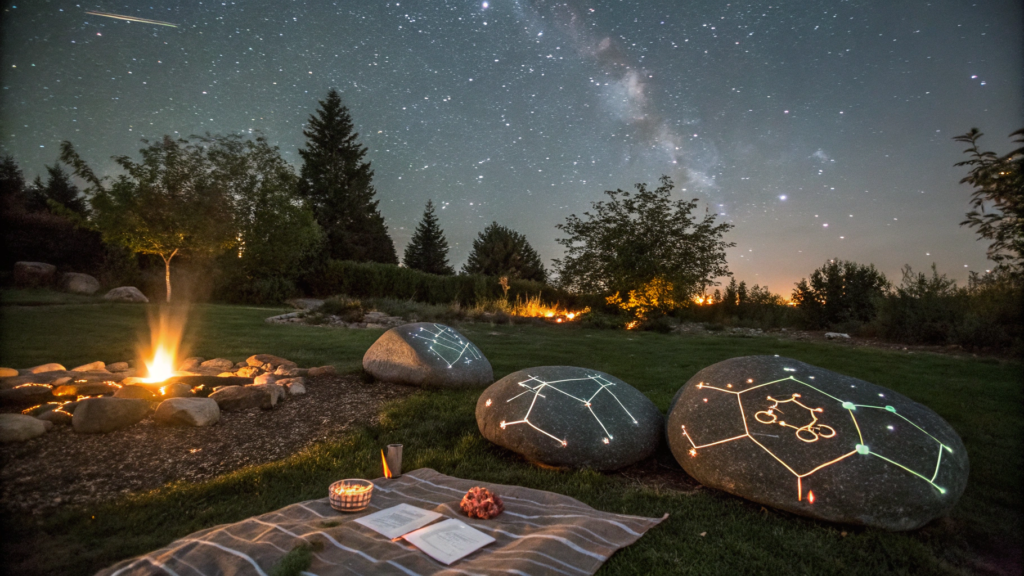
One summer night, we had a little picnic right in our garden. It was warm, quiet, and the sky above us was just unreal — the Milky Way, the North Star, constellations Lindy and I have known since we were kids.
Later that night, sitting by the fire, I thought: why not bring the stars down to the ground?
That’s how we ended up with glow-in-the-dark constellation rocks. Simple. But so striking — especially at night.
What you’ll need:
- Flat or rounded rocks, about 3–5 inches (7–12 cm)
- Glow-in-the-dark paint — we use FolkArt Glow Acrylic, it glows for up to 4 hours
- Black acrylic paint — to create a dark background
- A fine brush or a toothpick — perfect for making tiny star dots
- Clear outdoor sealant — helps the design last through weather
How we do it:
- Paint the entire rock black. This is your “night sky” — the base that will make the stars pop.
- Add star dots using glow-in-the-dark paint. Each dot is a star. A toothpick works surprisingly well for precision.
- Choose a real constellation — like Cassiopeia, Orion, or the Pleiades. Use a photo for reference.
- Sketch and connect the stars with a thin line if you want. We sometimes leave them unconnected for a scattered sky feel.
- Let everything dry overnight. Seriously — don’t poke it. Let the glow paint cure fully.
- Seal the rock with clear coat. Apply two layers, 30 minutes apart. The design will hold up against rain, heat, and foot traffic.
We’ve placed our constellation rocks along the path between the garden and the porch.
During the day, they’re nearly invisible. But once dusk hits and you’re walking out to grab something — they come alive.
Little glowing Pleiades, Cassiopeia, Corona Borealis… And more than once, I’ve caught myself just standing there, quietly searching for the Big Dipper on the ground.
Tips:
- Don’t know what constellations look like? Google them and draw them with a pencil before painting.
- It’s a hit with kids — they love finding “their” star cluster or making up their own.
- Create a whole galaxy by painting a bunch of rocks — we’ve scattered them all over the shady side of our yard.
Glow-in-the-dark constellation rocks aren’t just fun — they add something unexpected.
One quiet step on a glowing stone, and suddenly, your garden feels like it’s breathing with the night sky.
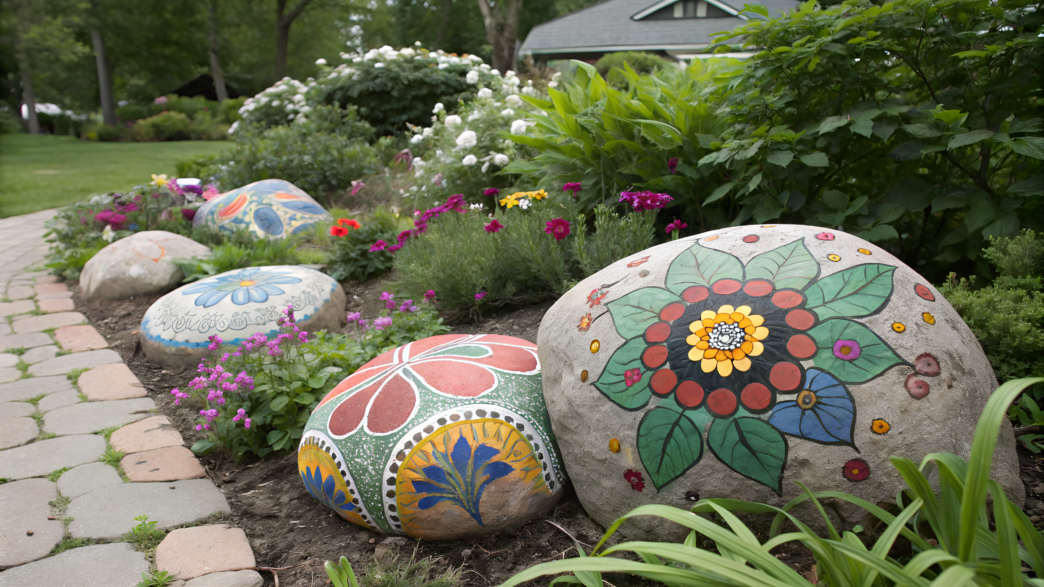
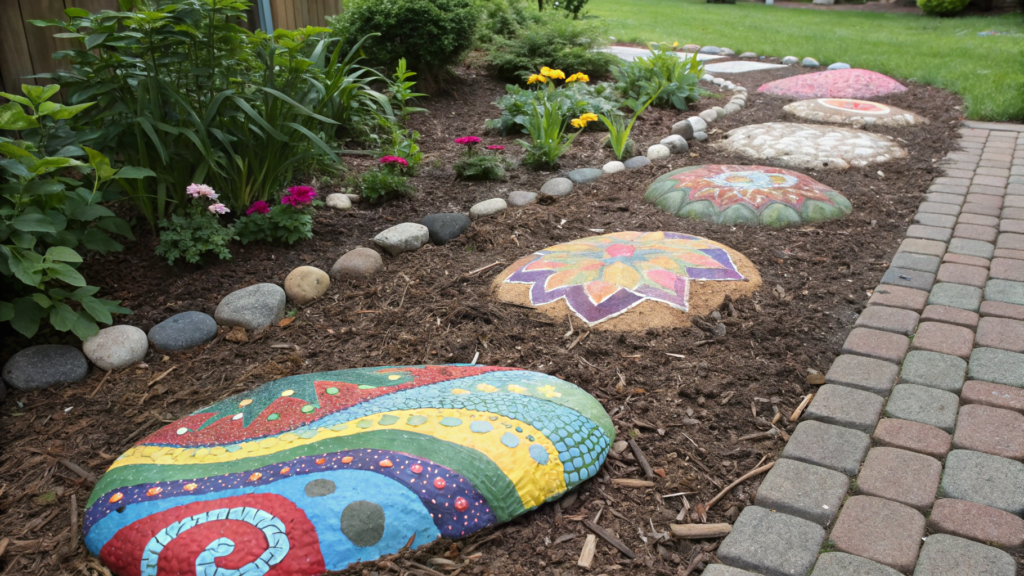
3. Mosaic-Style Pebble Mandala for Patios

If you’re craving something bright and calming at the same time — try a mosaic-style pebble mandala.
We have one now right on the patio, near the old garden chair. It turned out not just pretty, but surprisingly… addictive.
I started laying it out without much of a plan. Just dumped a bucket of colorful pebbles, crouched down — and it felt like someone flipped on my “meditation mode.” Half an hour later I had the center. Then a ring. Then another. And I didn’t want to leave — just keep going.
What you’ll need:
- Small flat pebbles, 0.5–2 inches (1–5 cm) in size, in various colors
- Outdoor adhesive (or cement if you want the mandala to be permanent)
- Metal ring or wooden frame — optional, for shaping
- Sealant or clear coat, if it will be exposed to the weather
How we do it:
- Choose the location. Works best on a flat surface — by the porch, patio, or deck.
- Clear the area. Pull weeds, remove rocks, level out the base — dirt or stone.
- Find your center. That’s where it all begins. We sometimes place one large stone in the middle — like a focus point.
- Start building the pattern. Ring by ring, color by color. There’s no right or wrong here. Just go with what feels good.
- Glue as you go. You can dot adhesive or spread it underneath — depends how permanent you want it.
- Let it dry. Usually takes a full day. Then seal it if your patio is uncovered.
Our mandala turned out about 18 inches (45 cm) wide. Not huge, but you see it right away when you step out for coffee.
And every single time I walk past it, I catch myself staring for just a second. Nothing fancy. But it’s beautiful. And made with our own hands.
Tip from experience:
If you want to see how your mandala will look after rain — wet the pebbles before laying them. When damp, the colors pop: gray turns slate, beige looks warmer, greens and reds come alive.
Now we toss our pebbles in a bucket of water first — and build straight from there. Makes choosing colors so much easier.
4. Painted Rock Cactus Garden
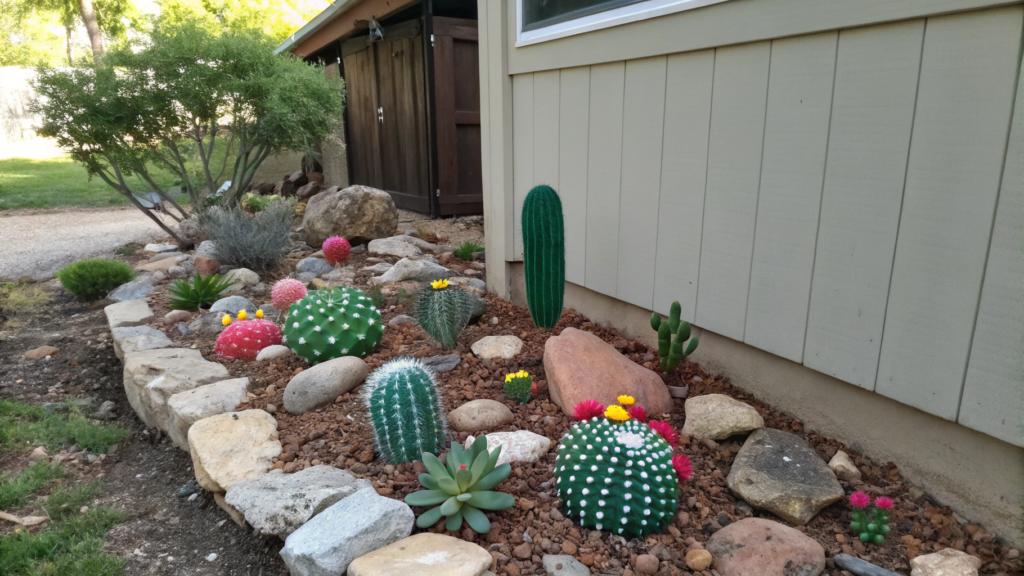
This is probably one of the most fun projects we’ve ever done.
It all started with a dry, shady corner near the shed where nothing would grow. Everything wilted. The soil felt like dust.
I half-joked that maybe we should plant cactuses there — only not real ones. Rock ones.
And within a day, our first cactus rock garden had “sprouted.”
The idea is simple: paint rocks to look like cactuses and arrange them into a little scene. No watering. No prickles. But it still looks like a tiny succulent patch.
What you’ll need:
- Smooth, elongated rocks in different sizes
- Green acrylic paint (multiple shades work best)
- White paint or marker for the needles and patterns
- Medium and fine brushes
- Outdoor-use sealant
- Optional: flat basket, ceramic pot, or shallow container
How we do it:
- Pick your rocks. The best ones are oval, chubby, and smooth — they naturally look like cactus shapes.
- Paint them green. Start with a base coat. Then add a lighter or darker shade on top to create some dimension.
- Add the details. Use white to draw spines, stripes, or dots. We mix it up — lines, zigzags, spots — the more variety, the better.
- Arrange your cactus garden. We usually place them in a basket with sand or gravel, sometimes mixing in one or two real succulents for contrast.
- Secure them if needed. If it’s going outside, you can glue them in place so they don’t tip over from wind (or a cat).
- Seal with matte clear coat. We prefer matte so the rocks don’t end up looking like plastic.
Tip. Add a few mini stones at the base of the “cactuses” — like little offshoots.
We always do that, and it makes the whole setup feel more natural. You can even stick a sign in there that says “No water needed!” — our guests always laugh when they see it.
Now we have these “pots” on the porch, on the greenhouse steps… They need zero maintenance, and yet they look like you’ve got a personal succulent garden.
Just one without the thorns.
5. Animal Footprint Stones for Garden Paths

When we built our first garden path, something just felt… off. It was practical, neat, gravel-lined, everything by the book. But honestly? It felt a little too perfect.
So one day, we decided to “mess it up.” Add a little playfulness. That’s when we laid down our first animal footprint stones.
At first, it was just a fun project for the kid. But somehow, that path stopped being just a shortcut between garden beds — and became a mini adventure trail.
What you’ll need:
- Flat round or square stones (6–10 inches / 15–25 cm)
- Outdoor acrylic paint — we use FolkArt Outdoor Acrylic
- Black or dark brown paint for the footprints
- Sponge brush or stiff bristle brush
- DIY stencils (cardboard, plastic folders — anything works)
- Clear fixative spray — Rust-Oleum Clear Enamel holds up great
How we do it:
- Paint the base color. We go for something earthy — tan, brown, warm gray — so it blends into the path naturally.
- Place the stencil. We made ours by cutting animal tracks out of old plastic folders. So far we’ve got: cat, dog, chicken, duck, raccoon — even a moose.
- Dab with a sponge. Instead of using a brush, we dab paint on with a sponge or stiff brush. It gives the footprint texture — like the animal just stepped in mud.
- Add small details. Claws, scratches, double prints — if you want it to look more real.
- Let it dry and seal with spray. Especially important if the stones will be set into gravel or soil.
Tip. If you want the prints to feel more natural, don’t lay them in a perfect line.
Leave uneven gaps, vary the angle — like the animal was walking and changing pace.
And if the path winds a little instead of going straight? Even better. Looks like something just ran right through the garden.
6. Mandala Rock Art for Garden Centerpiece

We made our first rock mandala totally by accident. It was a hot Sunday, and we just didn’t feel like going anywhere.
I dumped a bucket of small stones on the table near the porch, grabbed a couple of brushes — and started painting a circle. Then another. And before I knew it, I’d forgotten about my phone, the pot on the stove, even my garden gloves — still lying on the steps.
Now that mandala is the centerpiece of our garden. It sits in a round patch between the flowers, and every season its surroundings change: tulips in spring, zinnias in summer, sunflowers in the fall. But the mandala stays at the heart of it all.
What you’ll need:
- Flat stones, 2–4 inches (5–10 cm)
- Outdoor acrylic paints — we like FolkArt Outdoor Acrylic
- Thin brushes for detail work
- A palette of 3–4 colors — we love ochre, white, deep blue, and turquoise
- Rust-Oleum Clear Enamel Spray for sealing
- A circular base — an old flowerpot lid or a wooden round works great
How we do it:
- Sort the stones. Look for ones with similar thickness, but different shapes — rounds, teardrops, ovals. The variety gives your layout rhythm.
- Find the center. Usually, we place the most noticeable stone here — you can paint a symbol or a focal point on it.
- Paint the base. We start with a light background — gray, sand, or white — to make the colors pop.
- Build the pattern. Work outward from the center. First ring — dots. Second — teardrops. Third — spirals or diamonds. Don’t overthink symmetry — it finds you once you’re in the flow.
- Add color accents. We usually pick one bold contrast color — like turquoise against ochre and white. It gives depth.
- Air dry. Preferably in the shade, so the paint won’t crack in the sun.
- Seal with clear spray. Two coats, 30–40 minutes apart. Don’t skip it — this mandala will be in full sun.
Tip. If you want your mandala to truly feel like the garden’s heart, surround it with plants.
We once planted a ring of marigolds and silver wormwood around ours — and that’s when it came alive. The stones started to look like jewels in a green frame.
Now, whenever someone asks where the center of our garden is, we just point to the mandala.
It’s not loud. Not flashy. But everyone who sees it pauses for a few seconds — and slowly walks around it. And maybe that is the whole point.
7. Ladybug Painted Rocks

If there’s one thing in our garden that always gets the same reaction, it’s the ladybugs.
Everyone who spots one on a rock or peeking out from the grass immediately says, “Oh my gosh, how cute!”
And that’s exactly what makes ladybug painted rocks perfect for any garden.
These little beetles… they’re everywhere: by the roses, near the steps, between the lettuce and spinach, at the edge of the raised bed.
Small, round, red — and somehow alive, even though they’re just painted stones.
What you’ll need:
- Small rounded rocks (2–3 inches / 5–8 cm)
- Red, black, and white acrylic paints — we like Apple Barrel Acrylic Paint Set
- Thin brush or marker for details
- Matte outdoor sealant (Rust-Oleum Clear Enamel works great)
How we do it:
- Pick the rocks. We go for small, rounded ones — slightly flattened, easy to hold in your palm. Sometimes we find them right on the path to the woods. One had a tiny chip on the side, and he became the “old grandpa” of our ladybug crew.
- Paint the base. Cover the whole stone in bright red acrylic. One coat is usually too light. The second makes it rich, like fresh strawberries.
- Add the head. A simple black half-circle on the narrow end of the rock. It’s the ladybug’s “face,” and it suddenly brings the whole thing to life.
- Draw the center line. We take a thin brush and carefully split the “back” in half. This one detail turns it from “a painted red rock” into a bug with personality.
- Add the dots. You can do a bunch, or just a couple. Don’t aim for perfect symmetry. We like when one ladybug has two spots, another five, and one has none at all. They each have their own character.
- Paint the eyes. White circles, tiny black pupils — and now it’s looking right at you. Sometimes up, sometimes sideways.
- Let it dry, then seal. We use a matte finish so it doesn’t look like a plastic toy. Two coats, with a short break in between.
Tip. To make sure your ladybugs stand out, place them near muted tones like gray rocks, mulch, or wood borders.
We also like to hide them in fun places: in a flowerpot, on the porch, behind a stump.
Even adults find themselves smiling when they spot one by surprise.
Last year we lined up a full “family” of 12 ladybugs along the path. In the morning, there were only 9. Three had “run away.”
Turned out our son had taken them inside and tucked them under his pillow — just because they were “nice.” Guess that’s our version of quality assurance.
8. DIY Rock Snake Path

Sometimes a garden just needs something playful.
Not more beauty. Not more symmetry. But something goofy, cheerful, a little childlike.
And if you’re craving that kind of joy — a rock snake is exactly what you need.
Our first one slithered out near the basil bed. Then another showed up near the sandbox.
Now these snakes are everywhere on our property: behind the shed, along the terrace, even one curled up by the compost pile — and stayed there.
It’s the perfect project: low cost, great for families, no need to mimic nature or obsess over form. Just fun and color.
What you’ll need:
- Dozens of rocks in different sizes (3 to 7 inches / 8–18 cm)
- Acrylic paints — bright ones! (We love Apple Barrel Acrylic Paint Set)
- Medium and fine brushes
- Black and white markers or paint for details
- Outdoor sealant
- Optional: googly eyes, tongue made from fabric or twine
How we do it:
- Gather the rocks. We walk down to the stream and grab anything that looks like a segment — small, medium, large. The first rock is the “head,” so go a little bigger.
- Pick your colors. We go full rainbow: blue, green, orange — like candy. Or do a monochrome snake: shades of teal, all in green, whatever fits your vibe.
- Paint by segments. Each rock is a body piece. Sometimes we add dots, waves, stripes — but keep it fun, not chaotic.
- Add the face. Eyes, a smile, maybe even eyelashes. One of ours has fangs and guards the greenhouse.
- Lay it out on the ground. Place the rocks like a snake crawling through grass. Don’t go in a straight line — curves and wiggles make it come alive.
- Seal with varnish. Especially if it’ll stay outdoors. We like Rust-Oleum Clear Enamel — holds up really well.
Tip. Want your snake to feel real? Make it bend around a raised bed, hug a tree, or peek out from behind the house.
And definitely add a tongue — we dip a scrap of twine in red paint and glue it under the “mouth.” Tiny detail, big personality!
We even once held a neighbor competition: Who could build the longest snake?
A little girl won with 74 stones. And now her snake still lives in their yard — one of many slithering along the block. Not planned. But so, so fun.
9. Colorful Pebble Art for Garden Mulch
One day while refreshing our garden mulch, I stared at that brown layer and thought: “Why does it all look the same?”
Sure, mulch is practical — holds moisture, blocks weeds — but visually? Just a backdrop.
We wanted color. Something with energy. So we tried swapping mulch for bright, patterned pebble zones — waves, puddles, even abstract art. Not for symmetry. Not for rules. Just play.
What you’ll need:
- Small pebbles (0.5–2 inches / 1–5 cm) — natural, white, or colored
- Acrylic paint that sticks to stone (FolkArt Outdoor Acrylic Paint is great)
- One big brush + a few smaller ones
- Plastic trays or a tarp — for drying
- Clear varnish (optional, for longer-lasting color)
How we do it:
- Wash and sort. We batch our pebbles — by size and color. Lay them out in trays or boxes.
- Paint your palette. Choose a color theme (blues and teals? rainbow?) and layer bolds with accents. We use 3–4 main colors and add a pop of contrast.
- Dry outdoors. On a tarp in the shade works best. If it’s humid, a little sun helps — but don’t overdo it or the paint may crack.
- Seal with varnish. Only if you want it to last past one season. We sometimes skip this and just repaint in spring.
- Lay it out. Use the pebbles to form “pools” in mulch — around shrubs, along beds, near paths. Don’t aim for perfection. Slight messiness makes it look natural and full of life.
Tip. If you don’t want your pebbles sinking into the soil or getting in the way — frame them.
We use flat border stones or low wooden edges. It keeps the color contained and the garden looking tidy.
Now we’ve got pops of color in all kinds of places: under bushes, near the apple tree, beside the garden bench.
And the best part? They shine in early spring and late fall when greenery is scarce but color still matters. Bonus — weeds barely stand a chance through these pebbles.
10. Hand-Lettered Garden Stones
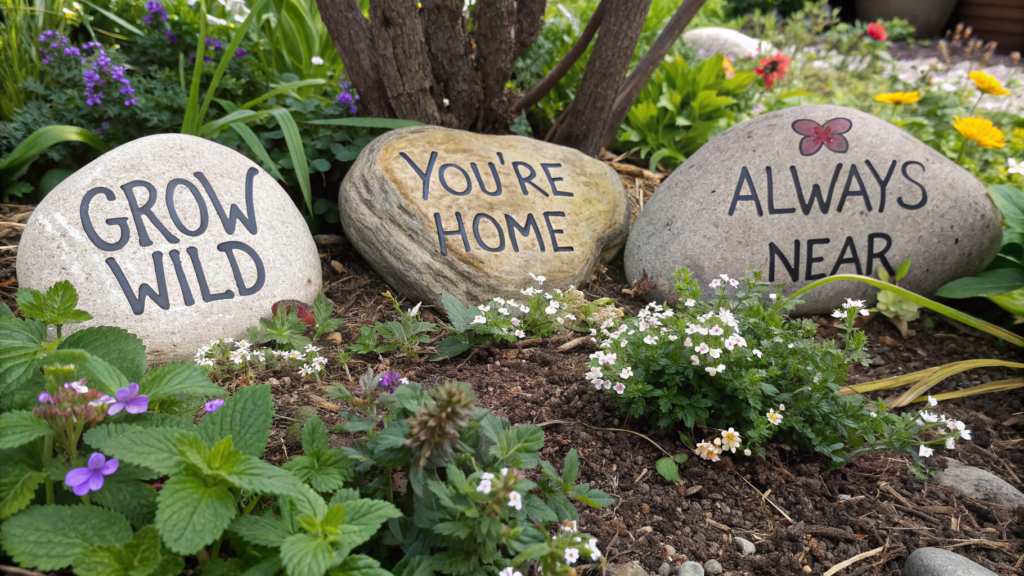
Some words stick in your mind longer than flowers in a bed.
“Grow wild.”
“You’re home.”
“Always near.”
We used to write little notes like that to each other — me and Lindy. Then one day, we started writing them on stones. And it turned out the garden is the perfect place for words.
Hand-lettered garden stones aren’t just a visual detail. They’re a feeling. Something personal. Something that speaks; you want to whisper again — standing near the dill, or walking past the mint.
What you’ll need:
- Flat stones (4–8 inches / 10–20 cm), preferably smooth
- Oil-based permanent marker — we use Sharpie Oil-Based Paint Marker
- White, black, or gold paint — depending on the stone color
- Matte outdoor varnish
- A little inspiration — what do you want to tell yourself and your garden?
How we do it:
- Find a “speaking” stone. Not every rock wants to be written on. We look for the one you want to rest your hand on. Sometimes it just “asks” to be marked.
- Clean and dry. No dust, no moisture — or the marker will slip and the paint won’t stick.
- Choose the words. Sometimes it’s the plant name. Sometimes it’s personal. “I feel calm here.” “Hi, Earth.” “You did it.”
- Write by hand. No stencils. No measuring. Uneven? That’s the point. One time, my “O” tilted sideways — and it looked like a grin. That became my favorite stone.
- Let it dry. Especially with oily paints — don’t rush. Overnight works best.
- Seal with varnish. Just one thin coat. We like it when the text blends into the rock — not shiny, just present.
Tip. One message per stone. Don’t try to cram in too many words. A thought, a phrase — that’s all. If you’ve got more to say — make a series. We place them like stepping stones along a bed or by the stairs. Each one — a step.
One of our very first stones still sits in the lavender patch. It just says: “Wait.” And every time I rush past or feel anxious, it catches my eye — like a quiet reminder: It’s okay. Just wait.
A Living Stone
So now you’ve seen 10 ideas — each one simple, doable, and honestly… kinda magical.
And now we’re curious: Which one speaks to you? Have you tried anything like this before?
Leave a comment. Me and Lindy love reading your stories. They inspire us just as much as a new mandala pattern laid out on the porch.Because a garden isn’t about how it “should” look — It’s about how you feel in it.
And if just one painted stone showed up in your garden today… maybe that’s already the beginning of something bigger.