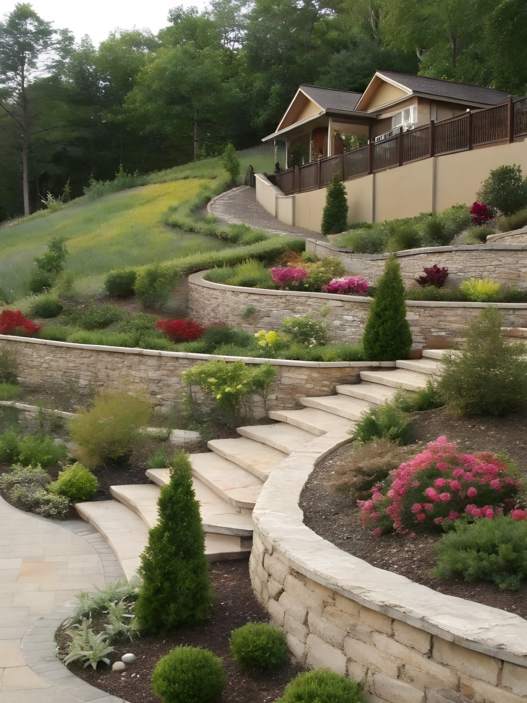
If you’ve got a slope, you know the struggle: spring brings runoff, summer brings cracks, and fall turns everything into mud. But here’s the thing — a slope doesn’t have to be a problem. With the right landscaping ideas, it can become a chance to stabilize the soil and build something both beautiful and practical.
Stairs, steps, paths — they don’t have to be expensive or complicated. They can be built with whatever you’ve got on hand and still become one of the coziest parts of your whole space.
In this list, I’ve gathered ten landscaping ideas — tested, simple, and honest. Everything that helps you tame a slope and turn it into a space where you actually want to walk. Whether it’s with a cup of tea in the morning… or a bucket of zucchini in the evening. Your call.
1. Timber Step Design That Works on Any Hill

Honestly, timber steps landscaping ideas are one of the cheapest, quickest, and most reliable ways to work with a slope. Especially if it’s steep and you don’t want to rent equipment or spend thousands on concrete. All you need is a bit of patience, gravel, treated wood, and a pair of strong arms (yours will do just fine!).
There are places where you just can’t walk after it rains. That’s when timber steps save the day. I won’t say it’s super easy… but the result? Oh yeah.
What you’ll need for these landscaping ideas steps
- Treated lumber beams, ideally 6×6 inches (about 15×15 cm). The best option is pressure-treated wood. Super important — this stuff won’t rot even when buried.
- Landscape spikes or rebar to anchor each timber (2–3 per step works well).
- Gravel or crushed stone — to fill the steps and provide drainage.
- Landscape fabric — to go under the gravel and block weeds.
- Liquid wood preservative — a must for all cuts and joints. Even if the wood’s treated, the ends are vulnerable!
- Waterproofing sealant (optional) — if your slope stays wet, this helps extend the life of the wood.
- Grip tape or anti-slip treads, especially if someone in your household walks barefoot (looking at you, Lindy!).
- Shovel, level, gloves, sledgehammer… and a bit of stubbornness
How to put Ii all together
Don’t stress — it sounds like a construction site, but it’s really pretty simple. Picture wooden “shelves” dug into the slope, holding back the gravel or soil behind them. That’s it — that’s your step.
- Start from the top. Find the spot where the stairs will begin. Mark the stair line — you can use stakes and string.
- Mark each step. Depth should be around 12 inches (30 cm), height about 6 inches (15 cm). That’s the comfortable standard for climbing.
- Dig in your first timber. Sink it slightly into the slope so it doesn’t just sit on top — it needs to be anchored. Drive rebar through the beam at the edges and center.
- Don’t skip the protection! Apply liquid wood preservative to every exposed end. That’s where rot starts. If the slope is wet or shaded, seal the wood with waterproofing too.
- Fill the step. Dump in the gravel between the timber and slope. Pack it down. Want a cleaner look? Add flat stones on top for stability.
- Repeat going down the slope. Always re-check your depth and height to keep things even. Use a level! Or do what we do — put a coffee mug down. If it doesn’t spill, it’s good enough.
What Not to Forget. Final anchoring is non-negotiable. Without solid rebar or spikes, the wood will eventually move — especially if, like here, the chickens race up and down the stairs like it’s a runway.
What about paint?
Short answer — don’t. Outside, paint peels fast. Better to use a wood oil or stain — it won’t crack, it lets the wood breathe, and it weathers beautifully over time. Way better than flaking paint.
Also — don’t try to finish in one day. This isn’t a sprint. I’d rather spread it over two days and feel human than rush it and end up sore and cursing everything.
Why this design works:
- Simple. You can build it solo, seriously.
- Affordable. One 8-foot timber (2.4 m) costs about $15–20.
- Reliable. If it’s well-anchored, this kind of stair will last 10–15 years.
- Natural-looking. Timber blends in with any outdoor space and doesn’t stick out visually.
One Last Tip. If your slope gets a lot of rain, dig tiny drainage channels off to the side, or make sure the gravel sits on landscape fabric — this keeps your steps from shifting or sinking over time.
2. Budget-Friendly Flagstone Staircase DIY
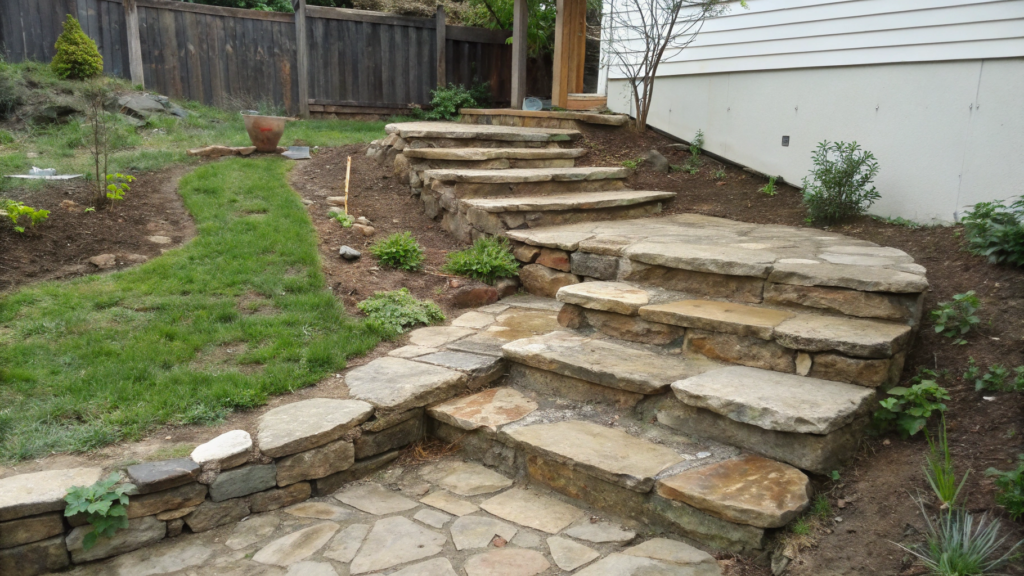
It might seem like a flagstone staircase belongs only in designer gardens that cost a few paychecks… but the truth is, you can totally DIY it without blowing your budget. Especially if you go with local or reclaimed stone.
Here’s what you’ll need:
- Flagstone — thin flat stones about 1.5–2 inches thick (≈3.8–5 cm). Sandstone, slate, or limestone work best. Each stone usually weighs around 30–50 lbs (13–22 kg), so grab a wheelbarrow.
- Gravel or crushed stone — to create the base and fill in steps.
- Sand or stone dust — for leveling the spot under each slab.
- Landscape fabric — to block out weeds from underneath.
- Hammer, level, pickaxe, and patience. Especially patience.
How to build these stairs:
- Plan your path. Flagstone stairs look best when they don’t follow a straight line. A gentle curve down the slope always feels more natural. Sketch the layout and estimate how many steps you’ll need — each one should rise about 6–7 inches (15–18 cm).
- Prep each step. Dig out a shallow trench just slightly deeper than the stone’s thickness. Add a layer of gravel, then sand. Tamp it down and check the level.
- Place the flagstone. Set the slab on the prepared spot. Tap it into place.
If it wobbles — add more sand.
If it won’t settle — take it out and shape it a bit (a masonry chisel with a hand guard works great for this — keeps your hands safe and your lines clean). - Fill the gaps. Between stones, you can use fine gravel or sand, or even soil with creeping thyme or moss. It’s especially magical on a shady, north-facing slope.
Important. Each stone should sit flat and stable. If it rocks even slightly, gravity will remind you of its power… probably at the worst possible moment.
Pro tip. If flagstone is too expensive, try looking for cutoffs from a local stone yard or reclaimed material from dismantled walkways. One of our friends picked up leftovers from a neighbor’s remodel and built a full 12-foot staircase almost for free.
A project like this isn’t “fast,” but that’s part of the magic. This is the kind of task where you work quietly, listening to the gravel crunch under your shovel, and slowly watching your slope turn into a path. A path worth walking barefoot.
3. How to Build Rock Border Stairs for Your Landscaping Ideas Slope
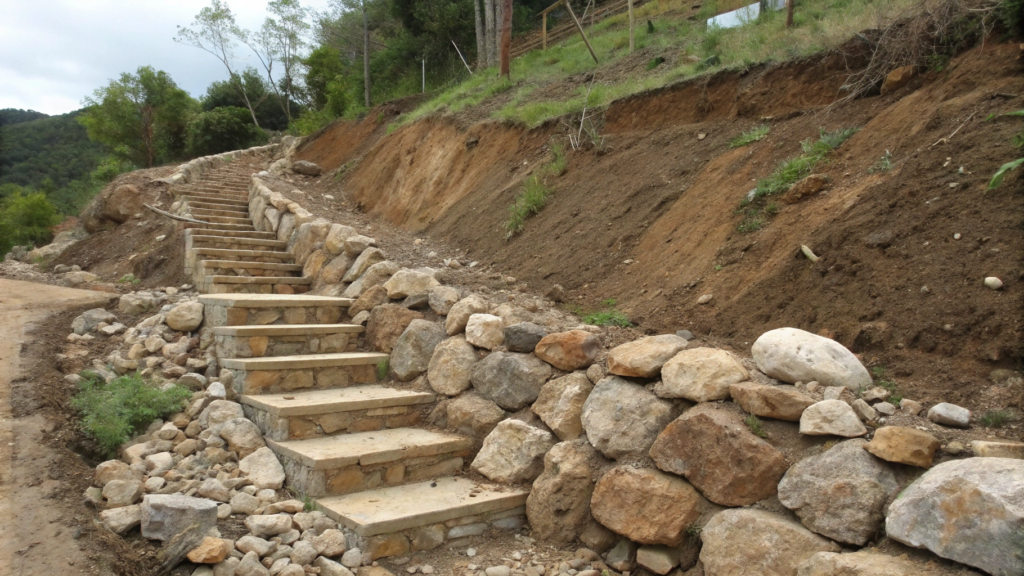
If you’ve got a slope and at least a couple free evenings — you’ve already got what it takes to build a rock border staircase. And no, we’re not talking about fancy catalog boulders. We mean the landscaping ideas kind of stairs built from whatever solid stuff you can find around: rocks, rubble, old cement chunks — it all works.
Especially if your slope tends to crumble or small landslides form after rain — rocks are great at holding the soil in place and stabilizing the area.
What you’ll need:
- Big rocks for the side borders — at least the size of a melon. Bigger, like a watermelon, is even better. You can collect them from your yard, the woods, or along gravel roads (only where it’s allowed, of course).
- Fine gravel or crushed stone — to fill in gaps between the rocks and steps.
- Shovel, pickaxe, level, and crowbar — just in case you run into extra-stubborn spots on the slope.
- Wheelbarrow. Without it, your back will file for divorce
- And definitely landscape fabric — trust me, in a year, those gaps between the rocks will be full of nettles and burrs. Fabric is cheap and saves tons of effort.
Without it, your whole staircase might be taken over by weeds after one season — especially in shady or damp areas.
How to build it Landscaping Ideas:
- Mark your path. The staircase can go straight down or zigzag — depends on the terrain.
Each step is basically a little shelf cut into the slope, held in place by two rocks (one on each side). - Start from the top. Dig out the first step — make a small platform about 6–8 inches deep (15–20 cm).
Flatten the sides and place one rock on the left, one on the right. That’s your “border.” - Fill the center with gravel and tamp it down. If you have a flat stone, place it on top as a tread.
- Work your way down the slope. Each new step should be slightly set into the slope — not just resting on top.
Always check the level. The rocks should sink slightly into the soil, not wobble around. - Fill gaps with gravel or soil. And if you want your staircase to “grow into” the landscape — sprinkle in a bit of creeping thyme or moss seeds between the rocks.
Some hard-learned tips:
- Angular rocks are easier to secure than perfectly round ones.
- Don’t use clay or plain dirt as filler — it’ll just wash out with rain.
- This may look like “rough” work, but the result is gorgeous, especially after a year or two when soft greenery takes over the edges.
This is one of those builds that ends up looking like it’s always been part of your landscaping ideas. And it’s a perfect weekend project — no budget needed, no experience required, but it gives you that deep-down feeling that you’re actually taming your slope — not just slapping a temporary fix on it.
4. Concrete Block Steps for Steep Backyard Access
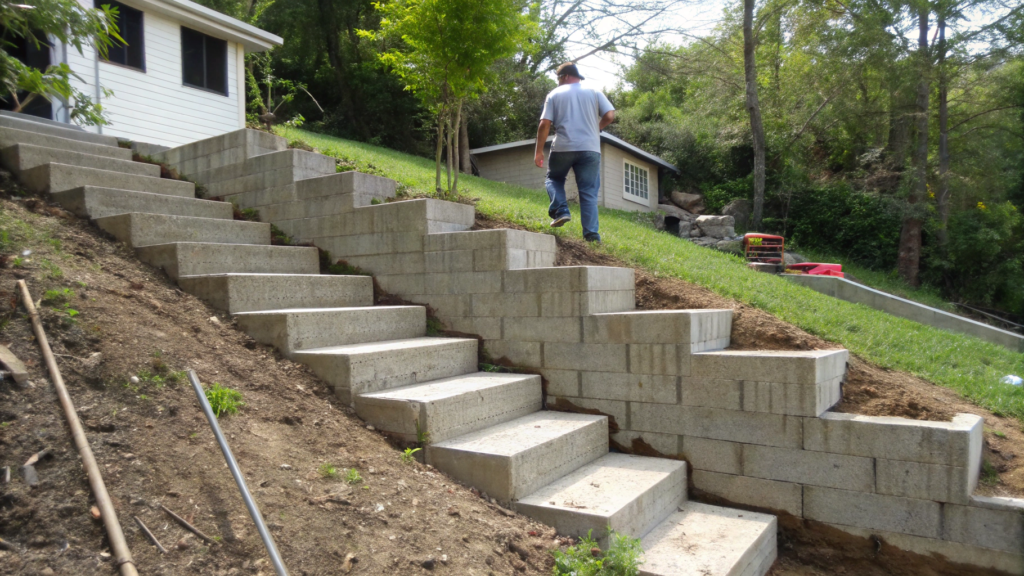
If you’ve got a steep slope in your yard, concrete blocks are a total lifesaver. They’re solid, stable, and long-lasting — and you can build steps with them without cement or contractors.
It’s a cheap and totally practical way to make your slope safer and easier to use.
What you’ll need for this Landscaping Ideas:
- Concrete blocks (CMU blocks) — standard size, 16×8×8 inches (≈40×20×20 cm). You can use hollow or solid ones.
- Gravel or crushed stone — for the base and drainage.
- Sand or dry concrete mix — to level and secure the steps.
- Landscape fabric, level, shovel, sledgehammer — the usual tools.
Each block weighs around 30–35 lbs (13–16 kg) and costs about $1.50 to $3. For a 10-step staircase, you’ll need around 10–20 blocks depending on the width and depth of your stairs.
How to build these Landscaping Ideas:
- Prep the base. Dig out a little trench for each step — around 6–8 inches deep. Lay down landscape fabric, pour in gravel, and tamp it down well. This is the foundation.
- Lay the block. One block = one step. Place it horizontally, right against the edge of the dirt shelf you just made.
Check the level after every block — they need to sit flat and stable. - Fill the gaps. If you’re using hollow blocks, you can fill them with gravel — or even plant thyme or moss in them. Moisture will drain, and the surface won’t be slippery.
- Repeat down the slope. Each time, dig in a little further and place the next block on a fresh gravel bed.
This kind of staircase not only gives you stability going up and down, but it actually helps hold the slope together — so the soil doesn’t slide away.
That’s a big deal if you’re using the path to your garden beds or backyard shed every day.
They sit flush with the ground, they don’t wiggle, and they’re easy to move later. If a few years down the road you want to rebuild it — just pull the blocks out and use them elsewhere.
A little upgrade. To keep things grippy in the rain, you can stick on some anti-slip tape — it’s cheap, lasts a long time, and totally works.
If you follow the steps, you’ll have stairs you can walk, haul a wheelbarrow on, and even line with flower pots — and most importantly, they’ll hold up to whatever your backyard throws at them.
5. Rain-Resistant Cheap Landscape Stair Ideas

If your garden slope is already tricky, then one that turns into a stream after every rain is basically a waterfall.
And no kind of steps will help if you just dump some gravel and say, “well, that should hold.”
Because guess what — you’ll be picking up that gravel all over your yard.
With your hands. In the rain. Been there, done that.
Here are the principles we stick to:
- Water should never stop. The stairs shouldn’t block it — they should guide it away.
- Breathable, non-slip, concrete-free surface.
- Each step acts like a bowl with drainage.
- And all of it — without a big budget.
That’s why the best kind of stairs for rainy areas is a combo of gravel and wood (or stone).
What you’ll need:
- Pressure-treated 4×6 or 6×6 timber (≈10×15 cm or 15×15 cm) — this forms the “front wall” of each step.
- Gravel, 0.5–1.5″ (1.2–4 cm) — for filling the steps.
- Landscape fabric — a must-have. Without it, your step turns into a mud pie.
- Rebar or stakes — to hold the wood in place.
- Flat stones (optional) — you can lay these on top of the gravel to create a non-slip surface.
How to build stairs that won’t wash away
- Mark your steps starting from the top. Go with 12 inches deep and 6–7 inches high (30×15–18 cm).
- Dig in the timber or stone across the slope. This becomes the front edge of the step. Secure it with stakes or partially bury it.
- Lay landscape fabric across the whole step surface. This matters. Without it, you’ll have a mud pit in a month.
- Add the gravel. A mix of fine and medium gravel works best — it drains well and won’t feel slippery.
- If the slope is extra soggy — make a side trench. Just dig a drainage ditch alongside the stairs and fill it with gravel.
That’ll redirect water and keep it from cutting through your steps.
Personal tips for this Landscaping Ideas:
- Don’t fight the water — help it flow. A staircase with moving water lasts way longer than one where it just sits and pools.
- If the top layer starts to wash away — just add more gravel. One $5–7 bag and you’re back in business.
- Plant thyme or saxifrage along the edges. They help hold the soil, and they look lovely — even in the rain.
This kind of staircase is worry-free. And it lasts for years.
You don’t wake up after every storm wondering if it washed out again — because it’s already under control.
And best of all — you’re not leaping from rock to rock like a mountain goat. You’re just walking to your garden. Even in the rain. With coffee. And with pride.
6. Stone Stair Path with Secret Garden Vibes
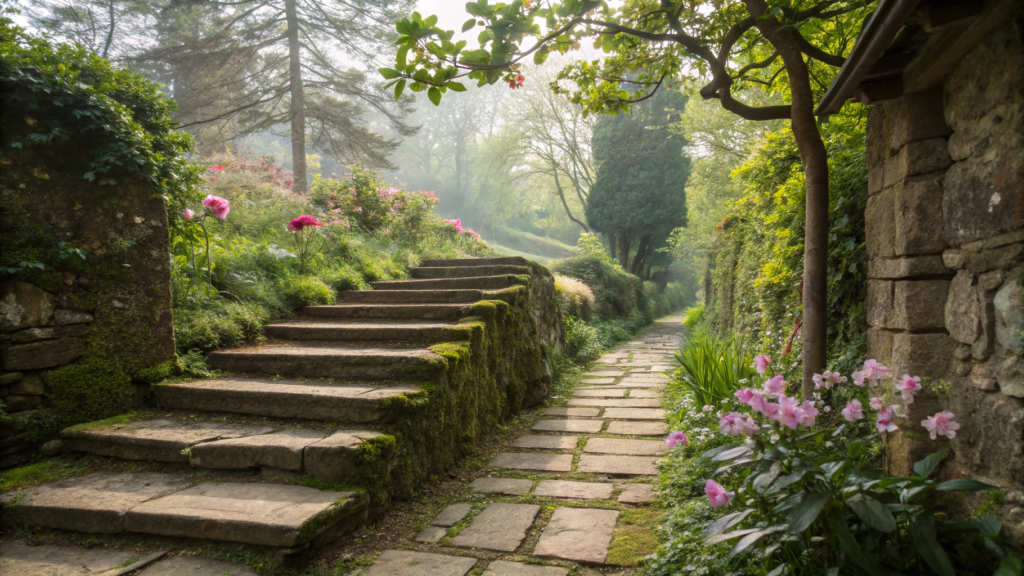
If you lay down stone steps between the greenery, let them get a bit mossy, and plant something blooming along the edges — you’re not just building stairs, you’re creating a little path into your own secret garden.
And this project is totally doable on your own — no contractors, no poured concrete, no thousands spent on landscaping idea.
What works best for this kind of path:
- Flat natural stone — slate, limestone, sandstone. Aim for about 1.5–2 inches thick (4–5 cm).
It doesn’t have to be perfect — the imperfections give it charm. - Gravel and crushed stone — to form the base under each slab.
- Sand or stone dust — for filling and leveling.
- Landscape fabric — to keep weeds from growing under the steps.
- And optionally — groundcover seeds or seedlings: moss, thyme, sedum.
How to build this kind of staircase:
- Plan the route. Ideally, don’t go in a straight line. Add a little curve, a gentle turn — and suddenly your steps feel like they lead somewhere more magical than just the compost pile.
- Dig each step like a “bowl.” Go about 3–4 inches deeper than the stone’s thickness. The bottom should be flat and compacted. First the landscape fabric, then gravel, then sand.
- Lay the stone. You don’t need perfect alignment. Small gaps add to the natural look. If the stone rocks or wobbles — add a bit of sand under it.
- Let the gaps breathe. Fill in the joints with sand or soil, then sprinkle in moss or low-growing thyme seeds.
Give it a couple of months, and it’ll all start filling in and coming alive.
Tip. If you want real “secret garden” vibes — don’t make the steps too wide or clean. Let them blend into the greenery a bit. And on the edges, plant astilbe, heuchera, ferns, or salvia — they frame the stone beautifully, especially in partial shade.
Kraft Tool 3″ Masonry Chisel with Hand Guard — a great pick for trimming stone. No vibration, easy grip, and you can even shape pretty thick slabs if needed.
Why this is a low-budget but high-impact landscaping idea:
- Natural stone is cheap or free. You can find it on-site or buy it by weight for $0.15–$0.30 per pound.
- No concrete, no cement, no week-long digging. Just gravel, sand, and a bit of patience.
- And most importantly — this kind of stairway only gets better with age.
Like an old tree: sturdy at first, then full of character a few years later.
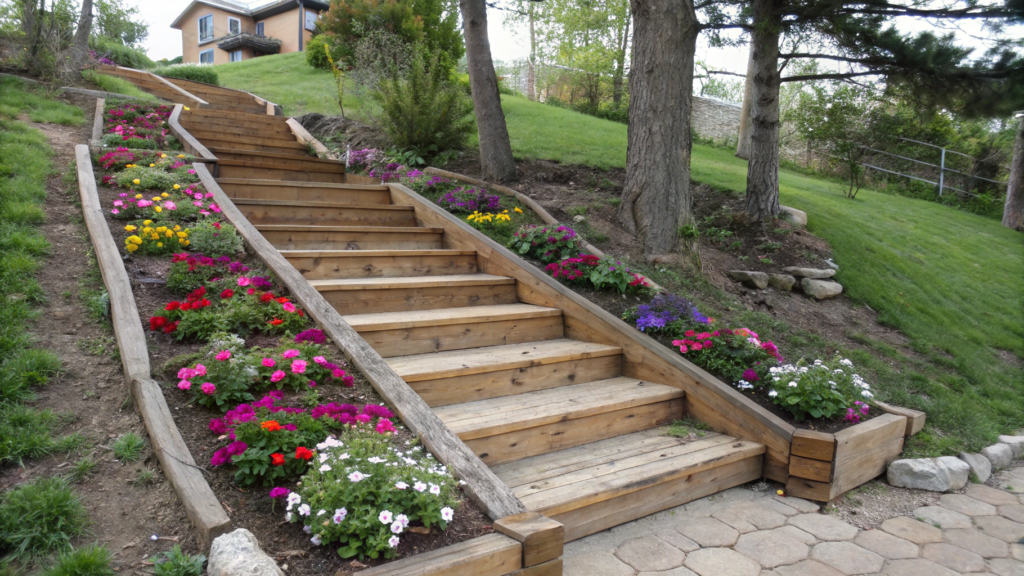
7. With Built-In Flower Edges on a Budget
Sometimes a garden staircase becomes one of the most beautiful parts of the whole yard.
And no — you don’t need marble borders or fancy designer shapes. All it takes is a bit of wood, a handful of soil, and a simple landscaping idea: what if the steps themselves could be alive?
A staircase with flower edges turns an ordinary slope into a blooming path. And it doesn’t look like a “staircase with flowerbeds” — it looks like the plants just decided to grow alongside your way.
You can build all of this without spending a fortune, using easy and affordable materials.
What you’ll need for this Landscaping Ideas:
- Boards or lumber for forming the steps — 2×8 or 2×10 (≈5×20–25 cm) will work great. Treated, but no need to splurge on fancy types.
- Rebar or metal stakes — for anchoring.
- Gravel or crushed rock — for the base layer of each step.
- Rich soil — to fill the edge “flower pockets.”
- Seeds or seedlings of compact plants: lobelia, sedum, alyssum, mint, sage, thyme, portulaca — anything that thrives in limited space and sun or partial shade.
Each step gets a small “pocket” along the edge — either on one side or both. These pockets are just narrow beds about 6–8 inches wide (15–20 cm), separated from the step by another board.
You fill them with soil and plant flowers or low groundcovers. Other than that — it’s just a regular staircase.
How to build landscaping idea flower-edged steps:
- Start with the basic build. Dig in your first board, secure it with stakes, and fill the step with gravel. Just like building a typical wooden step.
- Add the edge pocket. Before installing the next board, leave a small gap on one or both sides — you can nail in an extra angled board to hold the soil in place.
- Fill the pocket with fertile soil. Compost mixed with sand works great — light, drains well, and doesn’t get soggy. Don’t pack it too tight.
- Plant what you’ll love to see daily. Go for low, lush, aromatic plants that bring joy without demanding attention. Thyme, portulaca, nasturtium, alyssum — all perfect fits.
Why this works:
- The staircase becomes part of the garden — not just “infrastructure.”
- Flower pockets hold the slope together and stop erosion.
- It’s cheap — some boards, a bit of gravel and dirt, and one packet of seeds.
- And the result? Just stunning and totally authentic.
Scotts Premium Topsoil (25 qt) — a great soil blend for planting in edging beds and containers. Works perfectly for flower stairs: light, well-draining, doesn’t go sour, and holds shape during rain.
Pro Landscaping Ideas tips :
- In shade — try violas or ferns.
- In sun — go with herbs, sedum, lavender.
- Don’t be afraid to mix edible and decorative — we had thyme and strawberries along the same steps and it looked amazing.
- Keep it simple. One side of the steps is enough to create the right effect.
If you want firmer footing — for walking barefoot, for kids, or rolling a wheelbarrow — just lay flat stones, pavers, or old concrete slabs on top of the gravel.
No need to press them in hard — just make sure they’re flat and don’t rock.
This layer doesn’t replace drainage, but it makes the stairs sturdier and cleaner-looking.
8. Sloped Garden Steps Using Gravel and Wood

Honestly? If I had to pick just one method for building steps on a slope, it’d be this one: gravel and wood. This combo is like fresh bread with butter — simple, reliable, and works for almost any landscape. Especially if you want something clean-looking, budget-friendly, and doable without heavy equipment.
Gravel steps held in place by wooden “frames” won’t rot in the first season, don’t wash away with the rain, and don’t need cement or contractors.
Best part? You can build it yourself in a weekend. A few boards, some gravel bags — and your slope turns from a headache into a smooth walk.
This style shows up a lot in natural or “wild” gardens, where stairs don’t shout for attention but melt into the slope.They gently suggest a path instead of screaming “this way.”
Minimal structure, maximum vibe.
What you’ll need for this Pro Landscaping Ideas tips:
- Boards or timbers — 2×8, 2×10, or 4×4 (≈5×20–25 cm or 10×10 cm). Make sure they’re treated or rot-resistant (cedar, larch, etc.).
- Rebar or metal stakes — 2–3 per step to hold the boards in place.
- Medium gravel (¾″ / 1.5–2 cm) — to fill the steps and help with drainage.
- Landscape fabric — laid under the gravel so your steps don’t sink.
- Sand or stone dust — to level the base under the gravel.
- Level, shovel, gloves, mallet — the usual suspects.
Each step is basically a little shelf cut into the slope, held in place by a board and filled with gravel.
The board holds the fill material, and the gravel gives you a walkable, draining surface.
Step-by-step build this landscaping ideas:
- Mark out your staircase. Figure out the rise and run. Ideal dimensions: 12 inches deep (30 cm), 6–7 inches high (15–18 cm).
- Start from the top. Dig in your first board across the slope. Sink it 2–3 inches into the ground and secure it with stakes or rebar on each side.
- Lay landscape fabric behind the board. This will run the full length of the step. It prevents weeds and keeps gravel from sinking.
- Add your base layers. First a 1–2 inch layer of sand — tamp it down. Then add gravel. Distribute evenly and you can even overfill a little — it’ll settle.
- Repeat down the slope. Each new board becomes the front edge of the next step. Keep it even and check level often.
Important note:
Yes, these are gravel steps, not solid like concrete. But when compacted right, they’re stable and non-slip.
If you want a firmer surface (for walking barefoot or for kids), you can add flat stones or pavers on top of the gravel — just press them in gently.
They don’t replace the drainage layer, they just make the surface firmer and cleaner.
Pro Landscaping Ideas tips:
- Don’t skimp on the landscape fabric. Without it, you’ll end up with a grassy stairway in a year.
- For rainy areas, dig a drainage trench on one side — fill it with gravel and rain won’t wash out your steps.
- To blend the stairs into your yard, plant thyme, lavender, or sedum along the edges. They’ll trail and soften the edges beautifully.
Details that make it feel like a real garden path:
- Don’t make it too straight. Even a slight curve gives it a “grown-in” look.
- Surround the steps with mulch, small shrubs, or drought-tolerant grasses.
It balances out the hard lines of the wood. - For low-maintenance borders, pick plants that take care of themselves: catmint, dianthus, lemon balm, thyme.
- You can even vary the width slightly between steps — it makes the staircase feel alive and “unplanned” in the best way.
This type of staircase is perfect if you want to do it well and for the long run — but without turning your garden into a construction zone.
It looks natural, works in any weather, and finally lets you stop slipping down the slope and start walking it — calmly, daily, without the drama.
9. Hillside Steps from Recycled Materials

Building a staircase from recycled materials is one of the warmest, most honest ways to shape a slope.First of all — it’s almost free.Second — you’re saving old stuff from the landfill.
And third — every step tells a story.
A board from an old porch, bricks salvaged from a torn-down greenhouse, leftover laminate from the living room — everything gets a second life.
What you can use for this Landscaping Ideas:
- Old bricks, concrete blocks, rocks
- Wood pallets or scrap lumber
- Old pavers, roof tiles, broken ceramic slabs
- Chopped-up railroad ties (only if they’re not soaked in creosote)
- Metal bed frames, corner brackets, rebar
All of this can be mixed and matched. Boards can act as edge restraints, bricks as treads, and blocks as supports.
What you’ll need:
- Reclaimed materials — whatever you have on hand
- Gravel or crushed stone — at least a bit to level the base
- Landscape fabric — especially helpful if you’re using loose fill
- Shovel, level, mallet
- (Optional) — sand for bedding, cement mortar to lock in bricks or tiles
How to do this Landscaping Ideas:
- Walk the slope. Look for a natural line where walking feels easiest. It doesn’t have to be straight. Often, it’s better if the stairs “flow” with the hill.
- Mark your steps. A comfortable step size: 11–13″ deep and 6–7″ high (28–33 cm × 15–18 cm).
- Start at the top. Build your first step using what you’ve got — say, two bricks on the sides and an old board as the riser.
Underneath: some gravel or sand for leveling. - Tamp it down well. Even with reused materials, your steps should feel solid. Use a level to keep things even.
- Keep going downhill. Use whatever materials you’ve got. Don’t worry about mixing — a step made of boards, the next one with stones, then one with tile…
It doesn’t look like “junk,” it looks like part of a living garden.
Pro tip. Sometimes these kinds of staircases look cooler than the new ones.
Just try to keep everything within one color range or style.
If you want a cohesive look, keep the same width and repeat elements — for example, a brick in every second step.
Why this works:
- You’re spending next to nothing.
- You’re reducing construction waste.
- You’re creating a staircase that feels like part of a seasoned, thoughtful garden — not a concrete project.
- And honestly… these kinds of steps just have more soul than perfect store-bought pavers. Because they have a story.
This is the kind of staircase that always makes guests smile. “Hey, where are those bricks from?”
“Oh, those? That’s from the old oven my grandpa had in his basement.”
That’s the whole story. But it carries heart.
10. How to Make Stacked Rock Stairs Look High-End

Hand-stacked stone steps often look… well, a little messy.
Especially if the rocks are all different sizes, sticking out at weird angles, and there’s a happy little dandelion popping up in between.
But here’s the cool part: those same “wildly stacked” stones can actually be arranged in a way that looks like a designer staircase from an architectural magazine.
Yes — without cement, without laser leveling, and without hiring a pro crew.
You just need to understand a couple tricks — and you’ll turn your plain slope stairs into something people can’t stop looking at.
What a “high-end” stacked stone staircase looks like:
- Steps are clean-lined, but not too perfect
- Rocks sit solidly, creating a neat front edge
- There’s greenery or tight seams between them
- Nothing random around — just clean, intentional beauty
What you’ll need:
- Flat natural stones, 2–4″ thick (≈5–10 cm), up to 30 lbs (≈13 kg). Ideally, each one has at least one flat side — that’s your tread surface. Slate, sandstone, basalt, or local fieldstone all work great.
- Stone dust, sand, gravel — for base fill and leveling
- Landscape fabric — goes under everything to keep the stones from sinking
- Tiny wedge stones — to stabilize the big ones
- Shrubs, ornamental grasses, or moss — optional, to ground the whole thing into the landscape
How to do this Landscaping Ideas:
- Mark your path. Take your time. The stairs don’t need to be straight.
A gentle curve always makes it feel more expensive — trust me. - Prep the base. Each step is like a mini terrace. Dig a pocket for the first layer of stone, lay landscape fabric, pour in gravel, tamp it down.
- Start stacking. Your first row: the largest, flattest rocks — they form the front of your step.
Try to keep their top surface as level as you can. - Add fill rocks. Use smaller stones for the second layer. In the center of each step, pour in stone dust or fine gravel. It keeps the step tidy and smooth to walk on.
- Use wedges. If a stone wobbles, wedge it. Better to spend 2 minutes now than chase rolling zucchinis later.
- Repeat. Every new step: dig, base, stone, fill. The whole secret is rhythm.
Details that add polish:
- Stones should follow a clean line. Even if they’re all different, align the front edge — that’s what makes it look intentional.
- Keep it tidy. No random sticks, grass, or junk between steps. Either it’s cleaned up or it’s deliberately planted.
- Plant edges. Add ferns, hostas, or lavender depending on your climate — it softens the whole composition.
- And one more tip: fewer, wider steps always look better than a goat trail of tiny ones.
Scale matters.
Tool tip. Bon Tool 21-298 4-Pound Stone Mason’s Hammer. The perfect hammer for shaping stone, adjusting edges, and setting wedges. Heavy but precise — forget the sledgehammers and broken stones.
This kind of staircase looks like it grew out of the landscape — not something you slapped on top of it. Like the rocks were always there, and you just found the right order.
That’s the magic of a well-made garden path. It feels accidental — but it’s totally intentional. You did that. And you did it with taste.
Up the slope
Not all of these landscaping ideas will fit your slope. But one of them probably stuck in your head already. And that’s a good sign.
Because once you stop fighting the land and start listening to it, the garden starts giving back.
You can build stairs from granite or old bricks — what matters is how you do it, and why. And if you’ve already built your own quirky staircase out of something unexpected — drop it in the comments.
Seriously, I’d love to hear how others are taming their slopes.
Maybe your story will become landscaping idea number eleven.