

A slope isn’t a problem corner — it’s a stage for smart Landscaping Ideas. It challenges you to find form, adds depth to your yard, and demands a creative, thoughtful approach. That’s why slope landscaping ideas draw so much attention — they blend engineering with artistry.
You’re not just building stairs — you’re laying out a route. Not just stabilizing the hill — you’re giving the landscape its character.
That’s why these 20 ideas keep going viral, end up in Pinterest collections, and get bookmarked — they’re not just “technically correct.” They fall into the “That’s exactly how I’d want it at my place” category.
These aren’t just stairs and terraces. This is how your slope starts working for you.
1. Tiered Rock Garden That Transforms Any Slope

Back at our new place in Idaho, we faced a real challenge — our backyard was sloped at almost 30 degrees. Just a hill, completely overgrown with weeds, and a couple of awkward shrubs clinging to the edges. Mowing? Impossible. Planting anything? Pointless — the rain would just wash it all away. That’s when the idea of a tiered rock garden came to life — and it changed everything.
What is a tiered rock garden?
It’s a multi-level layout of small retaining walls and planting pockets filled with gravel, rocks, and slope-loving plants. This kind of garden doesn’t just calm down the terrain visually — it also holds the soil in place, prevents erosion, and turns an impossible hill into a real landscape feature.
How we built our rock garden — step by step landscaping ideas:
Step 1. Assessing the slope
Our slope was about 20 feet long and 10 feet wide (around 6×3 meters). The angle? Roughly 30° — and yep, that matters a lot when you’re planning. The steeper the slope, the more levels you’ll need to keep things natural-looking and stable.
Step 2. Marking out the levels
Just some string, garden stakes, and a bit of imagination. We mapped out horizontal terrace lines, spacing them every 3–4 feet (90–120 cm) in height. We ended up with three levels, with a drop of about 18–20 inches (45–50 cm) between them. Once those lines were in, you could already see the shape of the future garden.
Step 3. Building retaining walls and forming levels
Now comes the hard part. For each level:
- First, we dug out a “shelf” — a flat step into the slope. Basically, you bite into the hillside with a shovel and cut away the excess soil. That gives you a platform about 18–24 inches wide (45–60 cm) to plant on.
- Along the front edge of each shelf, we dug a shallow trench — about 4–6 inches deep (10–15 cm). We filled it with gravel for drainage, then started laying in rubble stones or retaining wall blocks.
- We built up the wall in rows, staggering the stones like bricks. That’s how you get strength and stability. Ours were about 3–4 rows high, with a total height of 18–20 inches (45–50 cm) per level.
- Behind each wall, we layered the fill like this:
3–4 inches (7–10 cm) of gravel
landscape fabric
rich soil (we mixed garden soil, compost, and sand in a 2:1:1 ratio)
Level by level, we worked our way up the slope, turning it into a solid, multi-level planting zone.
Don’t want to deal with stonework? You can use modular interlocking retaining wall blocks— way easier and still strong.
Step 4. Filling in and planting
Once all the terraces were up and the walls were solid, we got to my favorite part — bringing each level to life. We filled the “pockets” with that fertile mix and started picking the plants.
There’s one rule we followed: the higher the level, the drier it’ll be, because moisture runs downhill.
Here’s what we planted:
- Sedum (stonecrop) – drought-resistant and super pretty when it blooms
- Thymus serpyllum (creeping thyme) – smells like summer and it’s edible
- Lavandula (lavender) – smells like even more summer and keeps bugs away
We spread gravel between the plants to keep down weeds and make each plant stand out. A manual gravel spreader made things way easier.
Perks of a tiered rock garden:
- No lawn mowing! We swapped grass for decorative plants and gravel
- Erosion control. The soil stays in place — even during big rainstorms
- Looks amazing. It really does feel like a mini alpine garden in spring
- Low maintenance. Targeted watering, barely any weeds
This project turned into a kind of meditation. Lindy and I worked side by side — digging, hauling rocks, laughing, cursing the mosquitoes, and celebrating every little flower that popped up in the gravel. That slope that used to be such a pain? It’s now one of our absolute favorite spots in the yard.
And if you’ve got a piece of land that refuses to just “be flat,” trust me — it’s just waiting for you to give it shape. You don’t need to be a pro. We sure weren’t. But this is one of those cases where step by step, you can build something beautiful. Or at least something way more practical.
2. Pallet Lounge Deck for a Relaxing Sloped Backyard

Sometimes the solution is literally lying at your feet. Or in a warehouse. Or behind your neighbor’s shed.
And this is one of the fastest and cheapest backyard makeover ideas out there.
What is a pallet lounge deck?
It’s a simple platform made from wooden pallets, topped with boards—sometimes painted or stained. In our case, it was an 8×12 foot deck (about 2.5×3.5 meters) built right on a slope, leveled out with a basic frame. We added some pillows, a couple of pots with thyme and bay laurel, and ended up with a spot you just want to sink into any time of day.
How to build it:
- Checked the slope and cleared the area. On our 8×12 foot zone, we removed the grass and slightly carved into one side of the slope to level it out. The incline was minor, so we didn’t need any retaining walls.
- Gathered the pallets. We found four standard 48×40 inch pallets (122×102 cm). A couple were in great shape; others needed a little fixing and reinforcing.
Tip. Look for pallets marked “HT” (heat-treated), not “MB” (methyl bromide)—those are toxic. Here’s a great option if you want to order online North American Standard Pallets — Heat Treated, 48″x40″ - Built a support frame. To keep the deck from shifting downhill, we built a simple 2×4 wooden frame, attached it to long rebar stakes driven into the ground, and leveled it all out. One side was slightly raised, but the surface was totally level.
- Laid down the pallets. We placed the pallets on the frame, secured them with screws, and added our treated decking boards on top. Then sealed everything with outdoor wood oil.
- Added comfort. A couple of garage-sale chairs, throw pillows, and that handy little Fire Pit, 22″ Outdoor Portable.
Things to keep in mind:
- If the slope is steeper, you can raise the pallets on 4×4 posts and level them out.
- No frame? Use concrete blocks of different heights instead.
- Place landscape fabric or heavy-duty plastic under the pallets to block grass and moisture.
This is a space we built with our own hands—in just a weekend. All it took was some old pallets, a few boards, and a real urge to make at least one cozy spot on that slope.
3. DIY Retaining Wall to Maximize Usable Space

Almost every yard has at least one awkward corner where the ground slopes down—you can’t plant, can’t place furniture, can’t even walk comfortably. A lot of us deal with this: space is there, but it’s useless.
But nearly anyone can turn that tricky patch into a flat, usable space—good enough for a fire pit and a couple of chairs. And yes, you can do it yourself.
What’s a retaining wall?
It’s a basic structure that holds back soil and creates a flat area where there used to be a slope. The most affordable option is a wall made from concrete or stone blocks. Wood works too, but won’t last as long. We went with concrete—for strength and durability. How to do it?
Mark the area and set your wall height.
Start by eyeballing the slope and deciding where you want your new flat space. We built a 16-foot-long wall (4.8 m) to create a fire pit zone.
Our wall height was 2 feet (60 cm). If you go over 3 feet, you’ll need proper reinforcement and drainage.
Dig a trench.
Along the wall line, dig a trench about 6–8 inches deep (15–20 cm) and about 1.5× wider than your block.
We used standard 4×12×8 inch concrete blocks (10×30×20 cm), so our trench was around 18 inches wide (45 cm).
Level and compact the trench bottom—this is your foundation. Spend more time here and you’ll save it later.
Add gravel and tamp it down.
Pour a 3–4 inch (7–10 cm) layer of gravel or crushed stone into the trench and compact it well. This gives you proper drainage and stability.
Lay the first row of blocks.
The first row matters most. Set each block as level as possible, use a long level or string line to keep things straight.
If this row is off, the whole wall will be crooked.
You don’t need to leave gaps between the blocks. We used a mallet and rubber hammer to snug them tightly together.
Continue stacking rows.
For rows two and three, use a staggered brick pattern—this makes the wall much stronger.
You can also use landscape adhesive between rows, especially if kids play nearby or it rains often.
Tip. If your wall is over 2.5–3 feet high, add geogrid (soil reinforcement mesh) between rows and backfill farther out—this keeps the wall stable and upright.
Backfill with drainage rock.
Just behind the wall, lay down a 6–8 inch layer of gravel. Then lay landscape fabric on top, followed by soil.
This part is critical—if you just dump soil against the blocks, water will erode it, and the wall may fail in a year or two.
Backfill the area in layers.
Add soil in 6-inch (15 cm) layers, compacting after each one. That way, the ground won’t sink later when you place furniture or plant beds.
Top the wall (optional).
We added capstones (flat decorative stones) and planted a line of thyme with a strong root system—it drapes nicely and smells like summer.
What did we get in the end?
- A flat space that became our new hangout zone with a fire pit
- A slope that’s now useful, not a problem
- Solid soil retention, fewer weeds, and a vibe that just feels right
4. River Rock and Shrub Design for a Grass-Free Slope
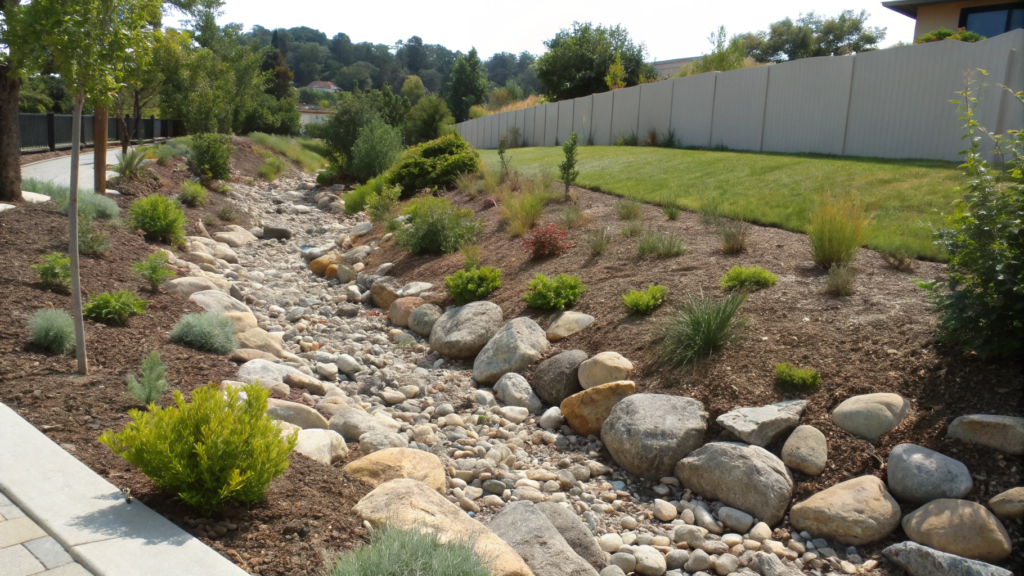
Some sloped areas just won’t hold grass—year after year. Too much sun, constant runoff, or just a pain to mow. The grass always ends up looking tired and patchy.
In spots like this, one of the best low-effort solutions is to turn the slope into a dry riverbed design: fill it with river rock, plant tough shrubs along the sides and in small “pockets,” and you’ve got a neat, low-maintenance landscape.
Why this works so well
- Rocks hold moisture and protect the soil from erosion
- Shrubs anchor the slope with their root systems
- No watering, no mowing, no patching
- The result looks intentional and clean, even on tricky ground
How to do it:
Mark out your “riverbed.”
Sketch a curving path down the slope, like a stream would naturally flow. Don’t use straight lines—keep it soft and organic. A width of 3–4 feet (90–120 cm) usually works well.
Clear the vegetation.
Remove grass, weeds, and debris from the marked area. Dig out about 2–3 inches (5–7 cm). The base doesn’t need to be perfect—rocks will settle into place.
Lay down landscape fabric.
Cover the whole stream area with geotextile fabric, pinned in place. This keeps weeds out and lets water soak through.
Add river rock.
Use 1.5–3 inch (4–7 cm) river rock—it won’t scatter and handles rain well. Pour on a 3–4 inch (7–10 cm) layer.
Rain Forest River Rock, 30-lb Bag, Grey Mix
Plant shrubs.
Cut “X” slits in the fabric where you want to plant. Move rocks aside, plant the shrub directly into the soil, then push the rocks back around it.
Great shrub options:
Spiraea japonica — fast-growing and easy
Juniperus horizontalis — evergreen ground cover
Potentilla fruticosa — blooms all summer
Artemisia ‘Powis Castle’ — beautiful silver foliage
For best effect, plant in loose groups of 3–5, not rigid rows.
Things worth adding
- Big rocks or boulders along the edges add visual weight
- Gaps between shrubs can be filled with mulch or low-growing groundcovers
- Solar path lights create a soft glow at night—especially beautiful reflecting off stone
You don’t need strict rules here. On a 10–12 ft wide slope (3–3.5 m) with a ~20° incline, a central “stream” about 3–4 ft wide looks balanced, with mulch or soil left on the sides.
If the slope is steep and crumbles easily, just cover the whole thing with rock and shrubs to keep it in place.
River rock and shrubs are the go-to for slopes where grass fails. It always looks neat—season after season—and almost takes care of itself.
5. Terraced Garden Beds Without Heavy Equipment

Terracing isn’t just for vineyards in the hills of Tuscany. Even on a modest garden slope—where regular garden beds keep sliding down after every rain—terraces can make life a lot easier.
They help you:
- Hold moisture and nutrients in the soil
- Create stable, flat planting zones
- Prevent erosion
- Visually “calm down” a chaotic-looking slope
And the best part? You can do it without machines, contractors, or months of digging.
How to build terraced beds by hand:
- Choose the layout. Plan your beds to run horizontally across the slope, not down it. This way, water stays where plants need it—in the root zone.
- Mark your first terrace. Lay out the line for your first bed. You can tie a string between stakes or just eyeball it with a level. A good bed width is around 3–4 feet (90–120 cm).
- Dig a level shelf. Use a shovel to carve into the slope—cut the front down, build up the back. You’re aiming for a shelf that’s roughly flat, even if it’s not perfect. Usually, you’ll cut 12–18 inches (30–45 cm) into the slope.
- Reinforce the front edge. To keep the soil in place, add wooden planks, bricks, stone, or logs along the front edge. Stake them in so they stay firm.
- Move uphill. Repeat the process above the first bed, leaving at least 12 inches (30 cm) of height between levels. That way, each terrace holds its shape without collapsing into the one below.
- Fill with soil, water, and mulch. Once all terraces are in, add compost or good soil, give them a deep soak, and top with mulch. Then—you’re ready to plant!
When this method is ideal:
- The slope isn’t steeper than 25–30°
- You’re growing veggies, herbs, or berries that need tending
- You want to skip pouring concrete or installing fancy geogrid walls
With this method, you’re not fighting the slope—you’re working with it. And instead of runoff and erosion, you get a hillside full of food.
6. Hillside Pathways That Look Professionally Built

A slope on your property is always a challenge. But once you add a proper path — everything changes. You can walk to your compost or greenhouse with ease, roll a wheelbarrow instead of hauling it, and the whole yard suddenly looks finished.
The key is: no crooked steps, no slippery clay, and no falling-apart edging in two months.
And yes — you can build this yourself. No concrete, no fancy equipment, no pavers.
How to build it:
- Plan your route. Avoid a straight line — gentle curves are easier to walk and push a wheelbarrow along.
Try to keep the slope under 10%, which means about 1 foot of rise per 10 feet of run. - Mark and clear the path. Remove all loose material: grass, roots, debris.
Minimum width is 2.5 feet (75 cm), and dig down about 4–6 inches (10–15 cm) for your base. - Add a gravel base. Pour in about 2 inches (5 cm) of gravel or crushed stone.
This helps water drain and keeps the path from sinking over time. - Install edging. Use wood planks (2×6 or 2×8), bricks, or natural stone for side support.
To keep it all in place, hammer in stakes every 3–4 feet along the edges. - Top with your surface layer. You can use decorative gravel, crushed stone, or even bricks or pavers laid on sand.
Final layer should be 2–3 inches (5–7 cm) thick. Pack it all down — even just using a board and your feet. - Add drainage. If your slope is steep, make a plan for runoff. Dig shallow side ditches or lay perforated pipe to stop heavy rain from washing out your work.
Optional: Add steps
If the slope demands it, place steps only where absolutely necessary. Each step should be at least 12 inches (30 cm) deep and about 6 inches (15 cm) high.
The easiest way is to use 2×6 boards as risers, anchored into the ground with rebar. Fill inside with gravel or sand for stability.
Pro tip. Don’t fight the slope — work with it. Instead of forcing everything to look like a flat garden, use the slope as a feature.
Break up the levels wisely, and choose plants that don’t demand your attention every week.
7. Flower-Filled Slope Ideas for Front Yards
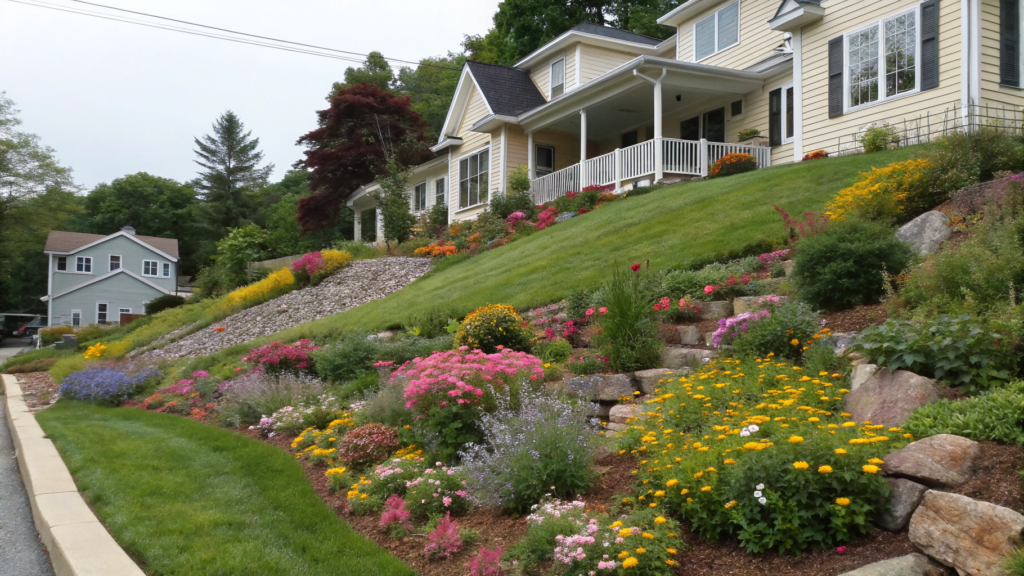
The front-facing slope near your house can be tricky. It’s always visible — to neighbors, passersby, and to you every single day.
But taking care of it is a pain: mowing grass is nearly impossible, water runs off before it can soak in, and weeds always win the race.
But when you plant the slope with the right flowers, it starts to work for you.
It adds curb appeal, attracts pollinators, softens the architecture, and gives your whole yard a finished feel.
How to make it work:
- Divide the slope into visual tiers or zones. You don’t need to flatten anything. Just mentally split it into upper, middle, and lower areas.
Each part has its own sunlight and moisture, and that helps you choose the right plants. - Add stepping stones or footpaths. You’ll need ways to reach your plants without trampling the slope.
Flat stones or zigzag paths are enough — and they also add rhythm and structure to the landscape. - Prepare the soil. Slopes need rich, moisture-holding soil.
Add compost, mulch, and a bit of sand for drainage.
If your soil is poor, build up little “flower pockets” where plants can thrive. - Choose flowers by microclimate zone. The top gets sun and dries out, while the bottom stays cooler and damper.
Here’s a simple breakdown:
- Top (drought-tolerant): Lavender (Lavandula), Purple coneflower (Echinacea purpurea), Meadow sage (Salvia nemorosa)
- Middle (balanced): Coreopsis, Catmint (Nepeta), Penstemon
- Bottom (moist shade): Astilbe, Coral bells (Heuchera), Hosta
- Plant in groups, not singles. Planting clusters of 3–5 makes the slope more visually cohesive and physically stable.
Grouped plants look lush and their root systems help prevent erosion. - Top it off with mulch or gravel. This cuts down on watering, helps retain moisture, and ties everything together visually.
Choose between bark chips, small gravel, or pine mulch — whatever matches your house best.
A flower-filled slope has real wow-factor. Even just three types of flowers, placed smartly, can turn a dead zone into a blooming, photo-worthy welcome mat.
After one or two seasons, it will no longer be a “zone where nothing grows,” but rather the entrance card to your plot.
8. Gravel-Filled Sloped Yard Makeover in One Weekend

Some parts of your yard just feel hopeless. The slope is there, but the grass refuses to grow.
All you get are weeds — not quite a jungle, but more like a sad no-man’s land between a dump and a dirt patch.
Then one day it hits you: What if I just covered the whole thing in gravel and moved on?
Not as a cop-out, but as a real fix — something that looks clean, cared-for, and demands nothing in return.
How to make it happen:
- Decide how much you want to cover. You don’t have to gravel the entire slope.
Sometimes just one bold patch — like a dry stream or a diagonal band — is enough to take it from “mess” to “intentional.” - Clear everything out. Pull weeds, scrape off the dirt, ditch the dying grass.
Just shaving off 2–3 inches of top layer (5–7 cm) makes room for the gravel to stay in place. - Don’t skip the geotextile. Seriously, it’s a must. Without it, your gravel will sink into the soil, weeds will come back, and the peaceful, low-maintenance vibe will be gone in a flash.
- Define the edges. Even with plain gravel, edging makes the look. Use stone, wood, plastic edging — doesn’t matter, as long as it creates a clear shape.
That’s what makes it feel planned, not like you just dumped rocks out of frustration. - Pour the gravel. Use a medium size (1/2″–3/4″) — it won’t turn dusty or shift underfoot.
Spread it at least 3 inches deep (7 cm). Less than that, and it’ll wash away. - Add one or two simple details. A single pot. A stone feature. Low lavender poking through a cut-out. A couple of large rocks at the edge.
No flowerbeds, no butterflies-on-sticks — just one calm element that says: this slope is under control now.
Pro tip. The less you try, the better it looks. With gravel, it’s not about designing the space — it’s about calming it down. Like laying a neutral rug over a loud floor.
Keep it light, breathe easy — and never water that slope again.
9. Low-Cost Slope Landscaping Without Contractors

Looking at your slope, it might feel like you need a bulldozer — or a guy named Dustin with a three-man crew — just to get it under control. But no.
You can absolutely tackle it without contractors or crazy money, as long as you’re smart about it and break it into steps.
This isn’t a “slope upgrade.” This is a strategic simplification.
How to create a low-cost slope, one step at a time:
Break the slope into zones.
Not with a ruler, but with logic: top, middle, bottom. Look at where the soil crumbles, where you can easily step in. You don’t need perfect terraces — just figure out where and how it makes sense to start. That already gives you a feeling of control.
Secure the soil before it runs off.
Use whatever you have: buried logs or planks, soil-filled bags, old bricks, even big rocks from your own yard. This isn’t about looks — it’s about keeping things in place.
Add living reinforcement.
The best slope stabilizers are plants with strong root systems: groundcovers, grasses, shrubs.Pick the kinds that hold onto soil like they mean it. Plant densely, no gaps.
Mulch everything that’s not planted.
Bare slope = future trouble. Use whatever you’ve got: straw, bark, clippings, even cardboard. The point is to keep moisture in and keep the soil from sliding down.
Work with what you already have.
Old boards? Make edging. Stones? Line a path.
Bricks? Use them for steps. This isn’t about design — it’s about function and intent.
And honestly? A slope built from leftover materials feels a lot more honest than one bought “turnkey.”
Take it one step at a time.
Don’t try to tame the whole slope in one weekend.
Start with the most annoying area. Once that’s under control, you’ll already feel like the slope is yours. The rest can wait — do it as you have time and energy.
Now that you’ve got a grip on the slope, it’s your call. You can leave it as is — a wild but stable terrain — or keep going: add terraces, edging, walkways, or raised beds.
You’ve built the base. Everything else is optional, depending on your mood, time, and energy.
DIY landscaping isn’t about cutting corners. It’s about control, clarity, and freedom.
Your slope doesn’t need to be a fashion show — it just needs to work for your yard.
No crumbling, no chaos, and definitely no three-hour Saturday maintenance routines.
10. Multi-Level Garden Zones for Challenging Hills

When you’re dealing with a steep or bumpy slope, the first thought is: “Well, this is useless — I’ll just sit here and watch everything slide downhill.”
But here’s the truth: a multi-level garden on a slope isn’t a problem — it’s an opportunity.
You can use the natural shape of the hill to build a layered, structured, and surprisingly functional space — and it doesn’t need to cost a fortune.
How to build a tiered garden without construction crews:
- Start by shaping out a few levels. No retaining walls, no heavy tools. Just pick two or three natural lines across the slope where you can level out small ledges. Dig a little here, build up there, pack it down with your boots — and suddenly, you’ve got space for a pot or a shrub.
- Give each level a clear purpose. The bottom tier could be home to moisture-loving plants. The middle might become your decorative layer with blooms and bushes. And the top — a lookout point with a bench or a chair. This layout doesn’t just look good — it makes sense.
- Let ground materials do half the design. If one tier has gravel, another has bark, and the top level has pavers — each section starts to feel distinct. Even with minimal planting, those textures instantly create a sense of order and intention.
- Connect the levels the right way. Pathways between tiers work better when they’re off to the side or diagonally cut in — not down the center. A centered path eats up space and breaks the design. A side trail with a gentle curve or zigzag feels more natural — and gives you full use of each level.
- Tackle one section at a time. Don’t feel pressured to redo the whole slope in a weekend. Start with just one ledge. Or even just one little pocket — maybe plant a shrub, lay down mulch. Next week, add a pathway. Later, move on to another layer. Slopes don’t demand urgency — they demand rhythm.
11. Timber Step Design That Works on Any Hill

Honestly, timber steps landscaping ideas are one of the cheapest, quickest, and most reliable ways to work with a slope. Especially if it’s steep and you don’t want to rent equipment or spend thousands on concrete. All you need is a bit of patience, gravel, treated wood, and a pair of strong arms (yours will do just fine!).
There are places where you just can’t walk after it rains. That’s when timber steps save the day. I won’t say it’s super easy… but the result? Oh yeah.
What you’ll need for these landscaping ideas steps
- Treated lumber beams, ideally 6×6 inches (about 15×15 cm). The best option is pressure-treated wood. Super important — this stuff won’t rot even when buried.
- Landscape spikes or rebar to anchor each timber (2–3 per step works well).
- Gravel or crushed stone — to fill the steps and provide drainage.
- Landscape fabric — to go under the gravel and block weeds.
- Liquid wood preservative — a must for all cuts and joints. Even if the wood’s treated, the ends are vulnerable!
- Waterproofing sealant (optional) — if your slope stays wet, this helps extend the life of the wood.
- Grip tape or anti-slip treads, especially if someone in your household walks barefoot (looking at you, Lindy!).
- Shovel, level, gloves, sledgehammer… and a bit of stubbornness
How to put Ii all together
Don’t stress — it sounds like a construction site, but it’s really pretty simple. Picture wooden “shelves” dug into the slope, holding back the gravel or soil behind them. That’s it — that’s your step.
- Start from the top. Find the spot where the stairs will begin. Mark the stair line — you can use stakes and string.
- Mark each step. Depth should be around 12 inches (30 cm), height about 6 inches (15 cm). That’s the comfortable standard for climbing.
- Dig in your first timber. Sink it slightly into the slope so it doesn’t just sit on top — it needs to be anchored. Drive rebar through the beam at the edges and center.
- Don’t skip the protection! Apply liquid wood preservative to every exposed end. That’s where rot starts. If the slope is wet or shaded, seal the wood with waterproofing too.
- Fill the step. Dump in the gravel between the timber and slope. Pack it down. Want a cleaner look? Add flat stones on top for stability.
- Repeat going down the slope. Always re-check your depth and height to keep things even. Use a level! Or do what we do — put a coffee mug down. If it doesn’t spill, it’s good enough.
What Not to Forget. Final anchoring is non-negotiable. Without solid rebar or spikes, the wood will eventually move — especially if, like here, the chickens race up and down the stairs like it’s a runway.
What about paint?
Short answer — don’t. Outside, paint peels fast. Better to use a wood oil or stain — it won’t crack, it lets the wood breathe, and it weathers beautifully over time. Way better than flaking paint.
Also — don’t try to finish in one day. This isn’t a sprint. I’d rather spread it over two days and feel human than rush it and end up sore and cursing everything.
Why this design works:
- Simple. You can build it solo, seriously.
- Affordable. One 8-foot timber (2.4 m) costs about $15–20.
- Reliable. If it’s well-anchored, this kind of stair will last 10–15 years.
- Natural-looking. Timber blends in with any outdoor space and doesn’t stick out visually.
One Last Tip. If your slope gets a lot of rain, dig tiny drainage channels off to the side, or make sure the gravel sits on landscape fabric — this keeps your steps from shifting or sinking over time.
12. Budget-Friendly Flagstone Staircase DIY
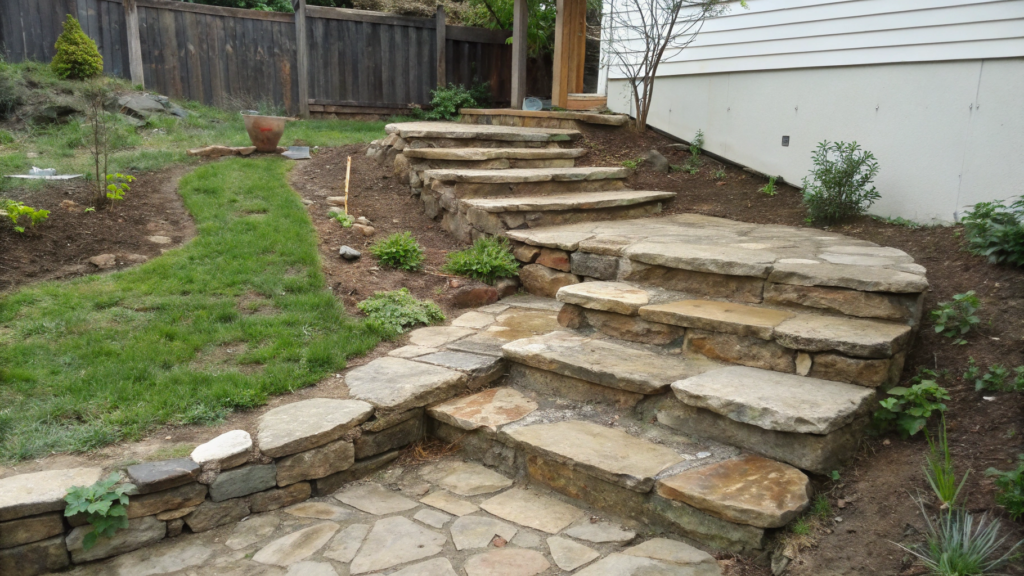
It might seem like a flagstone staircase belongs only in designer gardens that cost a few paychecks… but the truth is, you can totally DIY it without blowing your budget. Especially if you go with local or reclaimed stone.
Here’s what you’ll need:
- Flagstone — thin flat stones about 1.5–2 inches thick (≈3.8–5 cm). Sandstone, slate, or limestone work best. Each stone usually weighs around 30–50 lbs (13–22 kg), so grab a wheelbarrow.
- Gravel or crushed stone — to create the base and fill in steps.
- Sand or stone dust — for leveling the spot under each slab.
- Landscape fabric — to block out weeds from underneath.
- Hammer, level, pickaxe, and patience. Especially patience.
How to build these stairs:
- Plan your path. Flagstone stairs look best when they don’t follow a straight line. A gentle curve down the slope always feels more natural. Sketch the layout and estimate how many steps you’ll need — each one should rise about 6–7 inches (15–18 cm).
- Prep each step. Dig out a shallow trench just slightly deeper than the stone’s thickness. Add a layer of gravel, then sand. Tamp it down and check the level.
- Place the flagstone. Set the slab on the prepared spot. Tap it into place.
If it wobbles — add more sand.
If it won’t settle — take it out and shape it a bit (a masonry chisel with a hand guard works great for this — keeps your hands safe and your lines clean). - Fill the gaps. Between stones, you can use fine gravel or sand, or even soil with creeping thyme or moss. It’s especially magical on a shady, north-facing slope.
Important. Each stone should sit flat and stable. If it rocks even slightly, gravity will remind you of its power… probably at the worst possible moment.
Pro tip. If flagstone is too expensive, try looking for cutoffs from a local stone yard or reclaimed material from dismantled walkways. One of our friends picked up leftovers from a neighbor’s remodel and built a full 12-foot staircase almost for free.
A project like this isn’t “fast,” but that’s part of the magic. This is the kind of task where you work quietly, listening to the gravel crunch under your shovel, and slowly watching your slope turn into a path. A path worth walking barefoot.
13. How to Build Rock Border Stairs for Your Landscaping Ideas Slope
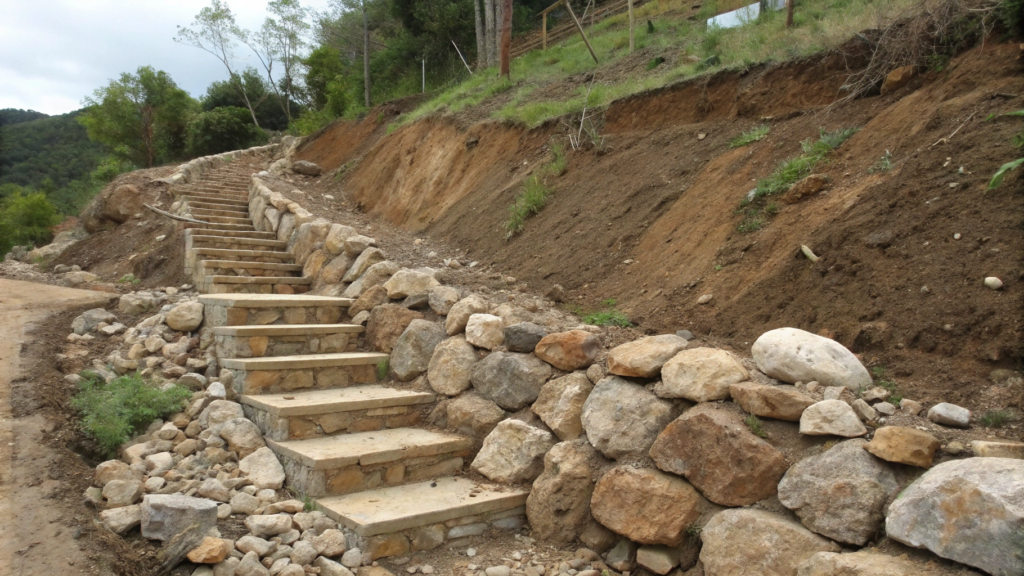
If you’ve got a slope and at least a couple free evenings — you’ve already got what it takes to build a rock border staircase. And no, we’re not talking about fancy catalog boulders. We mean the landscaping ideas kind of stairs built from whatever solid stuff you can find around: rocks, rubble, old cement chunks — it all works.
Especially if your slope tends to crumble or small landslides form after rain — rocks are great at holding the soil in place and stabilizing the area.
What you’ll need:
- Big rocks for the side borders — at least the size of a melon. Bigger, like a watermelon, is even better. You can collect them from your yard, the woods, or along gravel roads (only where it’s allowed, of course).
- Fine gravel or crushed stone — to fill in gaps between the rocks and steps.
- Shovel, pickaxe, level, and crowbar — just in case you run into extra-stubborn spots on the slope.
- Wheelbarrow. Without it, your back will file for divorce
- And definitely landscape fabric — trust me, in a year, those gaps between the rocks will be full of nettles and burrs. Fabric is cheap and saves tons of effort.
Without it, your whole staircase might be taken over by weeds after one season — especially in shady or damp areas.
How to build it Landscaping Ideas:
- Mark your path. The staircase can go straight down or zigzag — depends on the terrain.
Each step is basically a little shelf cut into the slope, held in place by two rocks (one on each side). - Start from the top. Dig out the first step — make a small platform about 6–8 inches deep (15–20 cm).
Flatten the sides and place one rock on the left, one on the right. That’s your “border.” - Fill the center with gravel and tamp it down. If you have a flat stone, place it on top as a tread.
- Work your way down the slope. Each new step should be slightly set into the slope — not just resting on top.
Always check the level. The rocks should sink slightly into the soil, not wobble around. - Fill gaps with gravel or soil. And if you want your staircase to “grow into” the landscape — sprinkle in a bit of creeping thyme or moss seeds between the rocks.
Some hard-learned tips:
- Angular rocks are easier to secure than perfectly round ones.
- Don’t use clay or plain dirt as filler — it’ll just wash out with rain.
- This may look like “rough” work, but the result is gorgeous, especially after a year or two when soft greenery takes over the edges.
This is one of those builds that ends up looking like it’s always been part of your landscaping ideas. And it’s a perfect weekend project — no budget needed, no experience required, but it gives you that deep-down feeling that you’re actually taming your slope — not just slapping a temporary fix on it.
14. Concrete Block Steps for Steep Backyard Access
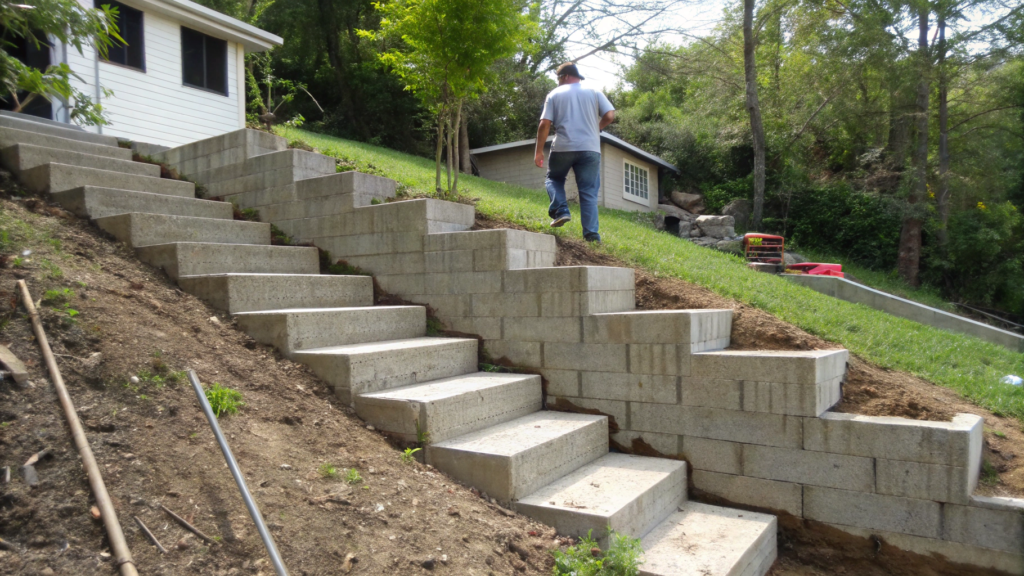
If you’ve got a steep slope in your yard, concrete blocks are a total lifesaver. They’re solid, stable, and long-lasting — and you can build steps with them without cement or contractors.
It’s a cheap and totally practical way to make your slope safer and easier to use.
What you’ll need for this Landscaping Ideas:
- Concrete blocks (CMU blocks) — standard size, 16×8×8 inches (≈40×20×20 cm). You can use hollow or solid ones.
- Gravel or crushed stone — for the base and drainage.
- Sand or dry concrete mix — to level and secure the steps.
- Landscape fabric, level, shovel, sledgehammer — the usual tools.
Each block weighs around 30–35 lbs (13–16 kg) and costs about $1.50 to $3. For a 10-step staircase, you’ll need around 10–20 blocks depending on the width and depth of your stairs.
How to build these Landscaping Ideas:
- Prep the base. Dig out a little trench for each step — around 6–8 inches deep. Lay down landscape fabric, pour in gravel, and tamp it down well. This is the foundation.
- Lay the block. One block = one step. Place it horizontally, right against the edge of the dirt shelf you just made.
Check the level after every block — they need to sit flat and stable. - Fill the gaps. If you’re using hollow blocks, you can fill them with gravel — or even plant thyme or moss in them. Moisture will drain, and the surface won’t be slippery.
- Repeat down the slope. Each time, dig in a little further and place the next block on a fresh gravel bed.
This kind of staircase not only gives you stability going up and down, but it actually helps hold the slope together — so the soil doesn’t slide away.
That’s a big deal if you’re using the path to your garden beds or backyard shed every day.
They sit flush with the ground, they don’t wiggle, and they’re easy to move later. If a few years down the road you want to rebuild it — just pull the blocks out and use them elsewhere.
A little upgrade. To keep things grippy in the rain, you can stick on some anti-slip tape — it’s cheap, lasts a long time, and totally works.
If you follow the steps, you’ll have stairs you can walk, haul a wheelbarrow on, and even line with flower pots — and most importantly, they’ll hold up to whatever your backyard throws at them.
15. Rain-Resistant Cheap Landscape Stair Ideas

If your garden slope is already tricky, then one that turns into a stream after every rain is basically a waterfall.
And no kind of steps will help if you just dump some gravel and say, “well, that should hold.”
Because guess what — you’ll be picking up that gravel all over your yard.
With your hands. In the rain. Been there, done that.
Here are the principles we stick to:
- Water should never stop. The stairs shouldn’t block it — they should guide it away.
- Breathable, non-slip, concrete-free surface.
- Each step acts like a bowl with drainage.
- And all of it — without a big budget.
That’s why the best kind of stairs for rainy areas is a combo of gravel and wood (or stone).
What you’ll need:
- Pressure-treated 4×6 or 6×6 timber (≈10×15 cm or 15×15 cm) — this forms the “front wall” of each step.
- Gravel, 0.5–1.5″ (1.2–4 cm) — for filling the steps.
- Landscape fabric — a must-have. Without it, your step turns into a mud pie.
- Rebar or stakes — to hold the wood in place.
- Flat stones (optional) — you can lay these on top of the gravel to create a non-slip surface.
How to build stairs that won’t wash away
- Mark your steps starting from the top. Go with 12 inches deep and 6–7 inches high (30×15–18 cm).
- Dig in the timber or stone across the slope. This becomes the front edge of the step. Secure it with stakes or partially bury it.
- Lay landscape fabric across the whole step surface. This matters. Without it, you’ll have a mud pit in a month.
- Add the gravel. A mix of fine and medium gravel works best — it drains well and won’t feel slippery.
- If the slope is extra soggy — make a side trench. Just dig a drainage ditch alongside the stairs and fill it with gravel.
That’ll redirect water and keep it from cutting through your steps.
Personal tips for this Landscaping Ideas:
- Don’t fight the water — help it flow. A staircase with moving water lasts way longer than one where it just sits and pools.
- If the top layer starts to wash away — just add more gravel. One $5–7 bag and you’re back in business.
- Plant thyme or saxifrage along the edges. They help hold the soil, and they look lovely — even in the rain.
This kind of staircase is worry-free. And it lasts for years.
You don’t wake up after every storm wondering if it washed out again — because it’s already under control.
And best of all — you’re not leaping from rock to rock like a mountain goat. You’re just walking to your garden. Even in the rain. With coffee. And with pride.
16. Stone Stair Path with Secret Garden Vibes
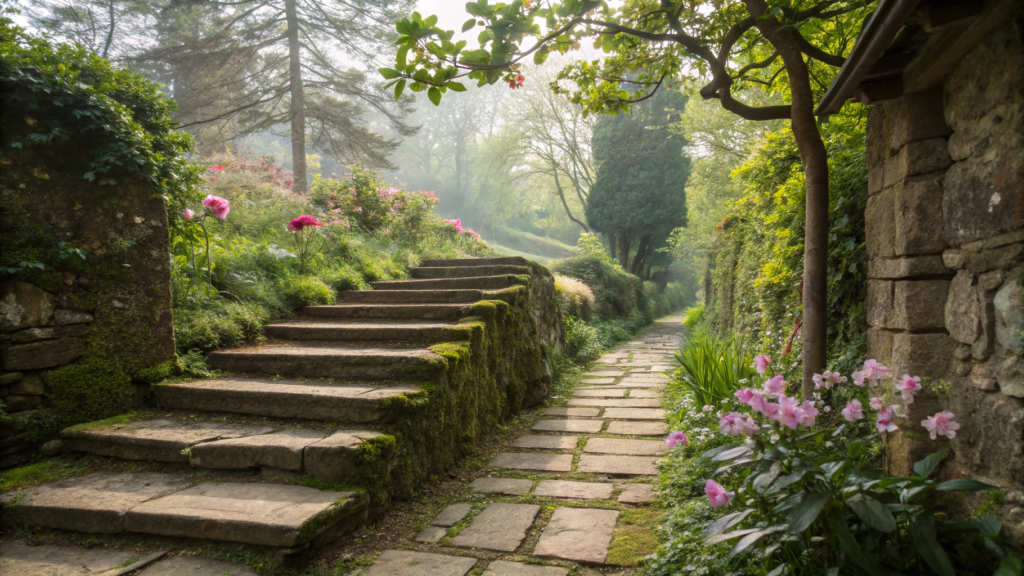
If you lay down stone steps between the greenery, let them get a bit mossy, and plant something blooming along the edges — you’re not just building stairs, you’re creating a little path into your own secret garden.
And this project is totally doable on your own — no contractors, no poured concrete, no thousands spent on landscaping idea.
What works best for this kind of path:
- Flat natural stone — slate, limestone, sandstone. Aim for about 1.5–2 inches thick (4–5 cm).
It doesn’t have to be perfect — the imperfections give it charm. - Gravel and crushed stone — to form the base under each slab.
- Sand or stone dust — for filling and leveling.
- Landscape fabric — to keep weeds from growing under the steps.
- And optionally — groundcover seeds or seedlings: moss, thyme, sedum.
How to build this kind of staircase:
- Plan the route. Ideally, don’t go in a straight line. Add a little curve, a gentle turn — and suddenly your steps feel like they lead somewhere more magical than just the compost pile.
- Dig each step like a “bowl.” Go about 3–4 inches deeper than the stone’s thickness. The bottom should be flat and compacted. First the landscape fabric, then gravel, then sand.
- Lay the stone. You don’t need perfect alignment. Small gaps add to the natural look. If the stone rocks or wobbles — add a bit of sand under it.
- Let the gaps breathe. Fill in the joints with sand or soil, then sprinkle in moss or low-growing thyme seeds.
Give it a couple of months, and it’ll all start filling in and coming alive.
Tip. If you want real “secret garden” vibes — don’t make the steps too wide or clean. Let them blend into the greenery a bit. And on the edges, plant astilbe, heuchera, ferns, or salvia — they frame the stone beautifully, especially in partial shade.
Kraft Tool 3″ Masonry Chisel with Hand Guard — a great pick for trimming stone. No vibration, easy grip, and you can even shape pretty thick slabs if needed.
Why this is a low-budget but high-impact landscaping idea:
- Natural stone is cheap or free. You can find it on-site or buy it by weight for $0.15–$0.30 per pound.
- No concrete, no cement, no week-long digging. Just gravel, sand, and a bit of patience.
- And most importantly — this kind of stairway only gets better with age.
Like an old tree: sturdy at first, then full of character a few years later.
17. With Built-In Flower Edges on a Budget
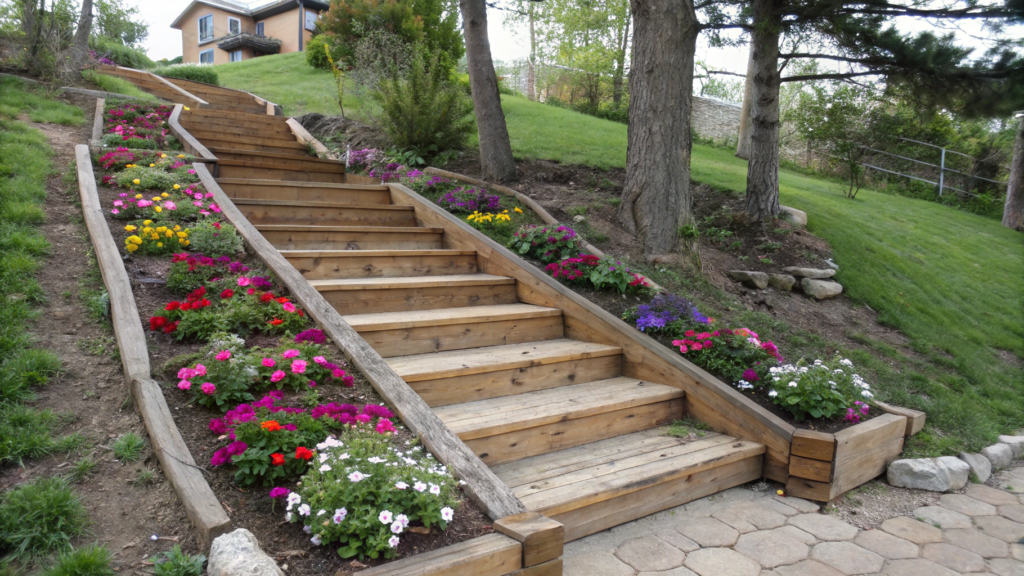
Sometimes a garden staircase becomes one of the most beautiful parts of the whole yard.
And no — you don’t need marble borders or fancy designer shapes. All it takes is a bit of wood, a handful of soil, and a simple landscaping idea: what if the steps themselves could be alive?
A staircase with flower edges turns an ordinary slope into a blooming path. And it doesn’t look like a “staircase with flowerbeds” — it looks like the plants just decided to grow alongside your way.
You can build all of this without spending a fortune, using easy and affordable materials.
What you’ll need for this Landscaping Ideas:
- Boards or lumber for forming the steps — 2×8 or 2×10 (≈5×20–25 cm) will work great. Treated, but no need to splurge on fancy types.
- Rebar or metal stakes — for anchoring.
- Gravel or crushed rock — for the base layer of each step.
- Rich soil — to fill the edge “flower pockets.”
- Seeds or seedlings of compact plants: lobelia, sedum, alyssum, mint, sage, thyme, portulaca — anything that thrives in limited space and sun or partial shade.
Each step gets a small “pocket” along the edge — either on one side or both. These pockets are just narrow beds about 6–8 inches wide (15–20 cm), separated from the step by another board.
You fill them with soil and plant flowers or low groundcovers. Other than that — it’s just a regular staircase.
How to build landscaping idea flower-edged steps:
- Start with the basic build. Dig in your first board, secure it with stakes, and fill the step with gravel. Just like building a typical wooden step.
- Add the edge pocket. Before installing the next board, leave a small gap on one or both sides — you can nail in an extra angled board to hold the soil in place.
- Fill the pocket with fertile soil. Compost mixed with sand works great — light, drains well, and doesn’t get soggy. Don’t pack it too tight.
- Plant what you’ll love to see daily. Go for low, lush, aromatic plants that bring joy without demanding attention. Thyme, portulaca, nasturtium, alyssum — all perfect fits.
Why this works:
- The staircase becomes part of the garden — not just “infrastructure.”
- Flower pockets hold the slope together and stop erosion.
- It’s cheap — some boards, a bit of gravel and dirt, and one packet of seeds.
- And the result? Just stunning and totally authentic.
Scotts Premium Topsoil (25 qt) — a great soil blend for planting in edging beds and containers. Works perfectly for flower stairs: light, well-draining, doesn’t go sour, and holds shape during rain.
Pro Landscaping Ideas tips :
- In shade — try violas or ferns.
- In sun — go with herbs, sedum, lavender.
- Don’t be afraid to mix edible and decorative — we had thyme and strawberries along the same steps and it looked amazing.
- Keep it simple. One side of the steps is enough to create the right effect.
If you want firmer footing — for walking barefoot, for kids, or rolling a wheelbarrow — just lay flat stones, pavers, or old concrete slabs on top of the gravel.
No need to press them in hard — just make sure they’re flat and don’t rock.
This layer doesn’t replace drainage, but it makes the stairs sturdier and cleaner-looking.
18. Sloped Garden Steps Using Gravel and Wood

Honestly? If I had to pick just one method for building steps on a slope, it’d be this one: gravel and wood. This combo is like fresh bread with butter — simple, reliable, and works for almost any landscape. Especially if you want something clean-looking, budget-friendly, and doable without heavy equipment.
Gravel steps held in place by wooden “frames” won’t rot in the first season, don’t wash away with the rain, and don’t need cement or contractors.
Best part? You can build it yourself in a weekend. A few boards, some gravel bags — and your slope turns from a headache into a smooth walk.
This style shows up a lot in natural or “wild” gardens, where stairs don’t shout for attention but melt into the slope.They gently suggest a path instead of screaming “this way.”
Minimal structure, maximum vibe.
What you’ll need for this Pro Landscaping Ideas tips:
- Boards or timbers — 2×8, 2×10, or 4×4 (≈5×20–25 cm or 10×10 cm). Make sure they’re treated or rot-resistant (cedar, larch, etc.).
- Rebar or metal stakes — 2–3 per step to hold the boards in place.
- Medium gravel (¾″ / 1.5–2 cm) — to fill the steps and help with drainage.
- Landscape fabric — laid under the gravel so your steps don’t sink.
- Sand or stone dust — to level the base under the gravel.
- Level, shovel, gloves, mallet — the usual suspects.
Each step is basically a little shelf cut into the slope, held in place by a board and filled with gravel.
The board holds the fill material, and the gravel gives you a walkable, draining surface.
Step-by-step build this landscaping ideas:
- Mark out your staircase. Figure out the rise and run. Ideal dimensions: 12 inches deep (30 cm), 6–7 inches high (15–18 cm).
- Start from the top. Dig in your first board across the slope. Sink it 2–3 inches into the ground and secure it with stakes or rebar on each side.
- Lay landscape fabric behind the board. This will run the full length of the step. It prevents weeds and keeps gravel from sinking.
- Add your base layers. First a 1–2 inch layer of sand — tamp it down. Then add gravel. Distribute evenly and you can even overfill a little — it’ll settle.
- Repeat down the slope. Each new board becomes the front edge of the next step. Keep it even and check level often.
Important note:
Yes, these are gravel steps, not solid like concrete. But when compacted right, they’re stable and non-slip.
If you want a firmer surface (for walking barefoot or for kids), you can add flat stones or pavers on top of the gravel — just press them in gently.
They don’t replace the drainage layer, they just make the surface firmer and cleaner.
Pro Landscaping Ideas tips:
- Don’t skimp on the landscape fabric. Without it, you’ll end up with a grassy stairway in a year.
- For rainy areas, dig a drainage trench on one side — fill it with gravel and rain won’t wash out your steps.
- To blend the stairs into your yard, plant thyme, lavender, or sedum along the edges. They’ll trail and soften the edges beautifully.
Details that make it feel like a real garden path:
- Don’t make it too straight. Even a slight curve gives it a “grown-in” look.
- Surround the steps with mulch, small shrubs, or drought-tolerant grasses.
It balances out the hard lines of the wood. - For low-maintenance borders, pick plants that take care of themselves: catmint, dianthus, lemon balm, thyme.
- You can even vary the width slightly between steps — it makes the staircase feel alive and “unplanned” in the best way.
This type of staircase is perfect if you want to do it well and for the long run — but without turning your garden into a construction zone.
It looks natural, works in any weather, and finally lets you stop slipping down the slope and start walking it — calmly, daily, without the drama.
19. Hillside Steps from Recycled Materials

Building a staircase from recycled materials is one of the warmest, most honest ways to shape a slope.First of all — it’s almost free.Second — you’re saving old stuff from the landfill.
And third — every step tells a story.
A board from an old porch, bricks salvaged from a torn-down greenhouse, leftover laminate from the living room — everything gets a second life.
What you can use for this Landscaping Ideas:
- Old bricks, concrete blocks, rocks
- Wood pallets or scrap lumber
- Old pavers, roof tiles, broken ceramic slabs
- Chopped-up railroad ties (only if they’re not soaked in creosote)
- Metal bed frames, corner brackets, rebar
All of this can be mixed and matched. Boards can act as edge restraints, bricks as treads, and blocks as supports.
What you’ll need:
- Reclaimed materials — whatever you have on hand
- Gravel or crushed stone — at least a bit to level the base
- Landscape fabric — especially helpful if you’re using loose fill
- Shovel, level, mallet
- (Optional) — sand for bedding, cement mortar to lock in bricks or tiles
How to do this Landscaping Ideas:
- Walk the slope. Look for a natural line where walking feels easiest. It doesn’t have to be straight. Often, it’s better if the stairs “flow” with the hill.
- Mark your steps. A comfortable step size: 11–13″ deep and 6–7″ high (28–33 cm × 15–18 cm).
- Start at the top. Build your first step using what you’ve got — say, two bricks on the sides and an old board as the riser.
Underneath: some gravel or sand for leveling. - Tamp it down well. Even with reused materials, your steps should feel solid. Use a level to keep things even.
- Keep going downhill. Use whatever materials you’ve got. Don’t worry about mixing — a step made of boards, the next one with stones, then one with tile…
It doesn’t look like “junk,” it looks like part of a living garden.
Pro tip. Sometimes these kinds of staircases look cooler than the new ones.
Just try to keep everything within one color range or style.
If you want a cohesive look, keep the same width and repeat elements — for example, a brick in every second step.
Why this works:
- You’re spending next to nothing.
- You’re reducing construction waste.
- You’re creating a staircase that feels like part of a seasoned, thoughtful garden — not a concrete project.
- And honestly… these kinds of steps just have more soul than perfect store-bought pavers. Because they have a story.
This is the kind of staircase that always makes guests smile. “Hey, where are those bricks from?”
“Oh, those? That’s from the old oven my grandpa had in his basement.”
That’s the whole story. But it carries heart.
20. How to Make Stacked Rock Stairs Look High-End

Hand-stacked stone steps often look… well, a little messy.
Especially if the rocks are all different sizes, sticking out at weird angles, and there’s a happy little dandelion popping up in between.
But here’s the cool part: those same “wildly stacked” stones can actually be arranged in a way that looks like a designer staircase from an architectural magazine.
Yes — without cement, without laser leveling, and without hiring a pro crew.
You just need to understand a couple tricks — and you’ll turn your plain slope stairs into something people can’t stop looking at.
What a “high-end” stacked stone staircase looks like:
- Steps are clean-lined, but not too perfect
- Rocks sit solidly, creating a neat front edge
- There’s greenery or tight seams between them
- Nothing random around — just clean, intentional beauty
What you’ll need:
- Flat natural stones, 2–4″ thick (≈5–10 cm), up to 30 lbs (≈13 kg). Ideally, each one has at least one flat side — that’s your tread surface. Slate, sandstone, basalt, or local fieldstone all work great.
- Stone dust, sand, gravel — for base fill and leveling
- Landscape fabric — goes under everything to keep the stones from sinking
- Tiny wedge stones — to stabilize the big ones
- Shrubs, ornamental grasses, or moss — optional, to ground the whole thing into the landscape
How to do this Landscaping Ideas:
- Mark your path. Take your time. The stairs don’t need to be straight.
A gentle curve always makes it feel more expensive — trust me. - Prep the base. Each step is like a mini terrace. Dig a pocket for the first layer of stone, lay landscape fabric, pour in gravel, tamp it down.
- Start stacking. Your first row: the largest, flattest rocks — they form the front of your step.
Try to keep their top surface as level as you can. - Add fill rocks. Use smaller stones for the second layer. In the center of each step, pour in stone dust or fine gravel. It keeps the step tidy and smooth to walk on.
- Use wedges. If a stone wobbles, wedge it. Better to spend 2 minutes now than chase rolling zucchinis later.
- Repeat. Every new step: dig, base, stone, fill. The whole secret is rhythm.
Details that add polish:
- Stones should follow a clean line. Even if they’re all different, align the front edge — that’s what makes it look intentional.
- Keep it tidy. No random sticks, grass, or junk between steps. Either it’s cleaned up or it’s deliberately planted.
- Plant edges. Add ferns, hostas, or lavender depending on your climate — it softens the whole composition.
- And one more tip: fewer, wider steps always look better than a goat trail of tiny ones.
Scale matters.
Tool tip. Bon Tool 21-298 4-Pound Stone Mason’s Hammer. The perfect hammer for shaping stone, adjusting edges, and setting wedges. Heavy but precise — forget the sledgehammers and broken stones.
This kind of staircase looks like it grew out of the landscape — not something you slapped on top of it. Like the rocks were always there, and you just found the right order.
That’s the magic of a well-made garden path. It feels accidental — but it’s totally intentional. You did that. And you did it with taste.
Your Personal Path
Some of the things in this list might seem complicated, others — ridiculously simple. But that’s the point: there’s no one right way to tame a slope.
Some people lay stone, others build steps from old wood. One makes everything straight and clean, another adds a curve on purpose so it looks like it’s always been there.
And that’s how you get spaces you want to stay in. Where the climb becomes a path, not an obstacle.
If something here spoke to you — say so in the comments. And if you’ve already tamed your own slope — tell us how you did it. Can’t ever have too many of those stories.


