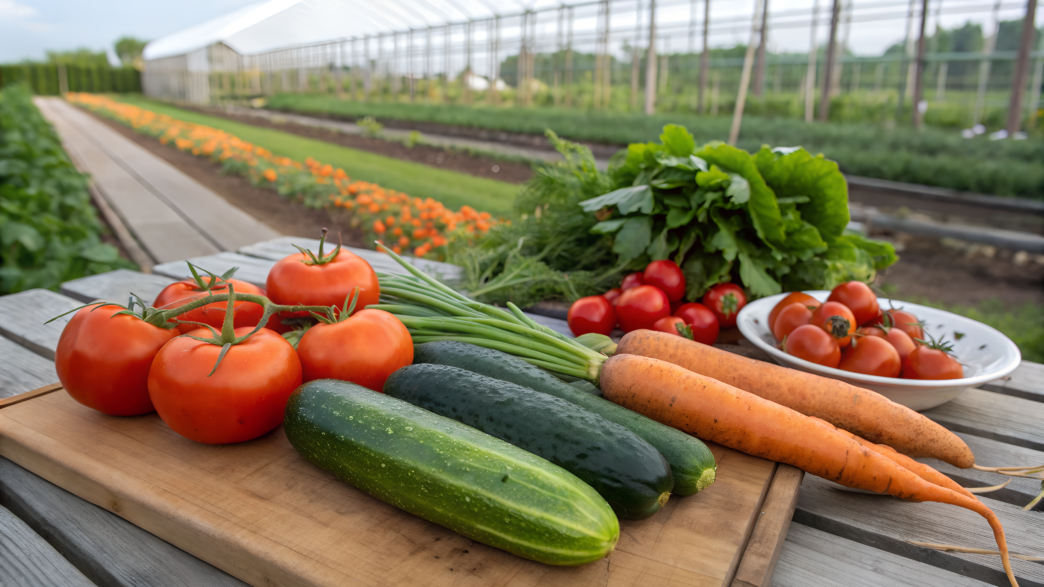
As soon as cucumbers, zucchini, tomatoes, greens, beans, and radishes start piling up in the kitchen, the question “what to do with fresh garden produce” comes up right away. In the middle of the season, there are a lot of vegetables, and you want to have simple recipes on hand that do not require long prep.
I tried to collect simple ideas for fresh garden vegetables: no canning, no complicated equipment, and no long list of steps. The kind you can make after work, after watering the garden beds, or between other important things. I hope this helps beginners not feel lost and use fresh produce as much as possible.
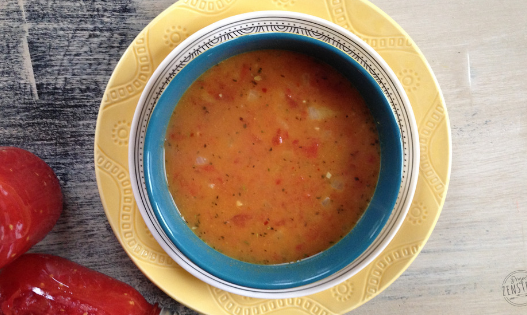
1. Tomato Pan Sauce With Basil and a Pat of Butter
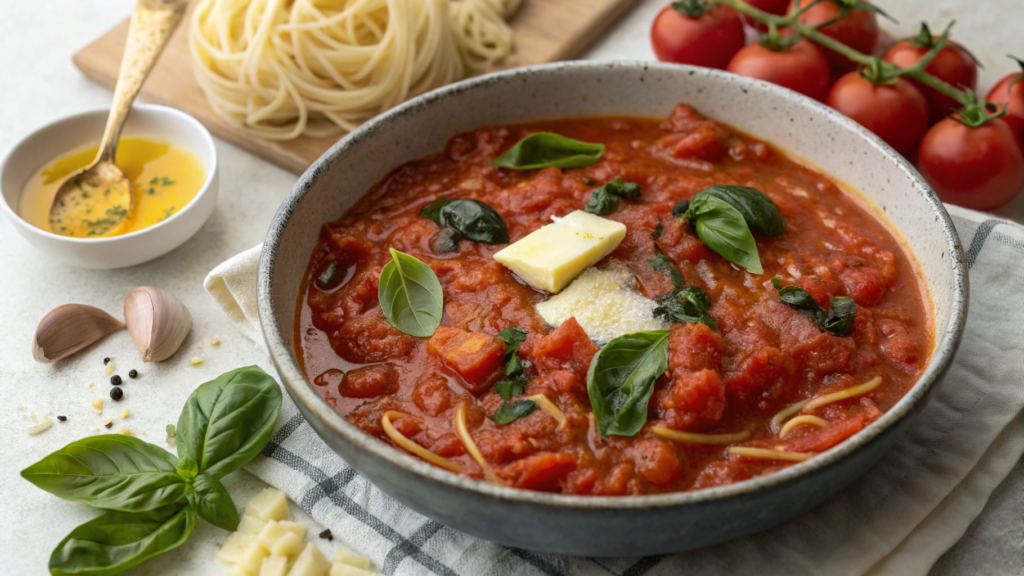
For this recipe, you need ripe tomatoes, garlic, basil, a little olive oil, and a pat of butter at the end. The sauce turns out thick, bright, and you can serve it with different dishes.
From my own experience, I’ve learned that a ripe harvest does not wait until you feel like cooking something. The tomatoes are ripe — be kind and use them.
What You’ll Need
For 3–4 servings:
- 2 lb fresh ripe tomatoes (about 900 g), cut into large pieces. Soft, slightly cracked, imperfect tomatoes work really well here.
- 2 tablespoons olive oil (about 30 ml).
- 3 garlic cloves, thinly sliced or finely chopped.
- 1/2 teaspoon salt (about 3 g), and you can add more later.
- 1/4 teaspoon black pepper (about 1 g).
- 1/4 teaspoon red pepper flakes, optional.
- 1 teaspoon sugar, only if the tomatoes are too acidic.
- 2 tablespoons butter (about 28 g).
- 1/2 cup fresh basil (about 10–15 g).
- 1/4 cup grated Parmesan (about 25 g), optional.
- 8 oz dry pasta (about 225 g), if you want to make dinner right away.
For this kind of sauce, a wide, heavy skillet is handy. Extra juice evaporates faster in it, and the sauce does not turn watery. I have been using Lodge 10.25 Inch Cast Iron Pre-Seasoned Skillet for a long time.
How to Make Tomato Pan Sauce
- Prepare the tomatoes.
Wash the tomatoes, cut out the rough core, and chop them into large pieces. I do not remove the skins for this sauce. They will soften, and in a homemade sauce, that is fine.
If you want a more even sauce texture, grate the tomatoes on a coarse grater. The pulp will go into the bowl, and the skin will stay in your hand. - Warm the oil with the garlic.
Put the skillet over medium heat. Add the olive oil and garlic. Cook for 30–45 seconds, until the garlic starts to smell bright. Do not let it turn brown, or it will taste bitter.
If you are using red pepper flakes, add them now. - Add the tomatoes.
Put the tomatoes into the skillet. Add salt and black pepper. Stir and cook uncovered for 15–20 minutes over medium heat, stirring from time to time.
At first, there will be a lot of juice. After a few minutes, the extra liquid will cook off, and the sauce will get thicker. - Mash the tomatoes.
When the pieces become soft, crush them with a spoon, spatula, or potato masher. I like to leave some small pieces in the sauce. That way, it feels less like jarred sauce. - Check the taste.
Taste the sauce. If the tomatoes are too acidic, add 1 teaspoon sugar. You can add a pinch of salt too. Very often, that is exactly what is missing. - Add the butter and basil.
Turn the heat down to low. Add the butter and stir. It makes the taste softer and helps take away the sharpness of acidic tomatoes.
Take the skillet off the heat and add the basil. Do not boil it for long: it darkens quickly and loses its aroma.
Serving
I like mixing the sauce with pasta. I boil 8 oz pasta (about 225 g), move it into the skillet, add 2–4 tablespoons pasta water (30–60 ml), and stir. You can add Parmesan, basil, and black pepper on top.
This sauce also goes well on toast with an egg, with rice, polenta, beans, fried zucchini, chicken, or fish. If you make a double batch, you can keep the leftovers in the fridge for 3–4 days or freeze them in small portions of 1 cup (about 240 ml).
There is nothing complicated about making this sauce. Take the ripest tomatoes, cook without a lid, do not add the basil too early, and taste as you cook. This way, you can successfully use your whole garden harvest and enjoy the results of your work.
2. Cucumber Sesame Salad Inspired by Tokyo Izakayas
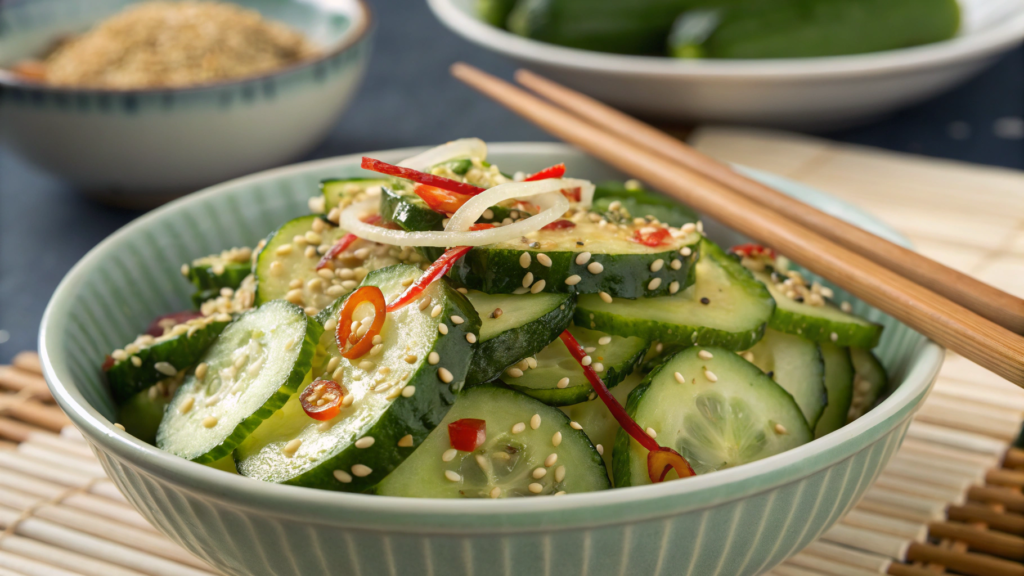
Cucumber sesame salad is crunchy, a little salty, lightly tangy, with sesame seeds and a splash of toasted sesame oil. This recipe uses fresh cucumbers without the stove, oven, or long prep.
What You’ll Need
For 3–4 servings:
- 1 1/2 lb fresh cucumbers (about 680 g), preferably small or medium, with thin skin.
- 1 teaspoon salt (about 6 g), so the cucumbers release extra juice.
- 2 tablespoons rice vinegar (about 30 ml).
- 1 tablespoon soy sauce (about 15 ml).
- 1 tablespoon toasted sesame oil (about 15 ml).
- 1 teaspoon sugar or honey, optional.
- 1 tablespoon sesame seeds (about 9 g), preferably lightly toasted.
- 1 green onion, thinly sliced.
- 1/4 teaspoon red pepper flakes, optional.
How to Make Cucumber Sesame Salad
- Slice the cucumbers.
Wash the cucumbers and slice them into thin rounds or half-moons. If the skin is tough, you can peel it in strips, but you do not need to peel them completely. - Salt and leave for 10 minutes.
Move the cucumbers to a bowl, add the salt, and mix with your hands or a spoon. Leave for 10 minutes. During this time, the cucumbers will release juice. - Drain the extra juice.
After 10 minutes, gently squeeze the cucumbers with your hands or just drain the liquid from the bowl. Do not press them too hard, because we still want crunch!
If they are too salty, quickly rinse them with cold water and pat dry with a towel. - Mix the dressing.
In a small separate bowl, combine the rice vinegar, soy sauce, sesame oil, and sugar or honey, if using. Stir until dissolved. If your cucumbers are naturally sweet, you can skip it. - Dress the salad.
Pour the dressing over the cucumbers. Add the sesame seeds, green onion, and red pepper flakes. Mix.
It is better to lightly toast the sesame seeds in a dry skillet for 2–3 minutes, until they start to smell stronger. - Let the salad sit for a bit.
Leave the salad for 5–10 minutes before serving. The cucumbers will have time to soak up the dressing but will stay crunchy.
You can keep it longer, but after a few hours, they will get softer. That is fine, it will just be a different salad.
Small tip. If the cucumbers are large and have a lot of seeds inside, cut them lengthwise and scoop out the soft center with a spoon. This way, the salad will release less liquid and keep a nice crunch longer.
Serving
I like serving this salad with rice, a fried egg, chicken, fish, noodles, or veggie bowls. It is a kind of quick side dish, especially when the main dish is already ready and you want to add something crunchy to dinner.
Leftovers can be moved to a container and stored in the fridge. During the first couple of hours, the cucumbers will be crunchy, and by the next day, they will get softer, but the dressing flavor will be more noticeable.
I love this recipe for its simplicity: quickly sliced, salted, mixed with dressing, and served. No canning, no kitchen heroics. Just fresh produce that got eaten in time.
3. Zucchini Lemon Pasta With Parmesan in One Pot
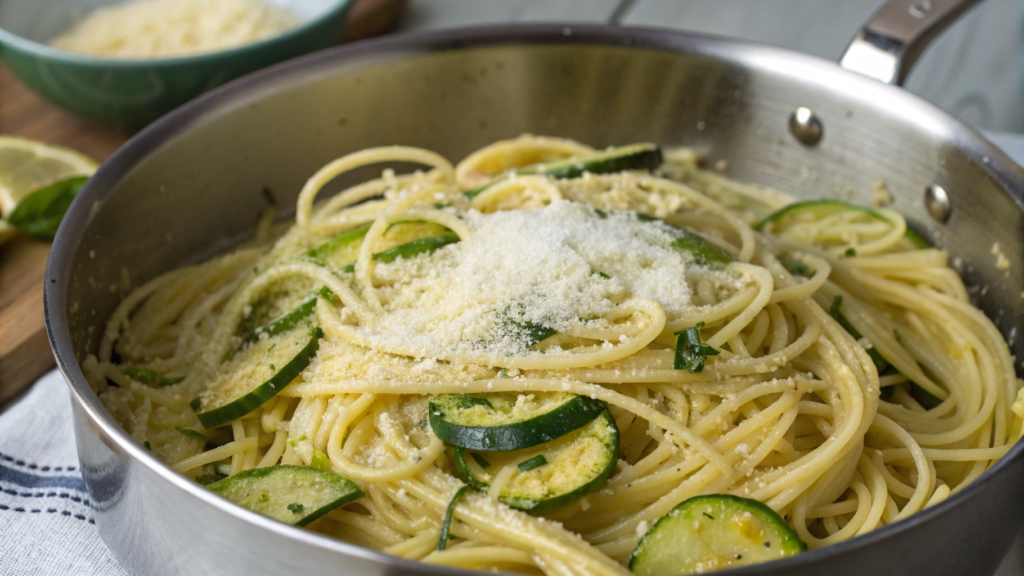
Zucchini lemon pasta with parmesan cooks in one pot, and in the end, we get a quick dinner without a heavy sauce and without a mountain of dishes. The zucchini gets soft, the lemon adds a fresh taste, and the Parmesan helps make the sauce thicker.
Recipes like this really help Lindy and me when there is literally a pile of zucchini in different sizes from the garden.
What You’ll Need
For 3–4 servings:
- 8 oz dry pasta (about 225 g), preferably a short shape or spaghetti.
- 1 lb zucchini (about 450 g), sliced into thin half-moons or grated on a coarse grater.
- 3 cups water or vegetable broth (about 720 ml).
- 2 tablespoons olive oil (about 30 ml).
- 2 garlic cloves, finely chopped.
- 1 teaspoon lemon zest.
- 2 tablespoons lemon juice (about 30 ml), and you can add more later.
- 2 tablespoons butter (about 28 g).
- 1/2 cup grated Parmesan (about 50 g).
- 1/2 teaspoon salt (about 3 g), then adjust.
- 1/4 teaspoon black pepper (about 1 g).
- 2 tablespoons fresh parsley or basil, optional.
How to Make Zucchini Lemon Pasta
- Slice the zucchini.
If the zucchini are small, slice them into thin half-moons. If the zucchini is large, it is better to grate it on a coarse grater. That way, it will cook faster and mix better with the pasta.
Large zucchini often have a soft, watery center. You can scoop it out with a spoon, especially if the seeds are already large. - Put the base into the pot.
Add the pasta, zucchini, garlic, olive oil, salt, pepper, and water or broth to a wide pot. Stir so the pasta does not stick together at the very beginning.
Do not add all the lemon and Parmesan right away. They are needed at the end, when the pasta is almost ready. - Cook uncovered.
Put the pot over medium or slightly above medium heat. Bring to a boil and cook uncovered, stirring often.
This usually takes 10–12 minutes, but it is better to go by the pasta. It should become soft, but not overcooked. If the liquid cooks off too fast, add another 1/4 cup water. - Make the sauce right in the pot.
When the pasta is ready and there is a little starchy liquid left on the bottom, turn down the heat. Add the butter, lemon zest, lemon juice, and Parmesan.
Stir for 1–2 minutes. The Parmesan will mix with the pasta liquid, and you will get a light sauce. If it is too thick, add a little more hot water. If it is too thin, keep the pot on low heat for one more minute. - Taste and adjust.
Taste the pasta. Add salt, pepper, or a little more lemon juice, if you want. Add lemon gradually. One lemon can taste mild, another can be very sharp. I usually start with 2 tablespoons, then decide by taste. - Add the herbs.
Take the pot off the heat and add the parsley or basil. Stir and serve right away.
If you still have a little Parmesan, you can grate more on top.
Small Tip. Do not overcook the zucchini. If it is sliced thin, it does not need much time. Cooking it too long makes it soft and watery. For a better texture, you can add part of the zucchini right away and a small part during the last 3–4 minutes.
Serving
You can add a fried egg, chicken, white beans, shrimp, or pieces of baked fish on top of the pasta. For vegetable lovers, you can serve it with a simple cucumber or tomato salad.
Leftovers can be moved to a container and kept in the fridge for 2–3 days. When reheating, add 1–2 tablespoons water (15–30 ml), so the pasta gets softer again and does not stick together.
You have already noticed that there is no need to fry anything here, take out a baking dish, or come up with a separate sauce. Everything cooks in one pot, and the taste is fresh, creamy, and not heavy. You can make this pasta after work, after watering the garden beds, or at the moment when you simply notice two more zucchini on the table and decide not to leave them until tomorrow.
4. Green Bean Char With Garlic and Chili Crisp
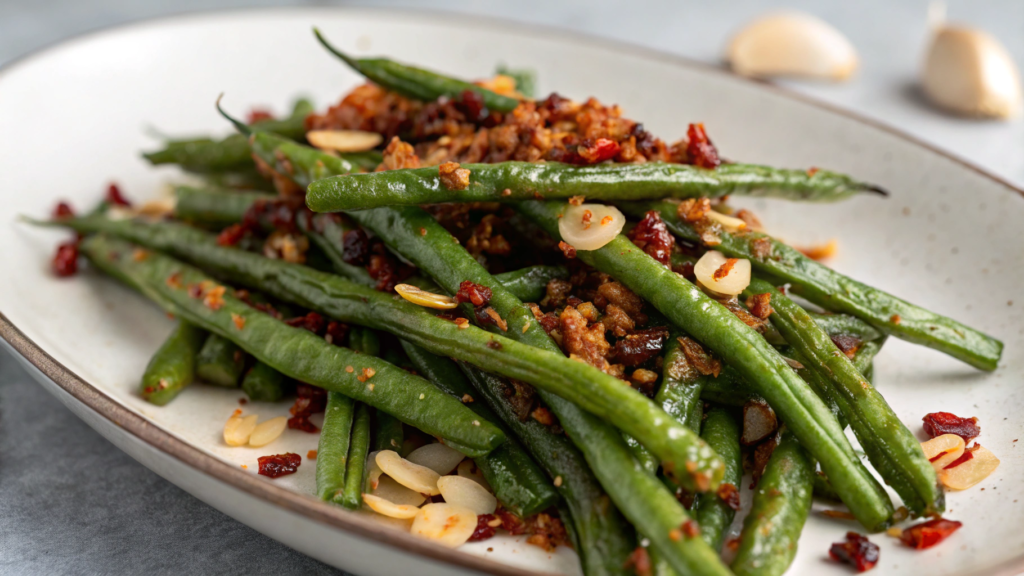
In this dish, green beans stay the main ingredient, but they do not feel like a regular boiled side dish. The pods quickly char in a hot skillet, the garlic adds aroma, and the chili crisp brings heat, texture, and the taste of fried spices.
I value this recipe for its speed. The beans do not need to be stewed for a long time, boiled until soft, or hidden under a heavy sauce. They stay a little crunchy, with charred edges. It is a real lifesaver recipe when you do not have the energy to make a complicated dish.
What You’ll Need
For 3–4 servings:
- 1 lb fresh green beans (about 450 g), ends trimmed.
- 1 tablespoon olive oil (about 15 ml).
- 2 garlic cloves, finely chopped.
- 1 tablespoon chili crisp (about 15 g), and you can add more later.
- 1/2 teaspoon salt (about 3 g).
- 1/4 teaspoon black pepper (about 1 g).
- 1 teaspoon soy sauce (about 5 ml), optional.
- 1 teaspoon lemon juice or rice vinegar, at the end.
- 1 tablespoon sesame seeds (about 9 g), optional.
How to Make Green Beans With Garlic and Chili Crisp
- Prepare the beans.
Rinse the beans and trim the tough ends. If the pods are very long, cut them in half. This makes them easier to eat, and they will cook faster.
It is better to dry the beans well with a towel. If they are wet, the skillet will start hissing, and the beans will steam more than char. We need charred edges, not a watery texture. - Heat the skillet.
Put the skillet over medium-high or high heat. Add the olive oil and let it heat well. - Char the beans.
Add the beans in a single layer. If the skillet is small, it is better to cook them in two batches. Cook for 6–8 minutes, stirring from time to time.
Some pods should turn bright green, and some should get dark spots. You do not need to make every piece the same color. In this recipe, a little unevenness is exactly what gives flavor. - Add the garlic.
Turn the heat down to medium. Add the garlic, salt, and black pepper. Stir and cook for another 30–60 seconds.
Add the garlic closer to the end because it burns quickly over high heat. And burnt garlic will simply ruin the skillet of beans. - Add the chili crisp.
Take the skillet off the heat or turn the heat down to low. Add the chili crisp and soy sauce, if using. Stir so the oil coats the beans.
Start with 1 tablespoon. If you are cooking for family, it is better to add less at first and then put the jar on the table. - Add acid and sesame seeds.
Add lemon juice or rice vinegar. At the end, you can sprinkle the beans with sesame seeds. It will be better if you lightly toast the sesame seeds in a dry skillet for a couple of minutes.
Small Tip. If the beans are not very young anymore and seem a bit tough, quickly boil them for 2 minutes in boiling water, then move them to cold water and dry them. After that, char them according to the recipe. This way, the pods will be softer inside, but they will still be able to char on the outside.
Leftovers can be moved to a container and kept in the fridge for up to 3 days. When reheating, I would suggest using a skillet instead of the microwave: this way, the beans soften less and keep a better texture.
When you have a lot of green beans, this recipe helps you use them quickly. Trim the ends, heat the skillet well, add garlic and a little chili crisp — and in just a few minutes, you have a very tasty vegetable side dish on the table. Enjoy!
5. Sheet Pan Peppers and Onions for Quick Fajita Bowls
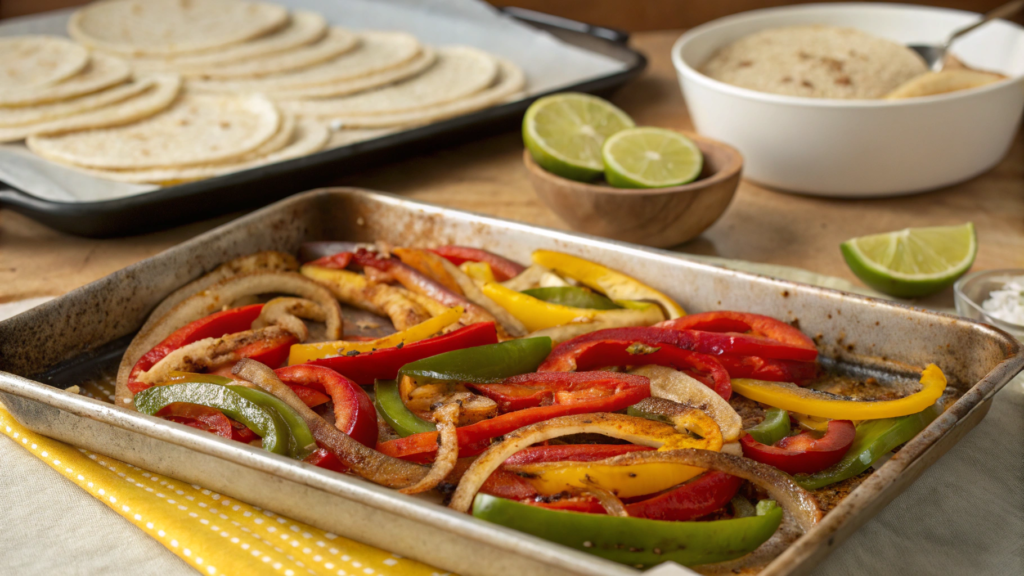
Sheet pan peppers and onions are a vegetable base for dinners for several days. Slice them, mix with oil and spices, send them to the oven — and in 20–25 minutes, you already have hot vegetables for rice, beans, tortillas, eggs, or chicken.
We often make this at the end of summer, when several sweet peppers ripen at once, and the onion has been asking to go into some kind of dish for a while.
What You’ll Need
For 4 servings:
- 3 large sweet peppers (about 1 1/2 lb / about 680 g), sliced into strips. You can use red, yellow, orange, or green.
- 1 large onion (about 10 oz / 280 g), sliced into thin half-moons.
- 2 tablespoons olive oil (about 30 ml).
- 1 teaspoon ground cumin.
- 1 teaspoon smoked paprika.
- 1/2 teaspoon garlic powder.
- 1/2 teaspoon salt (about 3 g), and you can add more later.
- 1/4 teaspoon black pepper.
- 1 tablespoon lime juice (about 15 ml), added after roasting.
- 2 tablespoons fresh cilantro, optional.
- 2 cups cooked rice (about 370 g), if you are making bowls.
- 1 can black beans (15 oz / about 425 g), rinsed and drained.
- 1 avocado, sliced, optional.
For recipes like this, I have a large, sturdy sheet pan so the vegetables do not sit too close together. (Nordic Ware Natural Aluminum Commercial Baker’s Half Sheet)
How to Make Sheet Pan Peppers and Onions
- Preheat the oven.
Turn the oven to 425°F (about 220°C). In a preheated oven, the vegetables get browned edges faster and do not have time to become too soft.
If you have a convection setting, you can use it and lower the temperature to 400°F (about 205°C). But the regular setting works too. - Slice the vegetables.
Cut the peppers into strips and the onion into thin half-moons. Try to make the pieces about the same thickness so they cook at the same time.
I do not cut the peppers too thin. Thin strips dry out quickly, especially around the edges. It is better to leave them a little wider — this helps them stay juicy. - Mix with oil and spices.
Move the peppers and onions to the sheet pan. Add the olive oil, cumin, smoked paprika, garlic powder, salt, and pepper. Mix with your hands or a spatula so the spices coat the vegetables evenly. - Spread the vegetables in one layer.
Spread the peppers and onions across the sheet pan. If there are a lot of vegetables, it is better to use two sheet pans. When the pieces sit too close together, they give off a lot of steam and become soft without browned edges.
And we need those slightly dark edges, because they give the right flavor. - Roast until soft with browned edges.
Put the sheet pan in the oven for 20–25 minutes. About halfway through cooking, stir the vegetables with a spatula.
Go by the peppers: they should become soft, but not fall apart. The onion may darken in some places — that is fine, as long as it does not burn. - Add lime.
Take the sheet pan out of the oven and immediately drizzle the vegetables with lime juice. Stir.
It is better to add the lime at the end. After the oven, the vegetables taste sweet and spiced, and a little acid makes the flavor brighter.
Small Tip. If you want the flavor to be closer to fajitas, add 1/2 teaspoon dried oregano and a pinch of ground chili to the spices. Just do not overdo the heat, especially if you will add salsa or hot sauce to the plate later.
Serving
For a quick fajita bowl, put rice, black beans, roasted peppers with onions, avocado, and a little cilantro into a bowl. Salsa, Greek yogurt instead of sour cream, or pieces of chicken would also be good on top if you want a more filling dinner.
These vegetables also work well for tortillas, omelets, tacos, quesadillas, or a simple leftovers lunch. The next day, you can reheat them in a skillet, add an egg or beans — and the taste will be like freshly cooked food.
When you have a lot of peppers and not much time, sheet pan cooking helps avoid extra kitchen hassle: you do not need to fry the vegetables in batches, stand by the stove, and stir something constantly. Slice, mix with spices, send to the oven — and you get a base for several quick dinners at once.
6. Carrot Ginger Soup With a Silky Blender Finish

I think every gardener knows the situation when more carrots have piled up than you need for regular cooking. Especially if some of the roots are not that pretty anymore. But for carrot ginger soup, they are exactly what you need. Here, carrots cook with onion, garlic, ginger, and broth, then get blended until soft and smooth. You end up with a warm soup with a little heat.
What You’ll Need
For 4 servings:
- 1 1/2 lb carrots (about 680 g), peeled and sliced into rounds.
- 1 medium yellow onion, chopped.
- 2 garlic cloves, chopped.
- 1 tablespoon fresh ginger (about 8–10 g), grated.
- 2 tablespoons olive oil (about 30 ml).
- 4 cups vegetable or chicken broth (about 960 ml).
- 1/2 teaspoon salt (about 3 g), and you can add more later.
- 1/4 teaspoon black pepper.
- 1 tablespoon lemon juice (about 15 ml), at the end.
- 1/2 cup coconut milk or cream (about 120 ml), optional.
- 2 tablespoons pumpkin seeds or croutons for serving, optional.
For this soup, you can use a blender or an immersion blender.
How to Make Carrot Ginger Soup
- Slice the vegetables.
Slice the carrots into rounds of about the same thickness. You can chop the onion roughly because the soup will be blended later anyway.
If the carrots are homegrown and thin, you do not always need to peel them. Scrubbing them well with a brush is enough. But if the skin is rough or there are damaged spots, it is better to remove a thin layer. - Cook the onion.
Put the pot over medium heat. Add the olive oil and onion. Cook for 5–6 minutes, until the onion becomes soft.
You do not need to brown it deeply. We want the onion’s sweet taste, not dark browning. That can overpower the carrot and ginger flavor. - Add the garlic and ginger.
Add the garlic and fresh ginger. Stir and cook for 30–60 seconds, until a bright aroma appears.
Ginger opens up quickly in hot oil, so do not let it sit there too long. - Add the carrots and broth.
Move the carrots into the pot. Add the broth, salt, and black pepper. Bring to a boil, then lower the heat.
Simmer for 18–22 minutes, until the carrots are soft. Check with a fork: the piece should pierce easily. If the carrots are still firm, give them a few more minutes. - Blend the soup.
Take the pot off the heat. Blend the soup with an immersion blender until smooth.
If you are using a regular blender, blend the soup in batches and do not fill the jar to the top. Hot soup likes to rise up, and the lid can play a bad joke. - Add lemon juice.
Add the lemon juice. For a softer taste, pour in the coconut milk or cream and stir.
Taste the soup. If it tastes too sweet, add a little more lemon juice. If it needs more depth, add a pinch of salt. Carrots are naturally sweet, so acid and salt matter here.
Small Tip. If you like a thicker soup, start with 3 1/2 cups broth (about 840 ml), not 4 cups. After blending, you can always add a little more liquid. But making a too-thin soup thicker is harder.
Serving
Serve the soup hot, with pumpkin seeds, croutons, herbs, or a spoonful of yogurt on top. Toast with butter, cheese, or an egg goes well with it. If you are very hungry, you can add a salad, a piece of roasted chicken, or beans.
When reheating, the soup may get thicker, so add a little water or broth and stir. You can freeze it too, preferably in 1–2 cup portions, so you can quickly reheat the amount you need.
7. Beet Citrus Salad With Feta and Toasted Nuts
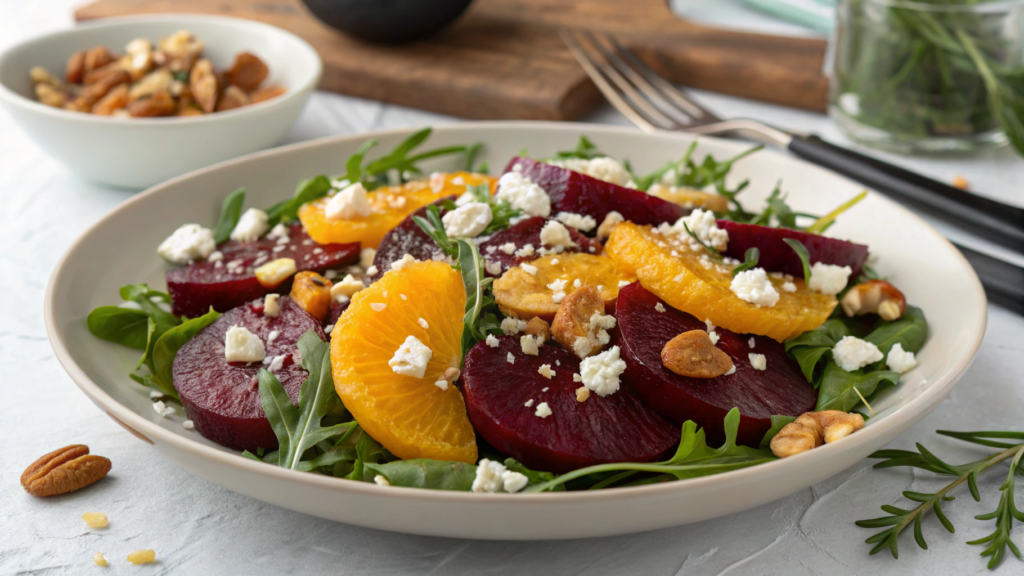
It often happens in my kitchen that the beets are already boiled or roasted, but I do not want to make the same salad with them again. So, in this beet citrus salad, the flavors are a little different and unusual for me: beets are paired with orange or grapefruit, feta, greens, and toasted nuts.
What You’ll Need
For 3–4 servings:
- 1 lb beets (about 450 g), roasted or boiled ahead of time.
- 2 oranges or 1 large grapefruit, peeled and cut into segments.
- 1/3 cup feta (about 45 g), crumbled.
- 1/4 cup walnuts, pecans, or almonds (about 30 g), toasted.
- 2 cups arugula or tender salad greens (about 60 g), optional.
- 2 tablespoons olive oil (about 30 ml).
- 1 tablespoon orange juice (about 15 ml).
- 1 tablespoon lemon juice or red wine vinegar (about 15 ml).
- 1 teaspoon honey or maple syrup, optional.
- 1/2 teaspoon salt (about 3 g), and you can add more later.
- 1/4 teaspoon black pepper.
- 1 tablespoon finely chopped mint or parsley, optional.
How to Make Beet Citrus Salad
- Cook the beets ahead of time.
You can boil or roast the beets. To roast them, wrap the roots in foil, place them on a sheet pan, and cook at 400°F (about 205°C) for about 45–60 minutes, until a knife goes easily into the center.
The time depends on the size. Small beets will cook faster, and larger ones will need more time. I usually roast several at once because they are easy to add later to salads, bowls, or just eat with salt and oil. - Peel and slice the beets.
When the beets cool slightly, remove the skins. You can do this with your hands or with a paper towel. Cut the beets into wedges, cubes, or thin slices. For a salad, medium-sized pieces are easier because they do not fall apart as much when mixed. - Prepare the citrus.
Cut the peel off the oranges or grapefruit so you remove the white bitter part too. Then slice the flesh into rounds or cut out the segments between the membranes.
If juice runs onto the cutting board, do not throw it away. Add some of it to the dressing. - Toast the nuts.
Add the nuts to a dry skillet and warm them for 3–5 minutes over medium heat, stirring often. As soon as the smell gets stronger, take them off the heat.
Raw nuts taste weaker in this salad. - Mix the dressing.
In a small bowl, combine the olive oil, orange juice, lemon juice or vinegar, honey, salt, and black pepper. Mix with a fork.
The dressing should be sweet and tangy. If the beets are very sweet, you can skip the honey. If the citrus is sour, keep the honey — it helps bring the flavor together. - Put everything on the plate.
Add the greens, beets, and citrus to a plate or bowl. Drizzle with the dressing. Add the feta, toasted nuts, and a little fresh herb on top.
Small Tip. Before putting the salad together, mix the sliced beets with half of the dressing and leave them for 10–15 minutes. This gives them time to take in the citrus juice, salt, and oil, so the flavor does not feel so separate. Add the greens, feta, and nuts at the end so they do not get stained or lose their texture.
How to Serve
This salad goes well with roasted fish, chicken, eggs, lentils, or a simple toast with cheese. If you want to make it more filling, add 1 cup cooked quinoa or a little white beans. Then it can become a light lunch, not just a side dish.
Beets store well, so you can roast the roots ahead of time and then quickly make the salad when you need a bright vegetable side. The citrus adds freshness, and the feta gives a salty taste. And the beets are no longer sitting in the fridge “for later” — they actually get used.
8. Radish Butter Toast French Bistro Style

I love radishes because they are one of the first things to show up in the garden. They are bright and juicy, and they crunch in your mouth. But they will not sit for weeks like carrots or beets. You need to eat them quickly. So you slice the radishes, spread butter on the bread, add salt — and you already have something close to a real meal.
What You’ll Need
For 2–3 servings:
- 4 slices good bread, preferably baguette, sourdough bread, or country bread.
- 4 tablespoons butter (about 56 g), softened.
- 6–8 fresh radishes, thinly sliced.
- 1/4 teaspoon flaky salt or regular salt, to taste.
- 1 tablespoon fresh chives, dill, or parsley, finely chopped.
- 1 teaspoon lemon juice, optional.
- 1/4 teaspoon black pepper, optional.
How to Make Radish Butter Toast
- Prepare the butter.
Take the butter out ahead of time so it gets soft. It should spread easily, but not melt into a puddle.
If you want the flavor a little brighter, mix the butter with a few drops of lemon juice and a pinch of salt. Just do not add too much liquid: the butter can split. - Slice the radishes.
Wash the radishes, trim the tails, and slice them into thin rounds. The thinner the slices, the nicer the texture on the toast.
If the radishes are very sharp, put the sliced rounds in cold water for 5–10 minutes, then dry them well. The flavor will get softer, but the crunch will stay. - Toast the bread.
Toast the bread slices in a toaster, in a dry skillet, or in the oven. The bread should become crunchy on the outside, but not turn into a cracker.
For these toasts, it is better to use bread with a dense crumb. Bread that is too soft will quickly get damp from the butter and radishes. - Spread the butter.
Spread a generous layer of butter on the warm bread. Not a transparent hint, but a real layer. In this recipe, butter is not decoration. It is an important part of the flavor.
The butter softens the sharpness of the radishes and helps the salt open up better on the toast. - Add the radishes.
Arrange the radish slices over the butter in one or two layers. You do not need to make a perfect pattern if you do not want to. The main thing is that every bite has bread, butter, and radish. - Add salt and herbs.
Sprinkle the toasts with flaky salt, black pepper, and herbs. Serve right away while the bread is still crunchy.
If the toasts sit for a long time, the radishes will release a little moisture, and the bread will get softer. It is not a disaster, but they are better eaten right after assembling.
Small Tip. Do not throw away radish greens if they are fresh and not bitter. Young leaves can be finely chopped and added on top with dill or parsley. And if you have a lot of leaves, quickly sauté them with garlic and olive oil — you will get a separate green side for eggs, rice, or potatoes.
Serving
These toasts go well with boiled eggs, an omelet, soup, a green salad, or just a cup of tea. You can add a slice of smoked fish, a soft-boiled egg, or a little goat cheese on top.
It is better to make them right before serving. The radishes stay crunchy, the bread does not have time to get damp, and the salt tastes brighter. If you need to prep ahead, you can slice the radishes and herbs, store them in a container, then toast the bread and assemble the toasts right before eating.
This is not really a full recipe, but it is a good quick kitchen move: bread, butter, radishes, salt. And sometimes that is enough to use fresh produce today.
9. Lettuce Wraps With Quick Pickled Veggies

Lettuce wraps with quick pickled veggies use several things from the garden at once: lettuce leaves, carrots, cucumbers, radishes, herbs, and sometimes even thinly sliced peppers. Nothing needs to be baked or boiled for a long time. The vegetables quickly pickle in vinegar, the leaves become the base, and the filling can change depending on what you already have in the kitchen.
In this recipe, it is important to slice the vegetables thinly and let them sit in a simple dressing for a bit. Then the wraps hold in your hands, crunch, and do not fall apart after the first bite.
What You’ll Need
For 3–4 servings:
- 8–10 large lettuce leaves, preferably romaine, butter lettuce, or large leaf lettuce leaves.
- 1 cup carrots (about 110 g), cut into thin strips or grated.
- 1 cup cucumbers (about 120 g), cut into thin strips.
- 1/2 cup radishes (about 60 g), thinly sliced.
- 1/2 cup sweet pepper (about 75 g), cut into thin strips, optional.
- 1/4 cup fresh herbs (about 10 g): cilantro, mint, basil, or parsley.
- 1/3 cup rice vinegar (about 80 ml).
- 1 tablespoon sugar or honey (about 12–20 g).
- 1/2 teaspoon salt (about 3 g).
- 1 tablespoon soy sauce (about 15 ml), for the sauce or serving.
- 1 tablespoon sesame oil (about 15 ml), optional.
- 1/4 cup peanut butter or tahini (about 60 g), if you want to make a quick sauce.
- 2–3 tablespoons warm water (30–45 ml), to thin the sauce.
For thinly slicing vegetables, a simple knife, grater, or mandoline is useful, for example, Grips Handheld Mandoline Slicer. Just make sure to use the finger guard, especially with radishes and carrots.
How to Make Lettuce Wraps With Quick Pickled Veggies
- Prepare the leaves.
Carefully separate the lettuce leaves, rinse them, and dry them well. Water on the leaves will quickly dilute the flavor of the filling and sauce, so it is better to use a salad spinner or spread the leaves on a towel.
If the leaves have a tough center rib, gently press it with a knife or cut off the thick part. This will make the leaf easier to roll. - Slice the vegetables thinly.
Cut the carrot, cucumber, radish, and pepper into thin strips or rounds. The thinner the slices, the faster the vegetables will pickle and the easier the wraps will be to eat.
Of course, I do not make everything perfectly even. But it is better not to leave pieces too large: they tear the leaves and fall out of the middle. - Make the quick pickle.
In a bowl, mix the rice vinegar, sugar or honey, and salt. Stir until the sugar and salt almost dissolve.
Add the carrots, radishes, and pepper. It is better to add the cucumber later or pickle it only very briefly, because it releases juice quickly. Leave the vegetables for 10–15 minutes. - Drain the extra liquid.
After pickling, take the vegetables out of the bowl or drain the marinade through a sieve. The filling should be juicy, but not wet. Otherwise, the wraps will start leaking quickly. - Mix the quick sauce.
In a small bowl, combine the peanut butter or tahini, soy sauce, sesame oil, and warm water. Mix until creamy.
If the sauce is too thick, add another 1 tablespoon water. If you want a brighter taste, add a little lime juice or rice vinegar. - Put the wraps together.
Place a lettuce leaf on a board. Add a little pickled vegetables, cucumber, and herbs. You can add a spoonful of sauce on top or leave the sauce for dipping.
Do not add too much filling. One of the main secrets of these wraps is not overloading the leaf. It is better to make two small ones than one huge one that falls apart right away. - Roll and serve.
Fold the side edges of the leaf inward, then roll it around the filling. If the leaves are soft, you can simply fold them like little boats and eat them as small lettuce cups.
Serve right away, while the leaves are fresh and the vegetables still crunch.
Small Tip. If the lettuce leaves are too soft, put them in a bowl with very cold water for 10 minutes, then dry them well. The leaves will become firmer and hold the filling better. This trick is especially helpful on a hot day, when lettuce from the garden wilts quickly after picking.
Serving
- These wraps can be served as a light lunch, snack, or quick side with rice, chicken, fish, tofu, or noodles. You can add pieces of chicken, a boiled egg, tofu, shrimp, or a little rice noodle inside if you need a more filling version.
- The vegetables can be pickled ahead of time and kept in the fridge for up to 2 days, but the wraps themselves are better put together right before eating. This way, the leaves will not get soggy, and the filling will keep a fresh texture.
In this recipe, some of the vegetables pickle quickly, the leaves are used as an edible wrap, and the filling is easy to change with the season. Today carrots and radishes, tomorrow cucumber and pepper, the day after that a little chicken or tofu. For a home kitchen, this is a practical way to use a lot of fresh greens, and notice, all of this without long cooking.
10. Spinach Egg Scramble With a Splash of Cream

Scrambled eggs with spinach are a quick way to use up fresh greens when you have too many for a single salad. They cook quickly in a skillet, the eggs serve as the base, and a little cream makes the texture softer and more tender. This is regular food you can make in 10 minutes when you need something good to snack on.
What You’ll Need
For 2 servings:
- 4 large eggs.
- 2 cups fresh spinach (about 60 g), tough stems removed.
- 2 tablespoons cream (about 30 ml). You can use milk, but the texture is softer with cream.
- 1 tablespoon butter (about 14 g).
- 1 small garlic clove, finely chopped, optional.
- 1/4 teaspoon salt (about 1–2 g), and you can add more later.
- 1/4 teaspoon black pepper.
- 1 tablespoon grated Parmesan or soft goat cheese, optional.
- 1 tablespoon chives, dill, or parsley, for serving.
How to Make Spinach Egg Scramble
- Prepare the spinach.
Rinse the spinach and dry it well. If the leaves are wet, extra water will appear in the skillet, and the eggs can become watery.
Large leaves can be sliced into wide strips. Baby spinach is easy to leave whole: it shrinks quickly when heated. - Whisk the eggs with cream.
Crack the eggs into a bowl. Add the cream, salt, and black pepper. Whisk with a fork until smooth.
You only need a little cream. It should not turn the eggs into a runny mixture. - Quickly warm the spinach.
Put the skillet over medium or low heat. Add the butter. When it melts, add the garlic, if using, and warm it for 20–30 seconds.
Then add the spinach and stir. Cook for 1–2 minutes, until the leaves shrink and become soft. Do not keep the spinach on the heat for long: it loses color and texture quickly. - Add the eggs.
Turn the heat down to low. Pour the egg mixture into the skillet with the spinach.
Scramble likes low heat, and if the heat is too strong, the eggs will turn dry fast. We need a soft texture. - Cook, gently moving the eggs.
Slowly run a spatula across the bottom of the skillet, moving the eggs from the edges toward the center. Cook for 2–3 minutes, until the eggs are almost set but still slightly moist.
Take the skillet off the heat a little earlier than feels necessary. The eggs will keep cooking from the leftover heat. This saves the scramble from getting dry. - Add cheese and herbs.
If you are using Parmesan or goat cheese, add it at the end and gently stir. Sprinkle herbs on top.
Serve right away. Egg scramble does not like to wait: after a few minutes, it becomes firmer.
Small Tip. If you have a lot of spinach, cook it separately first, then drain off the extra liquid before adding the eggs. This is especially important for large garden spinach after rain or a good watering. This way, the scramble stays tender, but not watery.
Serving
You can serve this scramble with toast, fried potatoes, beans, tomatoes, avocado, or leftover roasted vegetables. If you need a more filling breakfast, add a little cheese on top, pieces of smoked fish, or a spoonful of Greek yogurt on the side.
In this recipe, I let myself swap ingredients based on what is already in the kitchen. A little more greens, a different cheese, a piece of yesterday’s toast, a few tomatoes for serving — and breakfast no longer feels like “I just quickly fried some eggs.” At the same time, everything stays simple: low heat, fresh spinach, and eggs taken off the skillet before they dry out.
Simple Ways
When vegetables ripen almost all at once, you need a small set of recipes that help find a place for them in your menu. One day, something goes in the skillet, the next day, a salad, then soup, toast, pasta, or a quick breakfast with greens. This way, fresh vegetables keep showing up in your kitchen, and there is always a tasty use for them.
Sometimes it is enough to simply slice, quickly sauté, add to eggs, mix with pasta, or serve with a dish that is already ready. The methods should be simple and help you use vegetables on time and without extra hassle.
Write in the comments — which vegetable piles up faster than you can cook it? Really, I would love to know. And which quick recipe helps you out?