For Valentine’s Day, you can make totally unexpected cookies, not just the usual vanilla hearts with pink icing. For example, they can be cookies with strawberry cream cheese, raspberry and white chocolate, rosewater, pistachios, and so many other things. I think that sounds really delicious!
Each of these homemade cookies has its own look. Some can go into a gift box as a sweet surprise for friends, and others can be served after dinner.
All these 10 unusual Valentine cookie recipes can be made by hand in your own kitchen. Some of them are very simple, some need a little more attention and time, but either way, they’ll be made with love, and everything will taste really good.
1. Strawberry Cream Cheese Heart Cookies
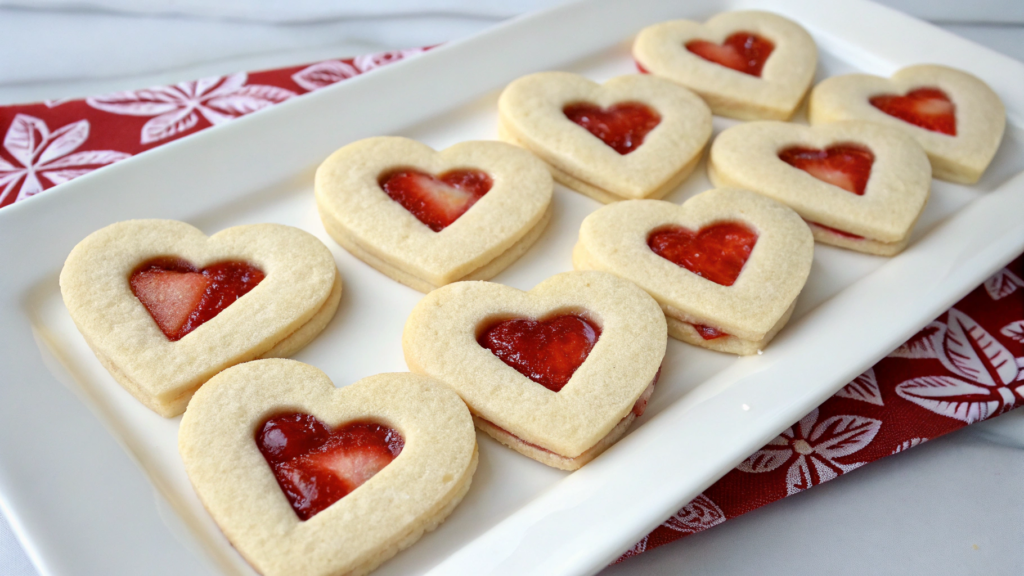
These strawberry cream cheese heart cookies absolutely do not require pastry skills. They have soft buttery dough, a strawberry filling, and a heart shape. Well, you get it — we’re making these for Valentine’s Day.
They don’t take much time to make. A little chilled dough, a thick filling, a neat cookie cutter — and you already have a festive dessert.
What You’ll Need
Dough:
- 1/2 cup butter, softened (about 113 g)
- 4 oz cream cheese, softened (about 115 g)
- 1/2 cup powdered sugar (about 60 g)
- 1 large egg yolk
- 1 teaspoon vanilla extract (about 5 ml)
- 1 1/2 cups all-purpose flour (about 190 g)
- 1/4 teaspoon salt
- 1/2 teaspoon baking powder
For the strawberry part:
- 1/3 cup strawberry jam (about 105 g)
- 1/2 cup finely chopped fresh strawberries (about 75 g)
- 1 teaspoon lemon juice
- 1 teaspoon cornstarch, if the strawberries are very juicy
For decorating:
- 1/2 cup powdered sugar for dusting (about 60 g)
- A few drops of pink or red food coloring, optional
- A heart-shaped cookie cutter, such as Wilton Comfort Grip Heart Cookie Cutter
- Baking parchment
How to Make Strawberry Cream Cheese Heart Cookies
- Prepare the strawberry filling.
Put the chopped strawberries, jam, and lemon juice into a small saucepan. Warm over low heat for 4–6 minutes, stirring as it cooks. If the filling looks too runny, add the cornstarch mixed with a little cold water and cook for one more minute. Let the filling cool completely. - Make the buttery dough.
Beat the softened butter and cream cheese until smooth. Add the powdered sugar, egg yolk, and vanilla. In a separate bowl, mix the flour, salt, and baking powder, then combine it with the butter mixture. Mix only until the dough comes together. For a light pink color, add a couple of drops of food coloring. - Chill the dough.
Shape the dough into a disk, wrap it in plastic wrap, and place it in the fridge for at least 45 minutes. This makes it easier to roll out, and the hearts will hold their shape better while baking. - Roll out and cut the hearts.
Preheat the oven to 350°F (about 175°C). Roll out the dough to about 1/4 inch thick (about 6 mm). Cut out an even number of hearts with the cookie cutter. Half of the hearts will be the bottom layer of the cookies, so leave them whole. In the other half, cut a small hole in the center so the strawberry filling will show after the cookies are assembled. - Assemble the cookies.
Place the whole hearts on a baking sheet lined with parchment. Add about 1/2 teaspoon strawberry filling to the center of each one. Cover each cookie with a heart that has a hole in the center, then gently press the edges with your fingers or a fork. Don’t add too much filling, or it may leak out. - Bake.
Bake for 10–12 minutes, until the edges are just set. The cookies should not get too dark. Leave them on the baking sheet for 5 minutes, then move them to a cooling rack. For several batches, Wilton Excelle Elite 3-Tier Cooling Rack is convenient to use. - Decorate before serving.
Once the cookies are completely cool, dust them with powdered sugar. You can add thin lines of pink icing, but it’s not necessary. If the filling shows nicely in the center, the cookies already look sweet and pretty.
Tips From Experience
- Don’t overload the cookies with filling. For a small heart, half a teaspoon is enough.
- If the dough gets soft while you’re assembling the cookies, put the baking sheet with the prepared cookies into the fridge for 10 minutes before baking.
- Use thick jam, not a runny syrup. This keeps the filling inside and helps the cookies hold their shape.
- If the dough sticks, roll it between two sheets of parchment. That’s better than constantly adding more flour.
For Valentine’s Day, this is a simple and pretty option: the strawberry filling, buttery dough, and heart shape already look festive enough, so no extra decorating is really needed.
You can place them in a small box, layer them with parchment, and tie the box with a ribbon. I think it would make a really nice surprise for guests.
2. White Chocolate Raspberry Shortbread Bites
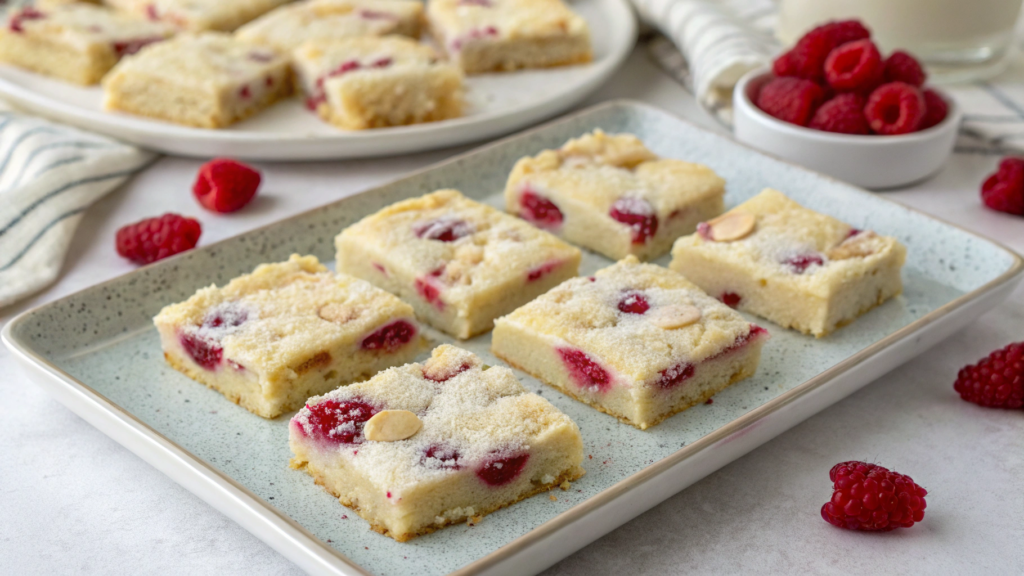
To make white chocolate raspberry shortbread bites, you don’t need to cut out perfect shapes or mess with a filling inside. The dough bakes as one slab, and then you cut it into small squares or rectangles.
This option for Valentine’s Day looks neat and is pretty simple to make. The shortbread dough turns out crumbly, the white chocolate gives it a gentle sweetness, and the raspberry adds a little tartness and a pretty color.
What You’ll Need
Shortbread base:
- 1 cup butter, softened (about 226 g)
- 2/3 cup powdered sugar (80 g)
- 1 teaspoon vanilla extract (about 5 ml)
- 2 cups all-purpose flour (about 250 g)
- 1/4 teaspoon salt
The add-ins:
- 3/4 cup white chocolate, finely chopped or in chips (about 130 g)
- 1/2 cup freeze-dried raspberries (about 15–20 g)
- 1/4 cup raspberry jam (about 80 g), optional
- 1 teaspoon lemon zest, optional
For decorating:
- Another 1/3 cup white chocolate for a thin drizzle (about 60 g)
- A little crushed freeze-dried raspberry on top
- 8×8 inch square baking pan
- Baking parchment
I think freeze-dried raspberries work better here than fresh ones. They give a bright raspberry flavor, but they don’t add extra moisture to the dough. Fresh raspberries can make the shortbread base wet and too soft in some spots.
How to Make White Chocolate Raspberry Shortbread Bites
- Prepare the pan.
Preheat the oven to 325°F (about 165°C). Line the pan with parchment so the edges of the paper hang slightly over the sides. Later, you can use them to lift the baked slab out of the pan. - Make the shortbread dough.
Beat the softened butter with the powdered sugar until soft and pale. Add the vanilla. Then add the flour and salt, and mix until you get a soft dough. Don’t overmix it, or the cookies may turn out too dense. - Add the chocolate and raspberries.
Mix the white chocolate and lightly crushed freeze-dried raspberries into the dough. You can add a little lemon zest too. It makes the sweetness of the white chocolate taste nicer. - Press the dough into the pan.
Move the dough into the prepared pan and smooth it out with your hands or a spatula. The layer should be about the same thickness everywhere. If you’re using raspberry jam, spread it over the top in very thin lines and gently run a knife through it to create a marbled pattern. - Bake.
Bake for 28–34 minutes, until the edges turn slightly golden. The center can stay light, that’s okay. The main thing is not to overbake it, or the pieces will crumble more than they should. - Cool and cut.
Let the slab cool in the pan for about 15 minutes, then lift it out by the parchment edges. Cut it into small squares or rectangles while it’s still slightly warm. This helps the edges come out cleaner. - Add white chocolate on top.
Melt the remaining white chocolate and drizzle it over the pieces in thin lines. While the chocolate is still soft, sprinkle crushed freeze-dried raspberry on top. It turns out simple, but really pretty, seriously.
How to Make Neat Pieces
- Don’t replace the freeze-dried raspberries with a lot of fresh ones. In shortbread dough, extra moisture changes the texture fast.
- If the white chocolate melts too thick, add just a little coconut oil — about 1/2 teaspoon. This makes it easier to drizzle in thin lines.
- Cut the cookies with a sharp knife. You can wipe the knife between cuts, especially if there is jam or chocolate on top.
- Don’t make the pieces too big. This dessert is pretty rich, so a small size works better. It’s easy to pick up from the plate, try with other sweets, and pack into a gift box.
I’m convinced this is a good dessert for a sweet holiday table. It doesn’t take much time to make, and the result looks really beautiful. For Valentine’s Day, you can cut them into very small squares and serve them as a mini dessert with tea, coffee, or hot cocoa.
3. Rosewater Sugar Cookies with Gold Dust
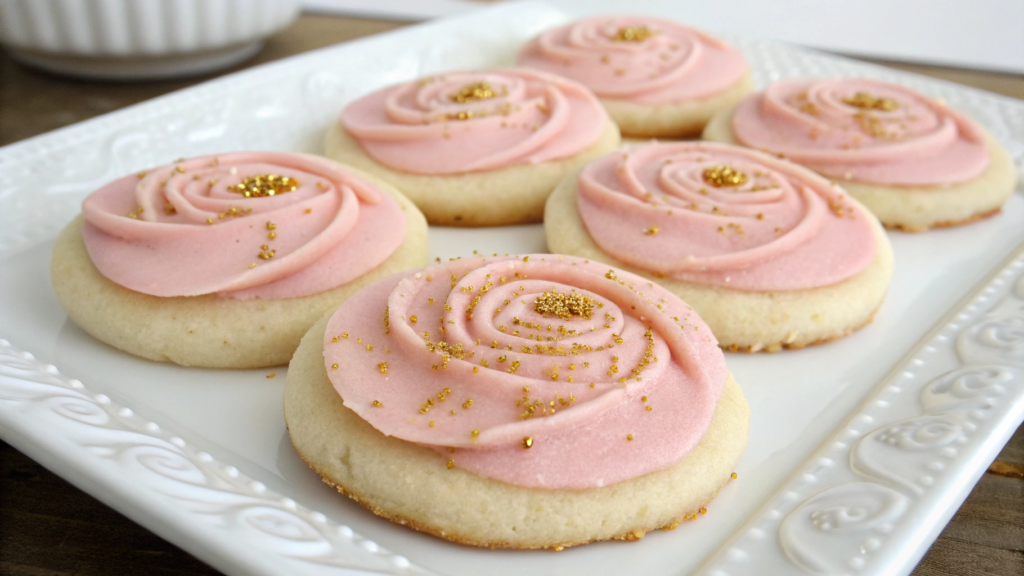
Rosewater sugar cookies with gold dust look pretty unusual, but the flavor is still familiar to everyone. The base is a soft sugar cookie, with a light rose aroma and a thin gold decoration on top.
But you do need to be careful with the rosewater here. It should give a gentle floral aroma, not a perfume taste. I always start with a small amount and then add a little more later if needed. And in baking, details like this really do matter a lot.
What You’ll Need
The dough:
- 1 cup butter, softened (about 226 g)
- 3/4 cup sugar (about 150 g)
- 1 large egg
- 1 teaspoon vanilla extract (about 5 ml)
- 1/2 teaspoon rosewater (about 2.5 ml)
- 2 1/2 cups all-purpose flour (about 315 g)
- 1/2 teaspoon baking powder
- 1/4 teaspoon salt
The icing:
- 1 1/2 cups powdered sugar (about 180 g)
- 2–3 tablespoons milk (about 30–45 ml)
- 1/4 teaspoon rosewater, optional
- 1–2 drops pink food coloring, optional
For decorating:
- Edible gold dust
- A thin decorating brush
- A heart-shaped or oval cookie cutter
- Baking parchment
How to Make Rosewater Sugar Cookies with Gold Dust
- Make the dough.
Beat the softened butter with the sugar until the mixture is pale. Add the egg, vanilla, and rosewater. Then add the flour, baking powder, and salt. Mix into a soft dough, without kneading it for too long. - Chill the dough.
Shape the dough into a disk, wrap it in plastic wrap, and place it in the fridge for at least 1 hour. This makes it easier to roll out, and the cookies will keep a neat shape. - Roll out and cut the cookies.
Preheat the oven to 350°F (about 175°C). Roll out the dough to about 1/4 inch thick (about 6 mm). Cut out hearts, ovals, or small circles. Simple shapes work better here because the gold decoration looks cleaner on them. - Bake.
Move the cookies to a baking sheet lined with parchment and bake for 8–10 minutes. The edges should only just set. Don’t wait for strong browning: these cookies look prettier when they stay light. - Cool.
Leave the cookies on the baking sheet for 5 minutes, then move them to a cooling rack. Before you cover them with icing, they need to cool completely, or the coating will start to run. - Make the icing.
Mix the powdered sugar with milk until the icing is thick but still pourable. Add just a little rosewater and, if you want, a drop of pink food coloring. The icing should be a soft shade, not bright pink. - Decorate with gold dust.
Cover the cookies with icing and let it set a little. Then use a thin brush to add edible gold dust along the edge, in the center, or in light strokes. You don’t need to cover the whole cookie with gold. One or two accents look neater.
Tips to Make the Cookies Look Pretty
- Don’t make the icing too runny. It should spread in an even layer, but not drip over the edges. If the mixture is too thin, add a little more powdered sugar.
- Before adding the gold dust, let the icing dry a little. On very wet icing, the decoration can smear.
- Choose simple shapes. Hearts, ovals, and circles look better than overly detailed cutters because the main accent here is the gold decor.
This cookie adds a little elegance and something unusual to the holiday table. The rosewater gives a light aroma, and the gold dust makes the cookies look beautiful, even though the dough itself stays simple and familiar. For Valentine’s Day, you can make some of the cookies heart-shaped so the plate doesn’t look too repetitive.
Oh, I almost forgot! Don’t stack the cookies on top of each other right away if the icing is still soft. It’s better to let them sit for a few hours.
4. Red Velvet Crinkle Delights
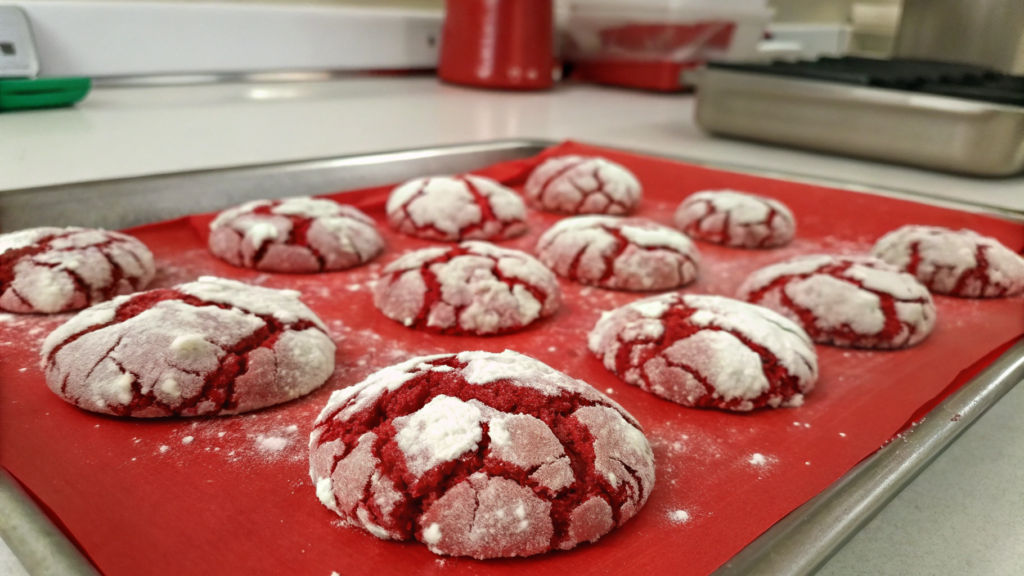
Red velvet crinkle cookies look beautiful and interesting right out of the oven: the red base opens up slightly, and the powdered sugar stays on the surface in neat little cracks.
I often use this recipe not only for Valentine’s Day. You don’t need to cut out shapes, make icing, or spend a long time decorating each cookie. The color and texture already do the job. And inside, the cookies turn out soft, chocolatey, and a little creamy.
What You’ll Need
For the dough:
- 1/2 cup butter, softened (about 113 g)
- 3/4 cup sugar (about 150 g)
- 1/4 cup brown sugar (about 50 g)
- 1 large egg
- 1 teaspoon vanilla extract (about 5 ml)
- 1 teaspoon white vinegar (about 5 ml)
- 1 tablespoon red food coloring (about 15 ml)
- 1 1/4 cups all-purpose flour (about 155 g)
- 1/4 cup unsweetened cocoa powder (about 25 g)
- 1/2 teaspoon baking soda
- 1/4 teaspoon salt
For rolling:
- 1/2 cup powdered sugar (about 60 g)
- 2 tablespoons regular sugar, optional
To make the balls round and even, you can use a small cookie scoop, such as OXO Good Grips Cookie Scoop.
How to Make Red Velvet Crinkle Cookies
- Mix the wet base.
Beat the butter with the regular sugar and brown sugar. Add the egg, vanilla, vinegar, and red food coloring. The mixture should become smooth and bright. - Add the dry ingredients.
In a separate bowl, mix the flour, cocoa, baking soda, and salt. Add the dry mixture to the butter base and mix until you get a soft dough. Don’t mix for too long. - Chill the dough.
Place the dough in the fridge for at least 1 hour. After chilling, it will be easier to roll, and the cookies will hold their shape better in the oven. - Shape the balls.
Preheat the oven to 350°F (about 175°C). Roll the dough into small balls, about 1 tablespoon each. You can roll them first in regular sugar, then generously in powdered sugar. This helps the white layer stay on better after baking. - Bake.
Place the balls on a baking sheet lined with parchment, leaving space between them. Bake for 10–12 minutes. The cookies should spread and get those crinkles, but the center should stay soft. - Cool.
Leave the cookies on the baking sheet for 5 minutes, then move them to a cooling rack. Don’t touch them right out of the oven: hot cookies are very soft and can break.
Tips From Practice
- Roll the balls generously in powdered sugar. If the layer is too thin, part of it will soak into the dough.
- Don’t skip the chilling. Warm dough spreads quickly, and the crinkles may come out less noticeable.
- Don’t overbake the cookies. Red velvet cookies are better when they stay soft inside. If you wait until they feel completely firm on the baking sheet, they may turn out dry after cooling.
This is a bright holiday cookie, and it really doesn’t need complicated decorating. The sugar crinkles make it pretty on their own, and the soft center goes well with tea, coffee, or a glass of milk. For Valentine’s Day, you can add a few strawberries or pieces of white chocolate next to the cookies — the color will look even better.
5. Dark Chocolate Chili Hearts

Dark chocolate chili hearts fit really well into Valentine’s Day. They are not pink and not vanilla. Here, dark chocolate gives the main flavor, and the chili is not there just for heat, but for a light warm aftertaste.
This cookie is different from classic hearts with icing. It has dark dough, a neat shape, and a little cocoa on top or a thin line of melted chocolate. Not only the taste, but the look is gorgeous too.
What You’ll Need
For the dough:
- 1/2 cup butter, softened (about 113 g)
- 2/3 cup sugar (about 135 g)
- 1/4 cup brown sugar (about 50 g)
- 1 large egg
- 1 teaspoon vanilla extract (about 5 ml)
- 1 1/4 cups all-purpose flour (about 155 g)
- 1/2 cup unsweetened cocoa powder (about 50 g)
- 1/2 teaspoon baking powder
- 1/4 teaspoon salt
- 1/4 teaspoon ground chili
- 1/4 teaspoon cinnamon, optional
- 1/2 cup dark chocolate, finely chopped (about 85 g)
For decorating:
- 1/3 cup dark chocolate for a thin coating or lines on top (about 55 g)
- A little cocoa powder for light dusting
- A heart-shaped cookie cutter
Add the chili carefully. I usually start with 1/4 teaspoon, because the cookie is still chocolate first of all. The heat should show up somewhere at the end, after you’ve tasted the cocoa and butter.
How to Make Dark Chocolate Chili Hearts
- Mix the butter and sugar.
Beat the softened butter with the regular sugar and brown sugar. The sugar should mix well into the butter. - Add the egg and vanilla.
Mix in the egg and vanilla extract. At this stage, the dough will become softer and smoother. - Combine the dry ingredients.
In a separate bowl, mix the flour, cocoa, baking powder, salt, chili, and cinnamon. The cinnamon is optional, but I think it helps connect the chocolate and the light heat. - Bring the dough together.
Add the dry mixture to the butter base and mix until you get a soft chocolate dough. At the end, mix in the finely chopped dark chocolate. It will give you small melted pieces inside the cookies. - Chill the dough.
Shape the dough into a disk, wrap it in plastic wrap, and place it in the fridge for 45–60 minutes. Cold dough is easier to work with, especially when you need to cut out heart shapes. - Roll out and cut the cookies.
Preheat the oven to 350°F (about 175°C). Roll out the dough to about 1/4 inch thick (about 6 mm). Cut out the hearts and move them to a baking sheet lined with parchment. - Bake.
Bake for 8–10 minutes. Don’t wait for the cookies to get noticeably darker — they are already chocolate-colored. The edges should set, and the center should stay a little soft. - Decorate after cooling.
Once the cookies are completely cool, drizzle them with thin lines of melted dark chocolate or lightly dust them with cocoa. I wouldn’t add too much decoration, because these hearts already look good.
Details That Improve the Flavor
- Don’t rush with the chili. In hot cookies, the heat can seem weaker, and after cooling it comes through more. So for the first batch, I would leave it at 1/4 teaspoon, and next time add a little more if needed.
- Choose dark chocolate that is not too sweet. Chocolate with about 60–70% cocoa works well. It makes the flavor deeper and doesn’t turn the cookies into a regular sweet dessert.
- Don’t dry out the cookies. Chocolate dough is easy to overbake because the color barely changes. It’s better to take it out when the edges hold their shape, but the middle is still soft.
- I usually put the cut-out hearts in the fridge for 10 minutes before baking, so their shape comes out neater, especially if you want to make a gift box with cookies.
These chocolate hearts will go really well on a holiday table with sweeter cookies that have berries or icing. They bring a different flavor, and I would serve them with small cups of coffee, without a lot of decoration, because dark heart-shaped cookies already look expressive enough. And in a gift box, these hearts will nicely balance out the softer and pinker options.
6. Champagne Kissed Macarons
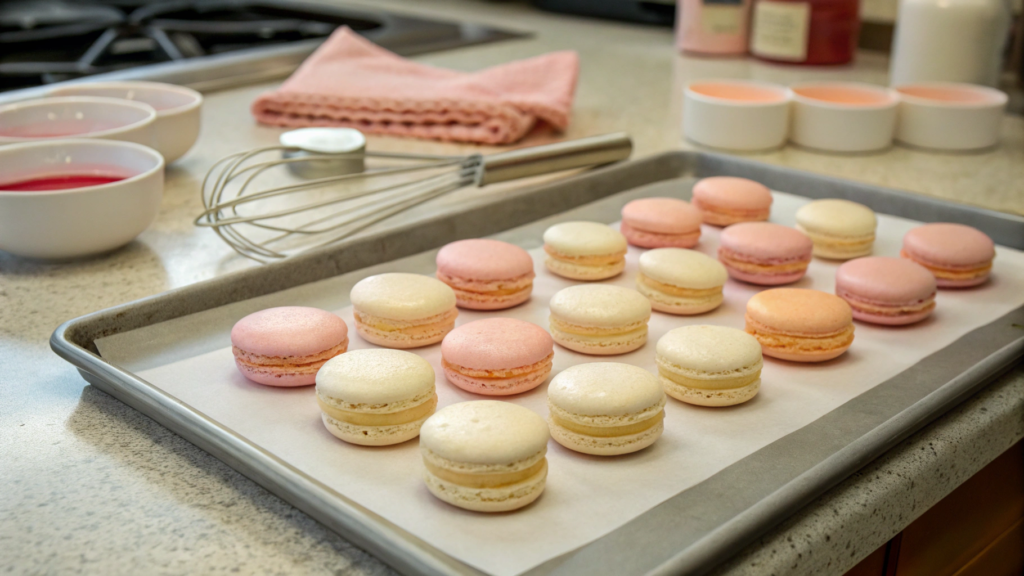
Champagne kissed macarons turn out small and neat, with a thin crisp shell and a soft filling inside. For Valentine’s Day, you can make them in a gentle pink, cream, or peach shade, and keep the filling buttery, with a light wine note.
You do need to fuss with these macarons a little more than with regular cookies. But don’t worry, there is nothing scary in this recipe if you don’t rush. Turn on some music, prepare the baking sheets, take your time with the batter — and everything feels much nicer.
What You’ll Need
For the almond shells:
- 1 cup powdered sugar (about 120 g)
- 3/4 cup almond flour (about 75 g)
- 2 large egg whites, room temperature
- 1/4 cup superfine sugar (about 50 g)
- 1/4 teaspoon cream of tartar, optional
- 1–2 drops pink or peach food coloring, optional
Filling:
- 4 oz butter, softened (about 113 g)
- 1 cup powdered sugar (about 120 g)
- 1 tablespoon champagne or sparkling wine (about 15 ml)
- 1/2 teaspoon vanilla extract (about 2.5 ml)
- A pinch of salt
Decorating:
- A little powdered sugar or edible shimmer, optional
- A piping bag with a round tip, such as Wilton 12-Inch Disposable Decorating Bags
For macarons, fine almond flour is especially important. If it is too coarse, the surface can turn out uneven. So I never skip sifting, even when I don’t really feel like doing it.
How to Make Champagne Kissed Macarons
- Prepare the dry mixture.
Sift the powdered sugar and almond flour into a bowl. It’s better to remove any large almond pieces. - Whip the egg whites.
Whip the egg whites until lightly foamy, then gradually add the sugar. Keep whipping until stiff peaks form. The mixture should hold its shape, but it should not look dry. You can add cream of tartar for more stability. - Add the color.
Mix in 1–2 drops of food coloring. For Valentine’s Day, I usually use a soft shade, not a bright pink. It looks gentler and goes better with the filling. - Mix with the almond flour.
Add the dry mixture to the egg whites in 2–3 additions. Mix with a spatula, gently folding the batter. The batter should slowly flow from the spatula in a wide ribbon. Don’t overmix it. - Make the circles.
Transfer the batter to a piping bag and pipe small circles onto a baking sheet lined with parchment. After baking, these circles will become the two halves of the macarons, which you will later join with filling. Tap the baking sheet on the table a few times to release the air bubbles. - Let the circles dry.
Leave the baking sheet at room temperature for 30–45 minutes. The surface of the circles should feel dry to the touch. This step helps the macarons rise more evenly and form that small raised edge at the bottom — the little “feet.” - Bake.
Preheat the oven to 300°F (about 150°C). Bake the macarons for 14–16 minutes. The circles should rise and come off the parchment easily after cooling. Don’t remove them while hot — they can tear. - Make the filling.
Beat the butter with the powdered sugar, then add the champagne, vanilla, and a pinch of salt. The filling should be smooth and not too runny. If it becomes soft, place it in the fridge for 10 minutes. - Assemble the macarons.
When the halves are completely cool, add the filling to one half and cover it with the second half. Press gently so the cream spreads almost to the edges. It’s better to place the finished macarons in the fridge for a few hours, or even overnight. The texture becomes nicer that way.
Tips
- Egg whites are better at room temperature. They whip more easily and give a more stable meringue.
- Don’t add too much champagne to the filling. One tablespoon is enough to give a light flavor. If you pour in more, the cream can become too soft.
- I usually make macarons small, about 1 1/2 inch in diameter (about 4 cm). They are easier to eat that way, and they look better in a small gift box with other cookies.
- If the shells crack, the most common reason is that they didn’t dry long enough before baking, or there was too much air left in the batter. Next time, you can let them sit on the counter a little longer and tap the baking sheet better.
Macarons stand out right away among simpler cookies: light almond shells, buttery filling, and a barely noticeable taste of champagne. I think this is exactly the kind of dessert that feels nice to put on the table at the end of dinner — not a huge portion of something sweet, but a few small pretty pieces with tea, coffee, or a glass of sparkling wine.
7. Buttercream Painted Linzers
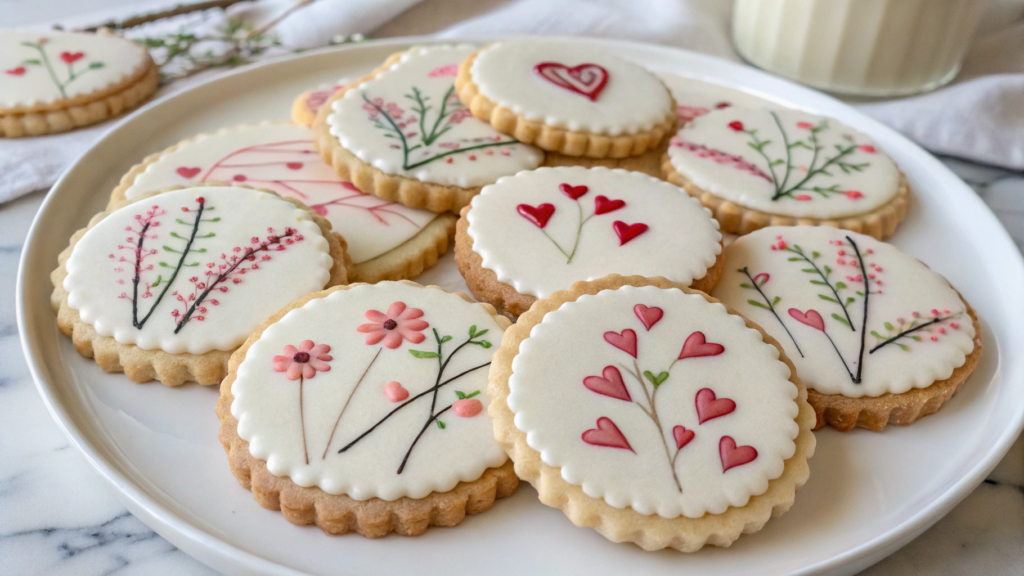
Usually, linzers are made with a little window in the center so the filling shows through. Here, we leave the top cookie whole and decorate it with thin strokes of buttercream, like a small edible Valentine’s Day card.
On top, you can draw small flowers, hearts, little branches, or just soft strokes of cream. You don’t need to try to make everything perfect. I think a slightly uneven drawing looks beautiful in a homemade way.
What You’ll Need
Dough:
- 1 cup butter, softened (about 226 g)
- 2/3 cup sugar (about 135 g)
- 1 large egg yolk
- 1 teaspoon vanilla extract (about 5 ml)
- 1 3/4 cups all-purpose flour (about 220 g)
- 3/4 cup almond flour (about 75 g)
- 1/4 teaspoon salt
- 1/2 teaspoon ground cinnamon, optional
Filling:
- 1/2 cup raspberry or strawberry jam (about 160 g)
- 1 teaspoon lemon juice, if the jam is very sweet
Buttercream:
- 1/2 cup butter, softened (about 113 g)
- 1 cup powdered sugar (about 120 g)
- 1–2 teaspoons milk (about 5–10 ml)
- 1/2 teaspoon vanilla extract
- Food coloring in pink, red, or green, just a little
How to Make Linzer Cookies with Buttercream Painting
- Make the dough.
Beat the butter with the sugar until the mixture is soft and pale. Add the egg yolk and vanilla. Then add the all-purpose flour, almond flour, salt, and cinnamon. Mix until you get a soft dough. It should come together into a ball, but it should not be sticky. - Chill the dough.
Divide the dough into two disks, wrap them in plastic wrap, and place them in the fridge for at least 1 hour. Chilled dough is easier to roll out, and the cookies hold their shape better. - Cut out the cookies.
Preheat the oven to 350°F (about 175°C). Roll out the dough to about 1/4 inch thick (about 6 mm). Cut out matching hearts, circles, or ovals. We leave the top cookie whole, without a window, because the drawing will go on top. - Bake.
Move the cookie shapes to a baking sheet lined with parchment and bake for 9–11 minutes. The edges should become slightly golden. After baking, let the cookies cool on the baking sheet for a few minutes, then move them to a cooling rack. - Prepare the filling.
Mix the jam with lemon juice so it is not too sweet. I usually use thicker jam because it does not leak out around the edges, and the cookies look neater. - Assemble the linzers.
Add a thin layer of jam to the bottom cookie, about 1 teaspoon. Cover it with the second cookie and press gently. Don’t press too hard: the filling should spread, but not push out. - Make the buttercream.
Beat the butter with the powdered sugar, vanilla, and 1 teaspoon milk. The cream should be soft, but still hold its shape. Divide it into a few small bowls and add just a little food coloring to each one. I like to leave some of the cream white and make some of it pale pink or light green. - Paint the decoration.
Move the cream into a small piping bag and add simple details: dots, tiny flowers, lines, hearts, or little branches. You don’t need to cover the whole surface. It is better to leave part of the cookie visible, so the decoration looks lighter.
Tips From Personal Experience
- For linzers, a thin layer of jam is enough. When there is too much filling, it comes out around the edges, and the cookies are harder to pack nicely in a box.
- Make the cream a little thicker than you would for cupcakes. If it is too soft, the small details will spread. I usually add powdered sugar one spoon at a time until the cream starts holding a line well.
- For this kind of cookie, bright red cream often looks heavier than needed. Pale pink, creamy white, and a little green for leaves already make it look lighter and more delicate.
- Before packing, let the decoration dry for at least 30–40 minutes. Buttercream will not become hard like icing, but the surface will set a little, and the cookies will be easier to move.
You get cookies that can feel personal: you can draw small hearts, initials, flowers, or just a couple of soft strokes. And it already looks less like regular baking and more like a small homemade gift. For the holiday table, I usually serve linzers not in a big pile, but in one layer on a plate or in a box with parchment. That way, every little drawing is visible, and the cookies don’t break.
8. Pistachio Rose Petal Sandwich Cookies
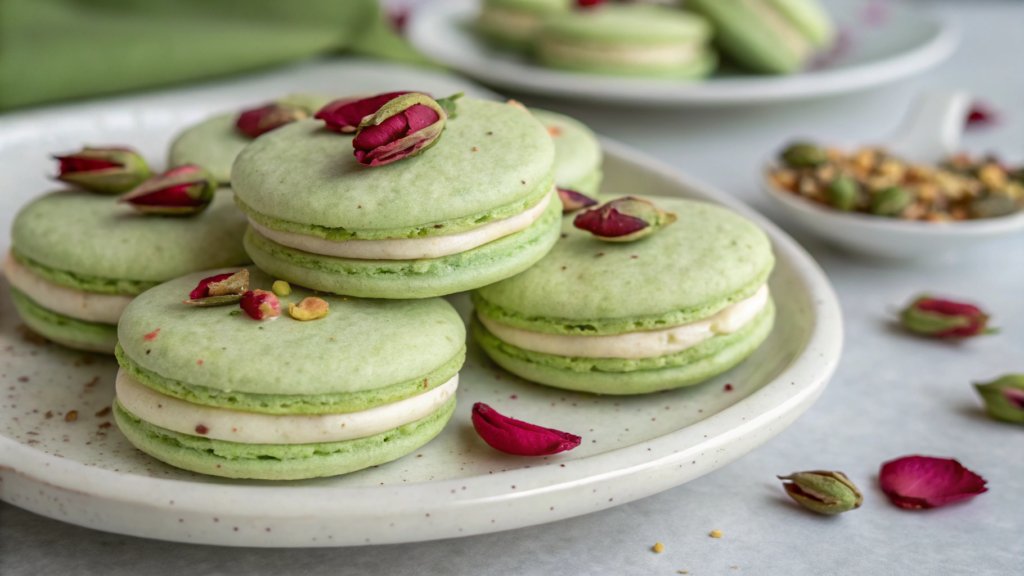
Pistachio rose petal sandwich cookies are cookies that sound beautiful and look wonderful too. There is no bright icing or heavy decoration here. Greenish pistachio dough, light cream inside, and a few petals on top look very expressive.
What You’ll Need
The pistachio dough:
- 3/4 cup shelled unsalted pistachios (about 95 g)
- 1 cup all-purpose flour (about 125 g)
- 1/2 cup butter, softened (about 113 g)
- 1/2 cup powdered sugar (about 60 g)
- 1 large egg yolk
- 1/2 teaspoon vanilla extract (about 2.5 ml)
- 1/4 teaspoon almond extract, optional
- 1/4 teaspoon salt
The filling:
- 4 oz cream cheese, softened (about 115 g)
- 2 tablespoons butter, softened (about 28 g)
- 3/4 cup powdered sugar (about 90 g)
- 1/2 teaspoon vanilla extract
- 1 teaspoon lemon juice
Decorating:
- 1–2 tablespoons chopped pistachios
- 1 tablespoon edible dried rose petals
- A little powdered sugar, optional
- A round cookie cutter or a small fluted cutter
How to Make Pistachio Rose Petal Sandwich Cookies
- Grind the pistachios.
Put the pistachios into a food processor and grind them almost into fine crumbs. Don’t turn them into a paste. We need pistachio flour with small pieces, so the cookies turn out fragrant and a little textured. - Make the dough.
Beat the butter with the powdered sugar. Add the egg yolk, vanilla, and almond extract. Then mix in the flour, ground pistachios, and salt. The dough should come together into a soft ball. If it feels too crumbly, you can add 1 teaspoon cold water. - Chill the dough.
Shape the dough into a disk, wrap it in plastic wrap, and place it in the fridge for 45–60 minutes. Pistachio dough is delicate, so chilling really helps here: it is easier to roll out and move to the baking sheet. - Roll out and cut the cookies.
Preheat the oven to 350°F (about 175°C). Roll out the dough to about 1/4 inch thick (about 6 mm). Cut out small circles or hearts. I make the cookies small because sandwich cookies with cream turn out richer. - Bake.
Move the cut-outs to a baking sheet lined with parchment and bake for 8–10 minutes. The edges should just set, but the cookies should not get too dark. This helps keep the pistachio color nicer. - Cool the cookies.
Leave the cookies on the baking sheet for a few minutes, then move them to a cooling rack. Before assembling, they need to cool completely, or the cream will start to melt. - Make the filling.
Beat the cream cheese with the butter. Add the powdered sugar, vanilla, and lemon juice. The filling should be smooth and thick enough. - Assemble the sandwiches.
Put a little cream on the bottom cookie and cover it with the second one. Press gently so the filling reaches almost to the edges. On top, you can add a thin swipe of cream, a few pistachio crumbs, and a couple of rose petals.
Tips
- It’s better to use unsalted pistachios. Salted ones can overpower the delicate flavor of the cream and rose petals.
- Don’t make the filling too runny. For sandwich cookies, the cream should stay between the two halves, not squeeze out on the first bite. I usually add powdered sugar gradually and watch the texture.
- Be careful with the amount of rose petals. A few small pieces on top look prettier than a thick layer. Especially on greenish pistachio dough.
- The cookies are easier to assemble right before serving or a few hours before it. After a night in the fridge, they will become softer. That is not bad, but the texture will no longer be as crumbly.
For Valentine’s Day, you can make some cookies round and some heart-shaped. This option is different from the chocolate and berry recipes. The flavor is softer here: pistachios, creamy filling, a light lemon note, and a few rose petals on top.
Beautiful and delicious, and so nice to serve with a cup of fragrant tea.
9. Salted Caramel Ganache Drops
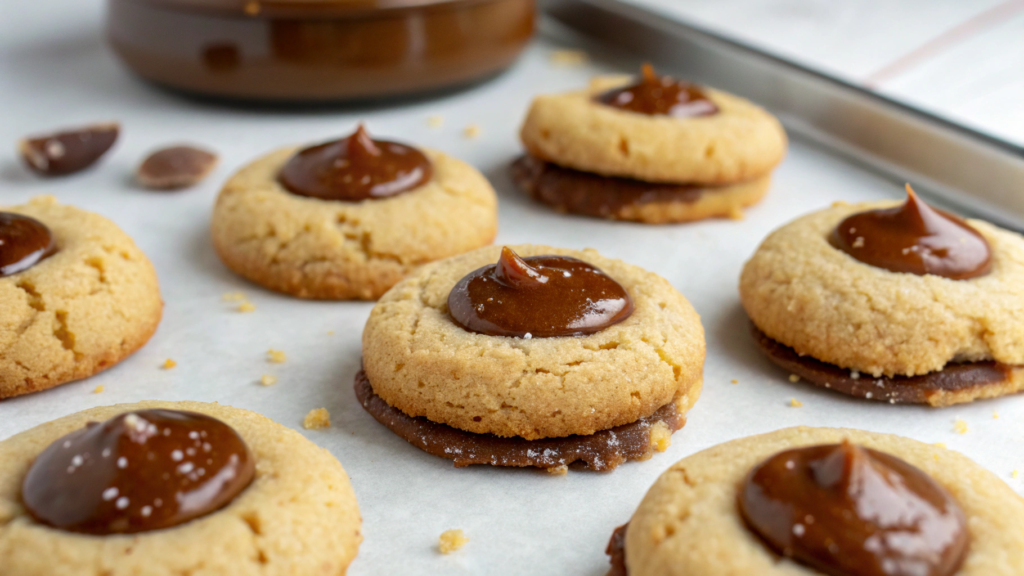
Salted caramel ganache drops are small cookies with a little well in the center, filled with thick caramel and soft chocolate ganache, and that makes the flavor of these cookies unforgettable.
You don’t need to draw, cut out perfect hearts, or make icing in several colors here. The main thing is to bake even little bases and fill the center nicely. You get these mini desserts for one or two bites.
What You’ll Need
Cookies:
- 1/2 cup butter, softened (about 113 g)
- 1/2 cup sugar (about 100 g)
- 1/4 cup brown sugar (about 50 g)
- 1 large egg yolk
- 1 teaspoon vanilla extract (about 5 ml)
- 1 1/4 cups all-purpose flour (about 155 g)
- 1/4 cup unsweetened cocoa powder (about 25 g)
- 1/4 teaspoon salt
- 1/2 teaspoon baking powder
Caramel:
- 1/2 cup soft caramel candies (about 90 g)
- 1 tablespoon heavy cream (about 15 ml)
- A pinch of salt
Ganache:
- 1/2 cup dark chocolate, finely chopped (about 85 g)
- 1/4 cup heavy cream (about 60 ml)
For decorating:
- A little coarse sea salt
- A small spoon or measuring spoon for shaping the wells
In this recipe, salt helps balance the sweet caramel and makes the chocolate flavor more noticeable. But it’s better to add just a little: a few grains on top already give the right effect.
How to Make Salted Caramel Ganache Drops
- Make the chocolate dough.
Beat the butter with the regular sugar and brown sugar. Add the egg yolk and vanilla. In a separate bowl, mix the flour, cocoa, salt, and baking powder, then combine it with the butter base. Mix only until you get a soft dough. - Chill the dough.
Place the dough in the fridge for 30–45 minutes. This makes it easier to roll, and the cookies won’t spread too much in the oven. - Shape the cookies.
Preheat the oven to 350°F (about 175°C). Roll small balls, about 1 tablespoon of dough each. Place them on a baking sheet lined with parchment and make a well in the center with your thumb or the back of a small spoon. - Bake the bases.
Bake for 9–11 minutes. If the wells rise a little during baking, gently press them again while the cookies are still hot. I usually do this right after they come out of the oven, because later the cookies become more fragile. - Melt the caramel.
Put the caramel candies, cream, and a pinch of salt into a small saucepan. Warm over low heat, stirring, until the mixture becomes smooth. You can also do this in the microwave in short 10–15 second bursts. - Fill the centers with caramel.
Add a little caramel into each well. Don’t fill them all the way to the edges: the ganache will go on top. Let the caramel set slightly, about 10 minutes. - Make the ganache.
Warm the cream until almost hot, but don’t boil it. Pour it over the chopped chocolate and leave it for 2 minutes. Then stir until smooth and glossy. If the chocolate hasn’t melted completely, you can warm the mixture a little. - Add the ganache and salt.
Add a little ganache on top of the caramel. While the chocolate is still soft, add a few grains of sea salt as a tiny accent.
Tips for a Better Result
- It’s better to make the caramel thick. A filling that is too runny can leak out of the center and stick to other cookies in the box.
- Let the ganache sit for a little before adding it. When it is very hot, it is too runny. After a few minutes, the mixture becomes thicker and settles more neatly.
- Don’t make the cookies large. The flavor here is rich: chocolate dough, caramel, ganache, and salt. A small size is much more convenient, especially if there will be several kinds of cookies on the table.
- Add the sea salt at the very end, right on the soft ganache. That way it stays visible on top and gives a nice contrast with the first bite.
The cookies are small, easy to serve, look pretty in a gift box if you decide to put one together, and go well with coffee after dinner. And the salt on top keeps the flavor from feeling too sweet — I, like many people, love those flavor contrasts. I think you’ll be able to make your loved ones happy on Valentine’s Day.
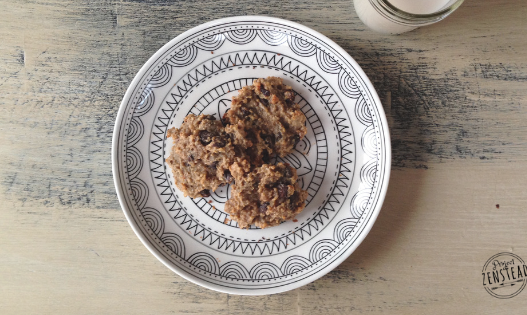
10. Hazelnut Espresso Thumbprints
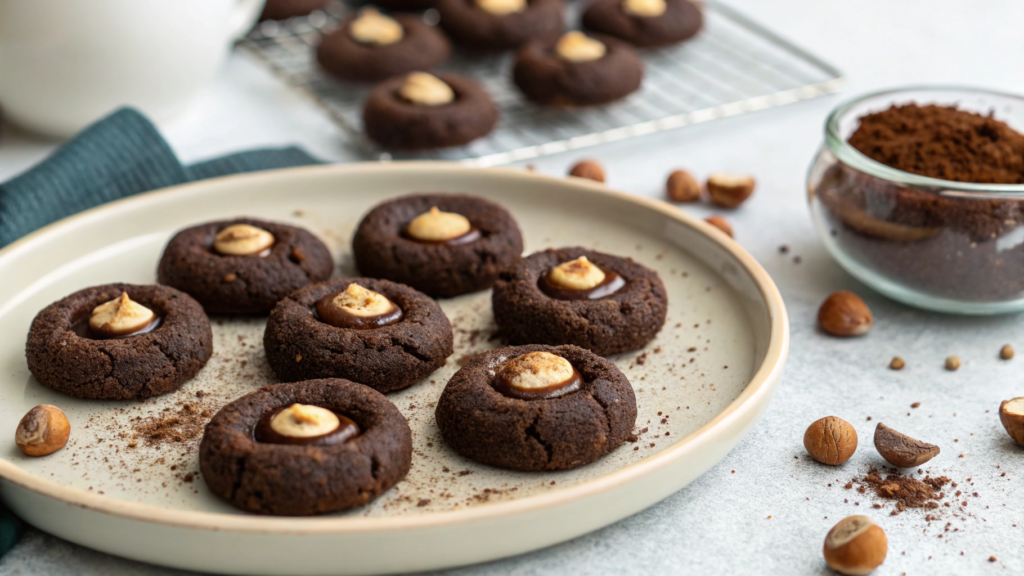
Hazelnut espresso thumbprints are not like berry, pink, or floral cookie recipes. The flavor here is deeper: hazelnuts, coffee, cocoa, and butter, so I usually bake them in a small size. Espresso does not make the dessert bitter if you add it moderately. It simply strengthens the chocolate flavor and gives a warm coffee aroma.
What You’ll Need
For the dough:
- 1/2 cup butter, softened (about 113 g)
- 1/2 cup brown sugar (about 100 g)
- 1/4 cup sugar (about 50 g)
- 1 large egg yolk
- 1 teaspoon vanilla extract (about 5 ml)
- 1 teaspoon instant espresso powder
- 1 cup all-purpose flour (about 125 g)
- 1/2 cup ground hazelnuts (about 55 g)
- 1/4 teaspoon salt
- 1/2 teaspoon baking powder
Chocolate center:
- 1/2 cup dark chocolate, finely chopped (about 85 g)
- 1/4 cup heavy cream (about 60 ml)
- 1 teaspoon butter, optional
Decorating:
- 1/4 cup chopped hazelnuts (about 30 g)
- A little cocoa powder, optional
- A small cookie scoop
It’s better to lightly toast the hazelnuts before adding them. 6–8 minutes at 350°F (about 175°C) is enough to make the aroma more noticeable. Just let the nuts cool before mixing them into the dough.
How to Make Hazelnut Espresso Thumbprints
- Prepare the hazelnuts.
Lightly toast the hazelnuts in the oven or in a dry pan. Then let them cool and grind some of them into fine crumbs for the dough, and leave some chopped for decorating. - Make the dough.
Beat the butter with the brown sugar and regular sugar. Add the egg yolk, vanilla, and espresso powder. In a separate bowl, mix the flour, ground hazelnuts, salt, and baking powder, then combine it with the butter base. The dough will turn out soft and fragrant. - Chill the dough.
Place the dough in the fridge for 30–45 minutes. After chilling, it is easier to roll, and the cookies hold their shape better. - Shape the cookies.
Preheat the oven to 350°F (about 175°C). Roll small balls, about 1 tablespoon of dough each. Place them on a baking sheet lined with parchment. Make a small well in the center of each ball with your thumb or the back of a small spoon. - Add the nut crumbs.
You can lightly roll the edges of the cookies in chopped hazelnuts. I usually don’t cover the whole surface, only the sides: that way, the nuts don’t cover the chocolate center, and the cookies look neater. - Bake.
Bake for 9–11 minutes. If the wells rise a little in the oven, press them again while the cookies are still hot. Do this carefully, because fresh cookies are soft. - Make the chocolate filling.
Warm the cream until almost hot and pour it over the chopped dark chocolate. Leave it for 2 minutes, then stir until smooth. A small piece of butter will make the filling glossier. - Fill the centers.
When the cookies are cool, add a little chocolate filling into each well. You can dust the top with cocoa or add a couple of hazelnut crumbs. But don’t overdo it: the chocolate center already looks beautiful.
Small Tips to Improve the Flavor
- For this recipe, it’s better to use instant espresso powder, not regular ground coffee. It blends into the dough more easily and does not leave gritty bits.
- It’s worth lightly toasting the hazelnuts. After that, they smell much brighter, and the cookies turn out not just sweet, but with a good nutty flavor.
- The chocolate filling is easier to add when it has thickened a little. Very hot ganache can spread, and after a few minutes, it settles into the center more evenly.
- I wouldn’t make these cookies too sweet. Brown sugar, hazelnuts, and chocolate already give a rich flavor, and the espresso adds a nice depth. So I would skip powdered sugar on top here.
Hazelnut espresso thumbprints go well with coffee, hot chocolate, or strong black tea. They will be a nice addition to a gift box with cookies — among the pink, berry, and creamy cookies, you need one darker coffee-flavored option. What do you think?
Dessert for Your Mood
You don’t have to choose only one holiday dessert. For any holiday, a little variety always wins. And Valentine’s Day is no exception: a few strawberry hearts, a couple of chocolate cookies, something with caramel or pistachios — and now the table has not just cookies, but a wonderful holiday treat with different flavors.
You can start with any recipe, depending on what you like and what mood you’re in. Do you prefer something more classic with berries, something chocolatey, something coffee-flavored, or something unusual like rosewater and pistachios? Write in the comments — I love seeing which recipes people choose for their holidays.