
When setting up your backyard, it’s very important how everything is arranged in it and how all the elements work together.
Backyard landscaping designs can completely change how you perceive your space. And it’s not about budget or complex solutions.
At first, it feels like you need to add more elements: plants, decor, details. But then you see that the space looks overloaded and still doesn’t give the right feeling. As soon as you start simplifying and building logic — the space changes.
Here I tried to collect 10 ideas that give a noticeable result. They help bring order, make the space more удобный and visually attractive without extra costs.
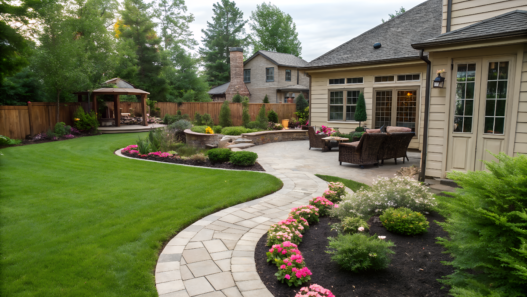
1. Modern Minimalist Patio Layouts That Feel Luxurious

When we first tried to make modern minimalist patio layouts, we removed almost everything… and there was no effect. Back then we didn’t understand that it’s not about the number of things, but about how precisely they are chosen and placed. And even in a small space, you feel it right away.
What affects how a space is perceived:
- Clear geometry — straight lines, no extra curves
- Limited palette — 2–3 colors maximum
- Material contrast — concrete + wood, metal + textile
- Free space — don’t fill every meter
Research in environmental design (including work from University of Minnesota) shows that structured spaces with repeating elements are perceived as more harmonious and organized.
What You’ll Need
A minimal set that gives the right effect:
- Pavers or concrete slabs
- Gravel for the base (2–3 inches / 5–7 cm)
- 2–4 furniture pieces
- One accent element (planter, fire, tree)
- Neutral-toned cushions (for example, Greendale Home Fashions Outdoor Seat Cushion)
- Simple outdoor lighting
- Level and rubber mallet
You don’t need more. Really. Any extra item creates visual noise
How to Make a Minimalist Patio (Step-by-Step)
- Define the shape. Choose a simple rectangle or square. No complex lines. A size of 10×10 ft (3×3 m) already works, 12×16 ft (3.6×4.8 m) feels more comfortable. A clear shape immediately organizes the whole space.
- Prepare the base.Remove the top layer of soil about 4–6 inches (10–15 cm). Add gravel (2–3 inches / 5–7 cm) and compact it. Add a layer of sand on top. This is not the step to simplify — it defines whether your patio will stay level in a year.
- Lay slabs with gaps. Leave 1–2 inches (2.5–5 cm) between slabs. Fill them with gravel or soil with low plants. It’s a small detail, but it gives depth and a clean look.
- Choose fewer but larger furniture pieces. One sofa, one table, maximum two chairs. That’s it. Many small items create visual noise, even if they are beautiful on their own.
- Add one accent. It can be a large planter or a fire bowl. One accent holds the composition. The second one starts to break it.
- Stick to a limited palette. Gray (concrete), black (metal), warm tone (wood or fabric). If a fourth color appears — the space starts to “fall apart”.
- Add soft lighting. Linear lighting along the edge or 2–3 directional lights is enough. The light should be soft, not bright.
Timely Practical Tip
Before buying anything, assemble the patio roughly right on the site. Just place future elements the way you see them: mark slab borders, place furniture (even if temporary), outline the accent spot. Then don’t rush.
Walk by a few times, look from the house window, sit there for a couple of minutes.
You’ll quickly see where it’s too tight, where it’s too empty, and whether you overloaded the space. This is the moment where it’s better to remove extra things than later try to fit in what you already bought. By the way, it’s exactly after these tests that we realized we shouldn’t order one more element.
A minimalist patio works especially well where you want to create a calm space without visual noise — near the house, by the kitchen exit, or in a small corner of the yard for relaxation. Fewer items — more air, and it actually feels much nicer to be there.
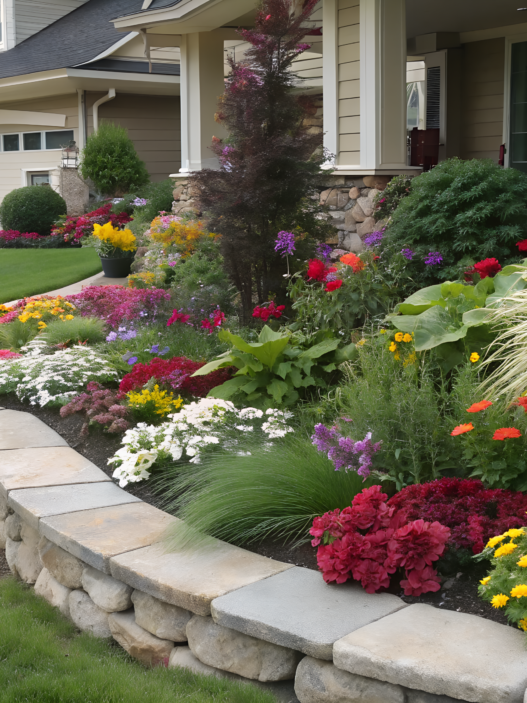
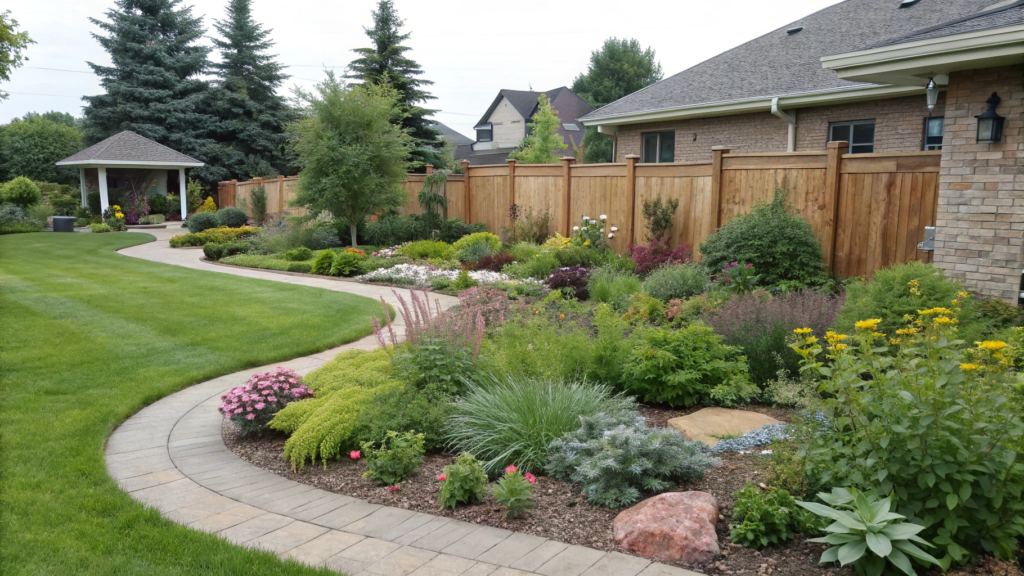
2. Layered Planting Borders Along the Fence Line
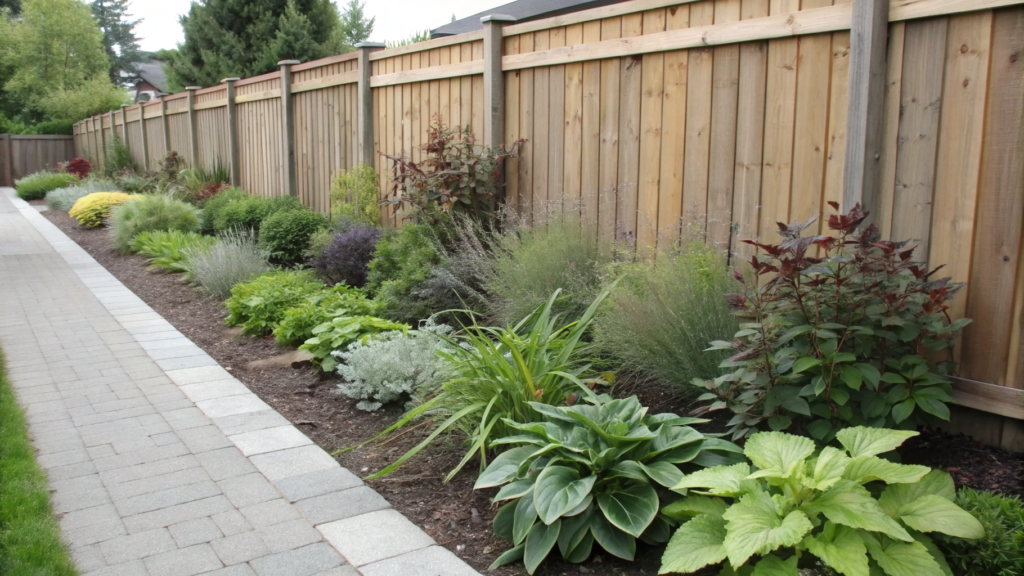
It’s always interesting to turn a boring fence into a living and visually interesting part of the space. Depth appears, and your eye stops hitting the fence.
Here’s what immediately gives results:
- Different plant heights — from low to tall
- Repetition — same plants in groups
- Different leaf textures — large + small
- Slight line offset — don’t plant everything in one straight line
I think you’ve noticed yourself that layered planting feels more volumetric and pleasant to the eye, even if the area doesn’t change.
What You’ll Need
- 3–5 types of plants of different heights
- Shrubs for the back layer (3–6 ft / 90–180 cm)
- Medium plants (1–3 ft / 30–90 cm)
- Groundcovers or low flowers (up to 1 ft / 30 cm)
- Quality soil (for example, Miracle-Gro Garden Soil All Purpose)
- Mulch (2–3 inches / 5–7 cm)
- Pruning shears (for example, “Fiskars Steel Bypass Pruning Shears”)
You don’t need dozens of plant types. Better fewer, but repeat them along the whole length.
How to Make a Layered Border Along the Fence
- Define the planting strip width. Minimum 2–3 ft (60–90 cm), better 4–6 ft (1.2–1.8 m) if you have space. Narrow strips almost don’t create a layered effect.
- Start with the back layer. Place tall shrubs or ornamental grasses closer to the fence. Not too close — leave 1–2 ft (30–60 cm) for growth and maintenance.
- Add the middle layer. Place medium-height plants in front of the shrubs. Lavender, echinacea, and sage work well here. They create a transition between levels.
- Fill the front layer. Low plants or groundcovers cover the soil and make the edge look clean. This is the layer that visually ties everything together.
- Plant in groups, not individually. 3–5 plants of the same type together. Then repeat this block further along the line. This makes everything look cohesive.
- Add slight offsets. Don’t align plants in one straight line. Shift them slightly forward and backward. This adds a natural feel.
- Mulch the entire area. A 2–3 inch (5–7 cm) mulch layer holds moisture and makes the planting look clean right away.
What Affects the Result
Don’t try to fill everything at once. Leave some empty space between plant groups.
At first, it might feel like something is unfinished. But after a season, plants will grow and fill that space. And if you plant everything densely from the start, in a year it will turn into chaos, where plants start competing with each other.
Layered borders work especially well along long fences where there used to be just an empty line. They add depth and break monotony. But even in a small yard, this technique makes the space feel bigger and more interesting — the fence stops being a boundary and becomes part of the design.
3. Water Features That Don’t Require a Pond
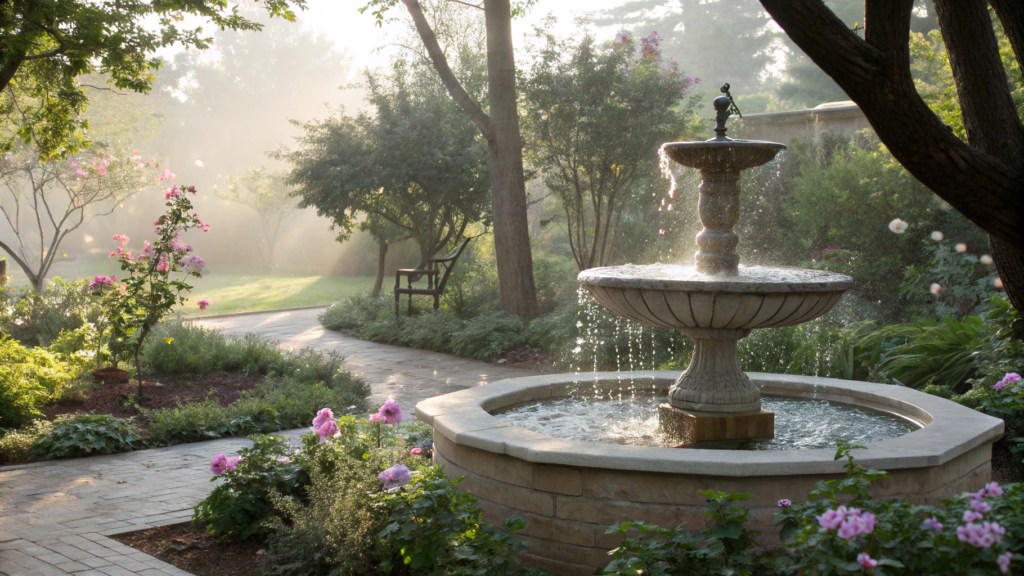
We were thinking about a pond on our site. But it felt like something too complicated. But the idea of a fountain we brought to life quickly.
There are several reasons why this format often wins over a classic pond:
- No need to dig and seal a pit
- Minimal maintenance — no need to control an ecosystem
- Can be moved if needed
- Works even in a small yard
Agree, the sound of flowing water helps reduce stress and makes the space feel more relaxing, even if it’s a small feature, not a large body of water.
What You’ll Need
- Ready-made fountain or a water form
- Submersible pump (if not built-in)
- Reservoir or hidden water container
- Gravel or decorative stone
- Level
- Extension cord or access to electricity
You can also use a stone with a hole or a ceramic bowl and assemble everything manually.
How to Make a Water Feature Without a Pond
- Choose the format. Decide what fits you better: a vertical fountain, a water stone, or a small bowl. Vertical models give more sound, while low ones look calmer. For the first try, it’s easier to take a ready-made option — it’s already balanced in water flow and doesn’t require adjustments.
- Choose the placement. Place the feature where you will actually hear it — near a patio, path, or seating area. At the same time, avoid full sun: water will evaporate faster and the pump can overheat. Light partial shade is the best option.
- Prepare the base. The base should be level and stable. Even a small tilt will cause uneven flow or spilling. If placing on the ground — level the area and add a layer of compacted gravel (2–3 inches / 5–7 cm).
- Install the reservoir and pump. If it’s not a ready-made fountain, place the reservoir at the bottom and put the pump inside. The decorative element goes on top. It’s important that the pump is fully submerged — otherwise it will fail quickly.
Make sure to use an outdoor-rated extension cord and keep all connections above ground and water level. - Hide the technical parts. Wires, pump, and reservoir shouldn’t be visible. Cover them with gravel, stones, or neatly placed plants. But don’t overload — keep access.
- Fill with water and adjust the flow. After запуск, check how the water flows. Sometimes you need to slightly adjust the stone position or tilt to make the flow look natural and avoid splashing outside the area.
- Add surrounding elements. A few plants or stones help integrate the feature into the garden. But don’t place them too close — leaves will fall into the water and clog the pump.
One Practical Tip That Saves Nerves
Think about easy access to the pump right away. Don’t fully cover it with decorative elements. Sooner or later, you’ll need to clean it, check it, or replace it.
And if you have to take apart half the structure to do it — it quickly becomes annoying. Better leave a small hidden access that doesn’t ruin the look but solves the problem in advance.
These water features are best placed near a patio, along a path, or in a small corner of the yard. Even a compact fountain changes how the space feels, and the garden starts to feel more alive.
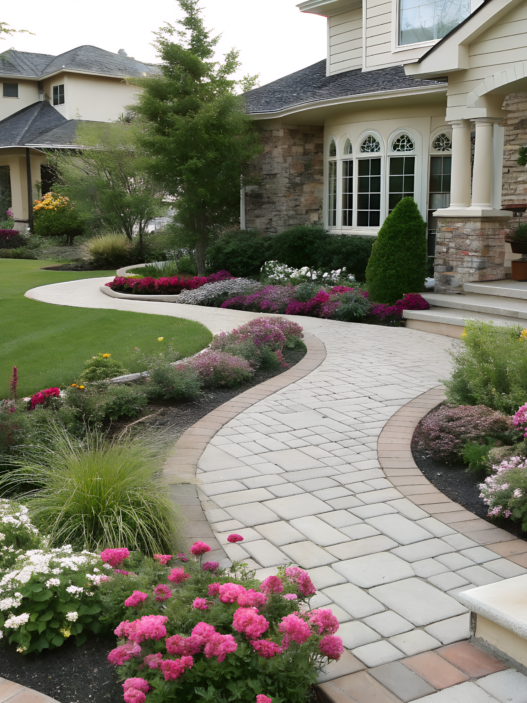
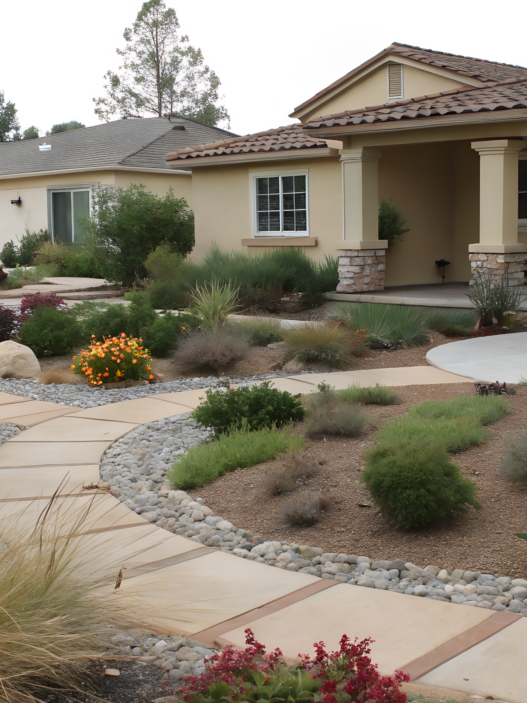
4. Gravel Pathways for Effortless Structure

Gravel pathways are the easiest way to bring order to your yard and make it visually clear.
Because this technique:
- Clearly defines movement routes
- Divides the space into zones without fences or partitions
- Adds contrast between plants and surfaces
- Easily adapts to any shape
What You’ll Need
- Gravel (best size 3/8–3/4 inch / 1–2 cm)
- Geotextile
- Edging or border (metal, plastic, or stone)
- Shovel and rake
- Tamper or just firm compaction with your feet
- Optional: stepping stones (if you want to add an accent)
Don’t skip geotextile. Without it, weeds will start growing through in a season, and the path will lose its look.
How to Make a Gravel Pathway
- Define the route. Walk through your yard and see where you actually walk. Don’t draw perfect lines on paper — the path should follow natural movement. Width is usually 2–3 ft (60–90 cm) for a single path.
- Mark the edges. Use string or just visually mark the borders. Try to avoid sharp turns — soft curves look more natural and are easier to use.
- Remove the top layer of soil. Remove 2–4 inches (5–10 cm) of soil along the entire length. This helps prevent gravel from spreading and rising above ground level.
- Lay geotextile. Spread it along the entire path. It blocks weed growth and keeps gravel from mixing with soil.
- Install edging. It holds the shape of the path and prevents gravel from spreading. Even a simple plastic border creates a clean edge.
- Add gravel and level it. A layer of about 2–3 inches (5–7 cm). Level it with a rake, then lightly compact it. No need to make it perfectly smooth — a slight texture adds natural feel.
- Add accents if needed. You can install stepping stones or leave clean gravel. Stones make walking more stable, especially after rain.
Tip
Don’t make the path too narrow just to save space. If it’s less than 2 ft (60 cm), it’s uncomfortable to walk on, especially if you’re carrying something. And it starts to feel like a temporary trail, not part of the design.
Better slightly wider and simpler than narrow and “economical.”
Gravel pathways work especially well between garden beds, along the house, or as a connection between seating areas. They don’t overload the space, but make it visually clear.
5. Raised Garden Beds Designed as Seating Walls
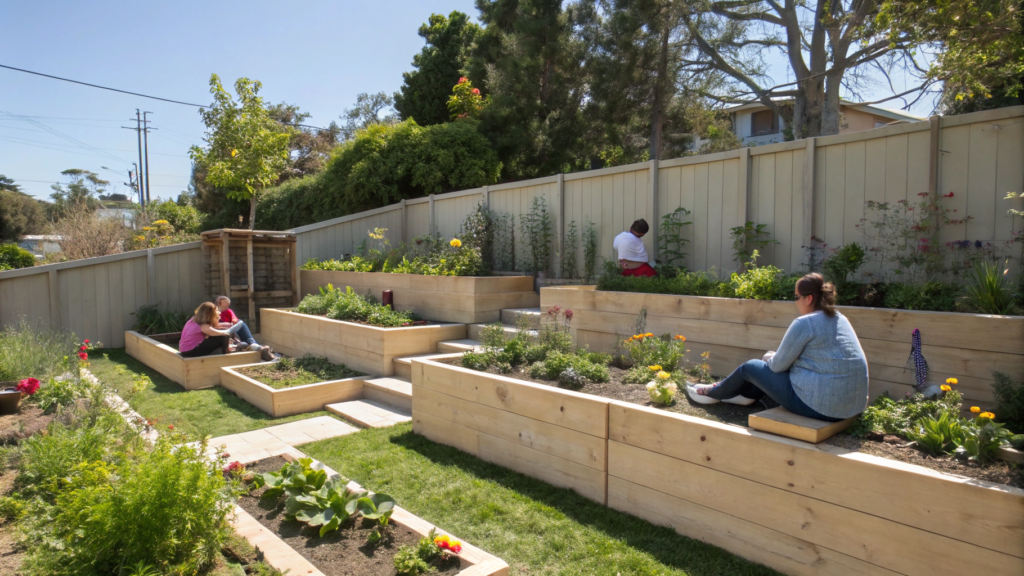
This is a solution that solves two things at once: it gives you a place for growing and at the same time creates a spot where you can sit and relax.
This format is convenient because:
- Saves space — one element instead of two
- Simplifies layout — fewer objects in the yard
- Makes the space more cohesive
- Easy to use — you sit and immediately start working
What You’ll Need
- Boards or blocks for the walls (cedar, metal, or concrete)
- Fasteners or brackets
- Soil mix
- Drainage layer (gravel or wood chips)
- Level
- Drill or basic tools
For seating, it’s important that the top edge is wider than usual.
How to Make a Raised Bed with Seating Function
- Define the height of the structure. Optimal is 16–20 inches (40–50 cm). Lower — uncomfortable to sit. Higher — it starts to feel more like a bar counter than a seating area.
- Make the top edge wider than usual. Minimum 10–12 inches (25–30 cm). This is what you’ll sit on. A narrow edge doesn’t work — it’s simply uncomfortable.
- Choose material considering contact. Wood should be smooth, without splinters. If concrete — better to add a wooden cap on top. This affects comfort more than it seems.
- Prepare the base. Level the area and add a gravel layer of 2–3 inches (5–7 cm). This protects the structure from moisture below and increases durability.
- Build a reinforced frame.Since people will sit on the edge, the structure must be solid. Add internal supports or extra fasteners so the walls don’t move.
- Fill drainage and soil. Bottom — a layer of rough material (branches, wood chips, or gravel), top — quality soil. This improves drainage and reduces soil usage.
- Plan the placement. It’s better to place such beds along a patio, near a wall, or at the edge of a seating area. Then they actually work as seating, not just as a decorative element.
Tip
Think right away about how you will sit. If the edge is too sharp or hard, you won’t want to stay there long. We once left an unprocessed edge — it looked fine, but sitting was uncomfortable. In the end, we had to redo it.
Better to:
- slightly round the edge
- sand the surface
- or add a top cap
And you can just throw a couple of outdoor cushions — even on a hard surface it becomes noticeably more comfortable to sit. And this determines whether you’ll actually use this space.
These beds are best in areas where you can combine rest and work — near a patio, kitchen exit, or in a small yard. They remove extra furniture, simplify the space, and make it more practical for everyday life.
6. Fire Pit Zones with Unexpected Materials
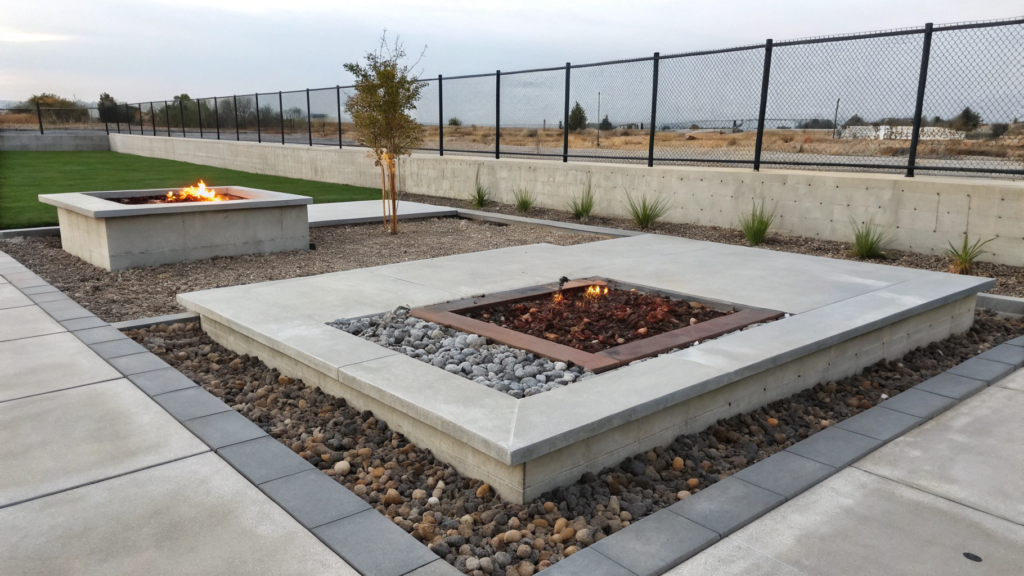
A typical fire pit zone already feels a bit overused — stones, circle, everything classic. But if you play with materials like concrete, metal, or gravel — the zone starts to look completely different.
This is where the difference appears:
- Contrast with surroundings — fire with concrete or metal looks stronger right away
- Clear shapes instead of random lines
- Looks more modern
- Easier to keep the area clean
Recommendations from the National Fire Protection Association say that if you use non-combustible materials around the fire and keep proper distance, the risk of fire spread becomes much lower, especially in dry climates.
What You’ll Need
- Fire base (for example, Sunnydaze 36-Inch Steel Fire Pit Ring)
- Non-combustible materials: concrete, metal, stone
- Gravel (2–3 inches / 5–7 cm)
- Base (sand or compacted soil)
- Metal edging or border
- Shovel, level
You can also use concrete slabs or even large metal elements as part of the design.
How to Make a Fire Pit Zone with Unexpected Materials
- Define the shape of the zone. Better to use simple geometry: circle or square. Diameter is usually 6–10 ft (1.8–3 m). This gives enough space for seating and safe distance.
- Prepare the base. Remove the top layer of soil 3–5 inches (8–12 cm). Add gravel and compact it. This protects from dirt and makes the surface stable.
- Install the fire element. Use a metal ring or ready-made fire bowl. It keeps the fire contained and protects surrounding materials.
- Add an unexpected material. Instead of standard stone, try concrete slabs, metal panels, or large gravel with a clear size.
It’s important that the material looks intentional, not random. - Create a clear boundary. Edging or metal border holds the gravel and visually organizes the space. Without it, everything starts to spread.
- Organize seating around. You don’t have to use separate chairs. You can use:
- concrete blocks
- wide edges
- built-in benches
The main thing — don’t overload the space.
- Check safety distances
Minimum 3 ft (90 cm) to seating and 10 ft (3 m) to buildings or plants. This matters, even if everything looks compact.
Practical Tip
Don’t use different materials just because they look good separately. If concrete, metal, and stone are not connected — the zone starts to feel random. Better choose one main material and one secondary, than mix everything together.
And pay attention to how the fire pit zone looks when the fire is off. During the day, it should look no worse than in the evening.
These fire pit zones are usually placed where people gather in the evening. And when materials are chosen right, even a simple fire starts to look like a thoughtful part of the whole yard, not just a place “where you burn wood.”
7. Pergola Corners That Double as Shade Havens
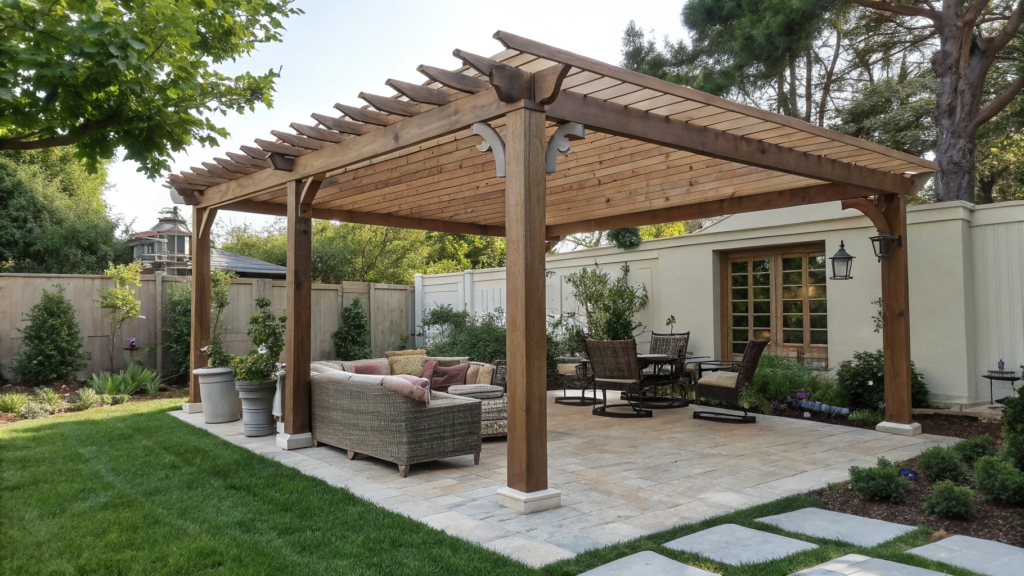
Pergola corners create shade exactly where it’s really needed. A clean corner that solves several things at once: sun protection, a place to relax, and a logical continuation of the layout.
Here’s why a corner pergola is more convenient than a freestanding structure:
- Saves space — uses a corner that often stays empty
- Gives shade exactly where you sit, not where it “ended up”
- Easily integrates into existing layout
- Creates a sense of a protected place, but without feeling closed
What You’ll Need
- Wooden or metal pergola structure
- Fasteners and anchors
- Base (concrete blocks or compacted gravel)
- Fabric or panels for extra shade
- Climbing plants (optional)
- Level, drill
Pergola size is usually 8×8 ft (2.4×2.4 m) or 10×10 ft (3×3 m) — enough for a full seating area.
How to Make a Pergola in a Corner
- Choose the right corner. Look for a spot where the sun hits strongest in the afternoon. Most often it’s the southwest side of the yard. A pergola there will actually be used, not just stand “for looks.”
- Define the size based on real furniture. First decide what will be inside: sofa, table, or chairs. Then choose the size. If you guess, you often end up with furniture that doesn’t fit or looks out of place.
- Prepare the base. If placing on the ground — level the area and add a layer of gravel 2–3 inches (5–7 cm). For a more permanent option — use concrete supports. The base must be stable, otherwise the structure can shift.
- Secure the structure. Corner placement requires solid fixing. Use anchors or крепления to the base. Even a light pergola can move in the wind if not secured.
- Add top shading. A pergola itself gives partial shade. If you need more — add fabric or panels that create soft diffused shade and don’t overload the structure.
- Add side protection if needed. If the sun comes at an angle, add one side — fabric or plants. This greatly increases comfort during hot hours.
- Integrate it into the space. Add 1–2 plants nearby or a small path leading to the pergola. This helps connect it with the rest of the yard so it doesn’t look like a separate element.
Tip
Don’t rely only on the top of the pergola. During the day it gives shade, but in the morning and evening the sun comes from the side and starts hitting the seating area directly.
It’s better to add side shading right away — for example, a fabric curtain, slats, or climbing plants. This makes it comfortable at any time of day.
These corner pergolas are placed where you want to create a seating area without taking the central part of the yard — in a patio corner, along the garden edge, or near the house. You can go there during the day when everything else is overheated and just sit in the shade.
8. Lighting Schemes That Transform Night Views
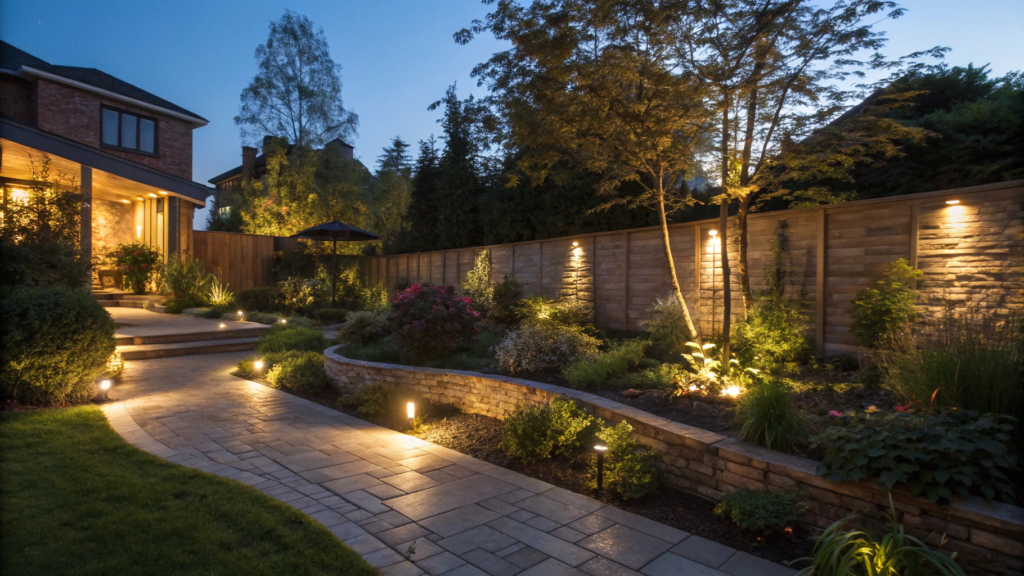
Lighting schemes literally change how your yard feels after sunset. And if everything is done right, the garden looks amazing.
The effect comes from soft, directional light, not full flooding; uplighting (plants, walls, textures); repetition of light points; and contrast between light and shadow.
What You’ll Need
- Low-voltage lights (for example, SUNVIE Low Voltage Landscape Lights 12W) — they give soft directional light and are easy to scale
- Transformer (usually 12V) — reduces voltage and makes the system safer
- Outdoor-rated cable with moisture protection — important to use one made for outdoor use
- Timer or smart plug — so lights turn on automatically in the evening
- Stakes or mounting hardware
- Optional: string lights or hidden linear lighting for soft ambient light
It’s better to build a simple system and then gradually add lighting than overload the yard right away.
How to Set Up Lighting
- Start with key points. Don’t try to cover the whole yard at once. Choose a few spots you already like: a tree, a patio corner, a path to the house. Light those. When these points turn on in the evening, the space immediately feels more intentional.
- Use uplighting. Place a light at the base of a plant or wall and aim it upward. This creates shadows, depth, and that effect where the object looks more dimensional. When we first lit a tree like this, it looked like a separate feature in the evening, not just “something green.”
- Separate lighting by function. One type of light is for visibility. Another is for atmosphere. And it’s better not to mix them. For example, a path can be lightly lit, while a seating area is softly illuminated from the sides. Then everything doesn’t feel equally bright.
- Place lights slightly off-center. If you point light directly at the center of an object, it often looks flat and even a bit harsh. Try shifting the source 1–2 ft (30–60 cm) to the side. The light becomes softer, and shadows more interesting.
- Choose warm light temperature. Cool light makes the yard feel technical. Warm light (2700–3000K) feels much calmer. This is when you don’t think about lighting — you just sit and feel good.
- Add soft ambient light. Not the main one. Just a layer that ties everything together. For example, string lights or lighting under a bench. It doesn’t stand out, but without it the space feels slightly empty.
Tip
It’s very easy to add one more light “just in case.” And that’s exactly when the space starts losing depth. Light should leave shadows — that’s the whole idea. If you’re unsure, it’s better to remove one light source than add another.
These lighting setups work especially well in seating areas, along pathways, and around plants where you want atmosphere without too much brightness. And when everything is set right, you’ll actually want to go there in the evening, not just walk past.
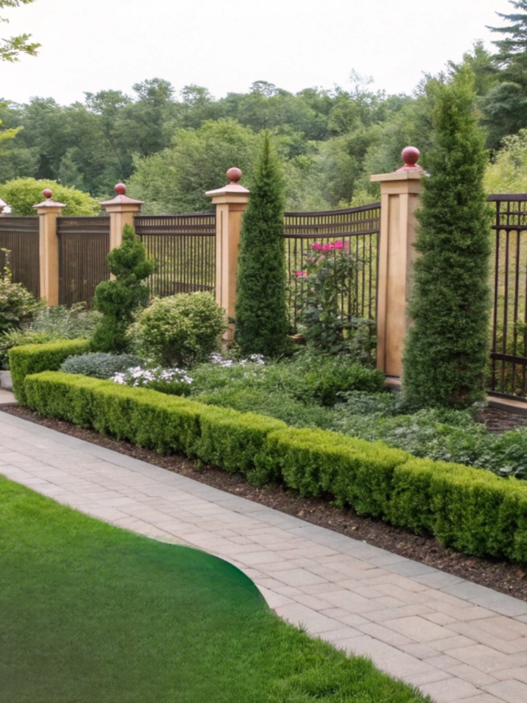
9. Sculptural Shrub Arrangements for Visual Drama
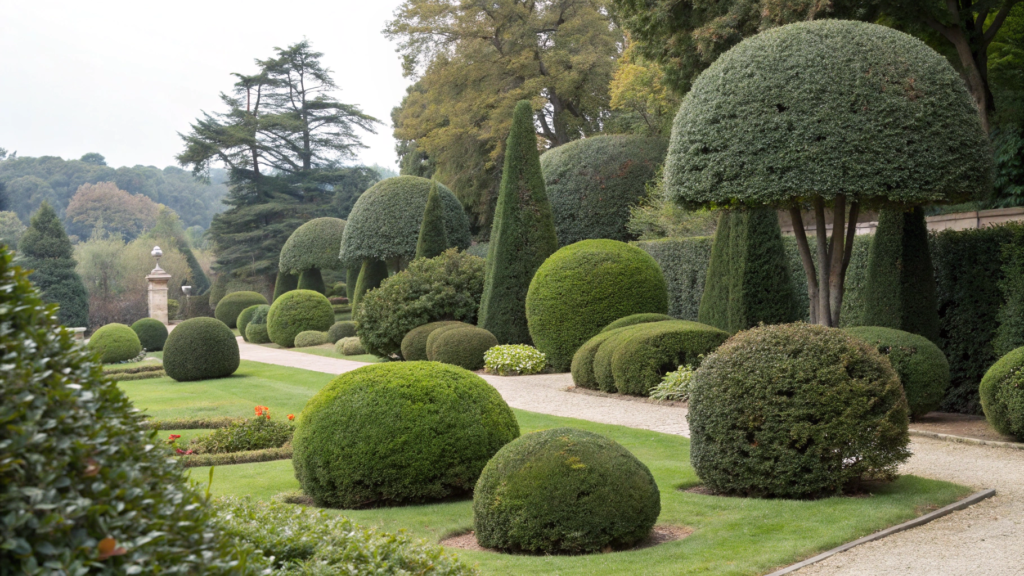
This type of composition creates the effect through:
- Clear shape — sphere, column, dome
- Size contrast — large next to small
- Repetition of one shape in different spots
- Minimum plant types, but thoughtful placement
What You’ll Need
- 2–4 shrubs with a clear shape
- Pruning tools
- Mulch (2–3 inches / 5–7 cm)
- Quality soil when planting
- Some free space around
Boxwood, thuja, laurel, and ornamental grasses with dense form work well.
How to Create a Shrub Composition
- Choose 1–2 shapes, not everything at once. For example, only spheres or a combination of sphere and vertical. When there are too many shapes, the eye starts to get lost. When one repeats — rhythm appears.
- Define the main accent. One shrub should be slightly larger or more noticeable than the others. It sets the composition. The rest support it, but don’t compete.
- Leave space around. Don’t plant shrubs too close to each other. They need space so their shape can be clearly seen. When they “merge,” the effect disappears.
- Work with different heights. Place one higher, another lower, a third in between. Even a small difference of 1–2 ft (30–60 cm) already creates depth.
- Add a simple background. Gravel, lawn, or single-tone mulch. No complex plant mixes around. Then the shrub shapes become the main element.
- Maintain the shape regularly. Light pruning a few times per season is better than one heavy cut. This way the shrub keeps its form and always looks neat.
- Repeat the element in another part of the yard. The same sphere or column a few meters away creates connection. The space starts to feel more intentional.
Practical Tip
Don’t be afraid that it’s “too simple.” In these compositions, simplicity is exactly what works.
One clean, well-shaped shrub can look better than a flower bed with ten different plants. If you’re unsure — it’s better to remove extra than add more.
These compositions work well near patios, along pathways, or at the entrance to the house — where you need an accent that holds attention. And when the shape is chosen right, even without flowers the yard feels alive and complete.
10. Low-Maintenance Layout Plans That Stay Green Year-Round
In this type of layout, there is less watering, less trimming, less rework. And at the same time, the yard doesn’t look empty in winter or summer.
To create this kind of layout, you need:
- More perennials and evergreen plants
- Minimal lawn or replacing it with alternatives
- Repetition of plants instead of a large “assortment”
- Simple zones instead of complex mixes
It’s clear that resilient and adapted plants require less water and maintenance, especially in regions with hot or variable climates.
What You’ll Need
- Evergreen shrubs (boxwood, thuja, juniper)
- Drought-tolerant perennials
- Groundcover plants
- Mulch (2–3 inches / 5–7 cm)
- Quality soil
- Drip irrigation (optional, but makes life much easier)
You don’t need dozens of plant types. Better 5–7, but repeat them across the yard.
How to Create This Layout
- Divide the yard into simple zones first. Define where you have seating, where paths are, where planting areas go. Without this, everything turns into random placement. A simple zoning logic immediately reduces chaos.
- Build the base with evergreen plants. This is the “skeleton” of the yard. Even in winter, it stays green. Place them so they hold the structure — along paths, borders, near the patio.
- Add resilient perennials. Choose ones that don’t require constant care. Lavender, sage, ornamental grasses — they add movement and texture without extra work.
- Cover the soil completely. Bare soil almost always leads to weeds and drying out. Use groundcovers or mulch. A 2–3 inch (5–7 cm) layer already gives a noticeable effect.
- Reduce lawn area. Lawn is one of the most demanding elements. Keep it only where it’s really needed. The rest can be replaced with gravel or plantings.
- Plan watering in advance. Even resilient plants need water in the first seasons. Drip irrigation makes it much easier and saves time.
- Repeat plants across the yard. When the same types repeat, the space looks more cohesive and requires less maintenance. You don’t need a separate approach for every spot.
Tip
Don’t chase a perfect look in the first season. It’s very tempting to make everything look full right away. But if you plant too densely, in a year plants will start competing with each other. You’ll have to replant, trim, fix things.
Better leave some breathing space and let plants fill it gradually.
Layouts like this make sense near the house, along pathways, or across the whole yard. Maintenance stops being a constant task and becomes part of your normal routine.
Your Outdoor Space
All these solutions seem simple. But when you start applying even 2–3 of them, the yard already looks different. Order appears, logic appears, and it becomes clearer how to use this space every day.
Look at your yard right now — don’t you want to change something? In the next few weeks?Write in the comments what resonated most. It’s interesting to see how the same space comes together differently for everyone.