Starting to cook delicious healthy meals at home might seem like a big challenge.
Especially when all the recipes around are complicated, full of strange ingredients and long instructions.
That’s exactly why I put together 10 surprisingly delicious healthy meals for beginners that are perfect even for those who just set foot in the kitchen for the first time yesterday.
All of them are time-tested: we’ve cooked them on weeknights at home, packed them for picnics, served them to friends, and just enjoyed being able to whip up something good without any fuss.
And yes, each recipe is designed to inspire you to cook more at home, without extra stress and overwhelm.
1. Beginner’s Favorite

I totally get it — when you’re just starting to cook at home, you want something simple, but still nice enough to put on the table. And preferably something that tastes good on the very first try.
So, here’s my personal “favorite” among beginner recipes. It’s so simple that even someone who yesterday only used a spoon to stir coffee could handle it.
What are we cooking?
Fragrant chicken breast with garlic and lemon — perfect to eat as is or toss into salads and toasts.
Ingredients:
- 2 chicken breasts (about 1 lb / 450 g)
- 1 tablespoon olive oil
- 2 cloves garlic, minced
- ½ teaspoon paprika
- ½ teaspoon salt
- ¼ teaspoon black pepper
- Juice of ½ lemon
- Zest of ½ lemon
- A pinch of thyme or oregano (optional)
Tip. You’ll need a good skillet! I use this one — Cuisinart Chef’s Classic Skillet on Amazon. Lightweight and cooks like a pro.
How to cook:
- Lightly pound the chicken breasts to even thickness. No need to turn them into pancakes — just enough so they cook evenly.
- In a bowl, mix olive oil, garlic, paprika, salt, pepper, lemon juice, and zest. Coat the chicken in the marinade and let it sit for 10–15 minutes. (If you have time — an hour is even better!)
- Heat the skillet over medium heat. Place the chicken in and cook for 5–7 minutes per side, until the juices run clear and the crust turns golden.
- Transfer the chicken to a plate and let it rest under foil for 5 minutes. That way it will stay super juicy.
This was one of the very first recipes that actually worked out for me without any “kitchen experiments”.
It was so simple: just a few moves, a minimal set of ingredients — and there it was, a real homemade meal!
That’s exactly why I love it — no unnecessary hassle. You just throw the chicken on the pan and go make yourself a cup of tea.
And another bonus: the smell! That garlic-lemon aroma does its magic even if you have zero cooking experience yet. A real lifesaver for any beginner cook.
2. Simple Baked Chicken with Yogurt Marinade

When the fridge looks empty but you still want to cook dinner, I always remember this recipe.
Minimal ingredients. Almost zero effort. And the result — good enough to invite friends over!
The secret here is the yogurt marinade. It makes the chicken incredibly tender, even if your chicken breasts used to turn out dry every single time before!
Ingredients:
- 2 chicken breasts (about 1 lb / 450 g)
- ½ cup Greek yogurt (120 ml)
- 1 tablespoon olive oil
- 1 tablespoon lemon juice
- 1 teaspoon garlic powder (or 2 cloves of fresh garlic)
- ½ teaspoon paprika
- ½ teaspoon salt
- ¼ teaspoon black pepper
How to cook:
- In a small bowl, mix together yogurt, olive oil, lemon juice, garlic, paprika, salt, and pepper.
- Coat the chicken breasts in the marinade. Cover and refrigerate for at least 30 minutes (or ideally a couple of hours).
- Preheat the oven to 400°F (about 200°C).
- Place the chicken on a baking sheet lined with parchment paper or lightly greased.
- Bake for 20–25 minutes, until the chicken is fully cooked through (internal temperature should reach 165°F / 74°C if you’re checking with a thermometer).
- Let the chicken rest for a couple of minutes before serving.
When we moved to our new place up in the Northwest, the kitchen there was in pretty rough shape.
No proper stove, no decent pots or pans.
Just an old oven and a couple of bowls. And at that moment, this yogurt chicken recipe really saved us.
Throw everything in a bowl, wait a bit, bake — done.
Even now, after so many years, it’s still our go-to for those “lazy evenings” when you want something homemade but simple.
Research shows that yogurt-based marinades really do help tenderize meat thanks to the lactic acids in the yogurt (National Institutes of Health (NIH)).
So it’s not just an old kitchen tale — it’s actual science!
3. Mediterranean Chickpea Bowl

I used to think of chickpeas as… well, something you eat just to survive.
But now I absolutely love them, and this chickpea bowl has become one of our go-to recipes for quick lunches.
Light, juicy, crunchy — and a little bit different every time, depending on what you have in the fridge.
Ingredients:
- 1 can chickpeas (15 oz / about 425 g), rinsed and drained
- 1 cucumber, diced
- 1 cup cherry tomatoes, halved
- ¼ red onion, thinly sliced
- ¼ cup crumbled feta cheese
- 2 tablespoons olive oil
- 1 tablespoon lemon juice
- ½ teaspoon dried oregano
- Salt and pepper to taste
- A few olives for garnish (optional)
- Pita bread for serving
How to make it:
- Rinse the chickpeas and pat them dry with a paper towel.
- Dice the cucumber, tomatoes, and onion.
- In a large bowl, gently mix the chickpeas, veggies, feta, and olives.
- Drizzle everything with olive oil and lemon juice. Sprinkle with oregano, add salt and pepper.
- Toss carefully — you want it mixed, not mashed.
- Serve with warm pita bread or enjoy it just as it is!
I still remember the moment when I dumped everything into a big porcelain bowl…
We were eating this “haphazard mix,” which honestly looked like food thrown together on the fly. And with every bite, it hit us: “Dang, this is insanely good!”
The freshness of the cucumber, the softness of the chickpeas, the salty bite of feta — it all just works together.
And the best part — it all came together in about 10 minutes, no frying pans and no heavy prep needed.
By the way, chickpeas are true champions when it comes to protein and fiber.
Research shows that regular consumption of legumes can help lower the risk of cardiovascular diseases by 10% (National Institutes of Health (NIH)).
So keep in mind — a bowl of chickpeas isn’t just tasty, it’s real heart nutrition.
4. Healthy Mac & Cheese with a Secret Ingredient

If someone had told me ten years ago that I’d be obsessed with mac and cheese… but a healthy version — I would have just laughed.
But here we are!
This version is not only lighter than the classic, but also seriously delicious.
And it’s all thanks to one secret ingredient that completely transforms the taste.
Ingredients:
- 8 oz (about 225 g) whole wheat or gluten-free pasta
- 1 cup cauliflower florets
- 1 cup low-fat milk (240 ml)
- 1 tablespoon butter
- 1 cup shredded cheddar cheese (about 115 g)
- ¼ cup grated Parmesan (about 25 g)
- ½ teaspoon salt
- ¼ teaspoon ground black pepper
- A pinch of paprika or nutmeg for flavor (optional)
How to make it:
- Cook the pasta in a large pot of salted water until al dente. Drain and set aside.
- In a separate pot, boil the cauliflower in a small amount of water until soft — about 8 minutes.
- Drain the water, transfer the cauliflower to a blender, add milk and butter, and blend until creamy.
- Pour the cauliflower sauce back into the pot. Add the cheddar, Parmesan, salt, pepper, and spices. Stir over medium heat until the cheese is fully melted.
- Add the pasta into the sauce. Gently toss until every piece is coated in creamy goodness.
Yes, the secret ingredient here is cauliflower. Of course, it sounds weird. I was skeptical too the first time!
But once you taste it — you’ll forget there are even veggies in there.
Smooth, creamy flavor, silky texture, and none of that “diet food” vibe.
I especially love making this dish in the fall when our garden is practically overflowing with cauliflower.
At that point, we could eat mac & cheese every day without even a hint of guilt.
Plus, cauliflower contains powerful antioxidants that can help reduce inflammation in the body (National Institutes of Health (NIH)).
So now you know: it’s not just tasty — it’s a real act of self-care.
5. Ground Turkey Taco Lettuce Cups

Crunchy lettuce cups instead of heavy tortillas make this dish light, fresh, yet seriously filling.
And the ground turkey filling turns out so flavorful that even those who are skeptical about healthy food happily devour every last bite.
Ingredients:
- 1 lb (450 g) ground turkey
- 1 small onion, finely chopped
- 2 cloves garlic, minced
- 1 tablespoon olive oil
- 1 teaspoon ground paprika
- 1 teaspoon chili powder
- ½ teaspoon cumin
- Salt and pepper to taste
- 1 tablespoon tomato paste
- ¼ cup water
- 8–10 leaves of romaine or iceberg lettuce (for the “cups”)
- Toppings to taste: shredded cheese, avocado, salsa, sour cream, fresh cilantro
How to cook:
- Heat olive oil in a skillet over medium heat.
- Add onion and garlic, and sauté for 2–3 minutes until translucent.
- Add ground turkey and cook, breaking it up, until it turns golden.
- Stir in spices, salt, pepper, tomato paste, and water. Cook for another 5–7 minutes until the sauce thickens.
- Prepare the lettuce leaves: rinse and pat them dry.
- Fill each lettuce cup with the turkey mixture and top with your favorite toppings.
One time I made these tacos for a summer get-together with friends. Everything needed to be simple because half the guests were chasing kids and the other half were chatting about garden successes.
And guess what — the plate of these lettuce cups was gone in 15 minutes!
Easy to grab, easy to eat, and absolutely delicious!
Best moments to serve Ground Turkey Taco Lettuce Cups:
If you’re wondering when to whip these up:
- At parties and BBQs, when you need something light and easy to grab.
- For weeknight family dinners, when there’s no time for complicated meals.
- On picnics and outdoor trips — the freshness of lettuce really hits the spot on a hot day.
- As meal prep for the week: make the turkey filling in advance and assemble cups as needed.
And by the way, according to the National Institutes of Health (NIH), turkey is one of the best sources of lean protein, helping maintain muscle mass, speed up tissue recovery, and support a healthy metabolism.
6. Banana-Oat Pancakes

These banana-oat pancakes are absolutely essential when you want something sweet for breakfast — without flour, sugar, or guilt.
They’re made from just three basic ingredients and turn out surprisingly delicious, soft, and slightly sweet — everything we love!
Ingredients:
- 2 ripe bananas
- 2 large eggs
- ½ cup quick oats (or regular oats, lightly blended)
- ½ teaspoon baking powder (optional)
- ½ teaspoon cinnamon (optional)
- A little oil for frying
Tip. If you make these often, I recommend using a good non-stick skillet with a thick base. Here’s the one I use — GreenLife Soft Grip Healthy Ceramic Nonstick on Amazon.
How to cook:
- Mash the bananas with a fork in a large bowl until smooth.
- Add the eggs and mix well until fully combined.
- Stir in the oats, baking powder, and cinnamon. Let the batter sit for 5 minutes so the oats can absorb some moisture.
- Heat a skillet over medium heat and lightly grease it with oil.
- Scoop the batter with a spoon to form small pancakes.
- Fry for 2–3 minutes on each side until golden brown.
One time I made these for a Sunday breakfast when friends with kids came over.
We were a little nervous — you know, kids can be picky — “ugh, oatmeal!”
But everything went great!
The kids devoured the pancakes faster than we could even brew coffee.
Best moments to serve Banana-Oat Pancakes:
- For quick weekday breakfasts: ready in 15 minutes, even when you’re half asleep.
- As a post-workout snack — a great source of carbs and protein.
- For kids’ parties or as a light dessert.
- For meal prep: they freeze really well! Just pop them in the toaster in the morning — and done.
And according to the American Heart Association (AHA), oats help lower bad cholesterol and support heart health thanks to their high content of beta-glucans.
7. Creamy Cauliflower Soup

Cauliflower, creamy texture, and a light smooth flavor make this soup a real comfort food.
And the best part — it’s ready in just 30 minutes and is perfect for a light dinner or family lunches with friends.
Ingredients:
- 1 large head of cauliflower, broken into florets
- 1 medium onion, chopped
- 2 cloves garlic, minced
- 4 cups vegetable or chicken broth (about 1 liter)
- ½ cup milk or plant-based milk (optional)
- 2 tablespoons olive oil or butter
- Salt and pepper to taste
- A pinch of nutmeg (optional)
Tip: If you want your soup perfectly smooth, an immersion blender is a lifesaver. I use this one — Mueller Austria Ultra-Stick on Amazon.
How to make it:
- Heat olive oil in a large pot over medium heat.
- Add onion and garlic, sauté until soft — about 5 minutes.
- Add the cauliflower and pour in the broth.
- Bring to a boil, then lower the heat and simmer for 15–20 minutes, until the cauliflower is soft.
- Remove from heat and blend the soup carefully until smooth.
- Stir in milk for a creamier texture, season with salt, pepper, and a pinch of nutmeg.
When to serve Creamy Cauliflower Soup:
There are a few times when this soup just fits perfectly.
On autumn and winter evenings, when the wind howls outside, a bowl of warm creamy soup turns an ordinary dinner into a little celebration. Its mild taste and soothing texture feel exactly right when you’re craving something comforting.
It’s also the perfect option for lunches at work. Just pour it into a thermos and you’ll have homemade comfort in the middle of a busy day.
It works beautifully as a starter for family dinners too. Before the main course, it brings a warm, welcoming vibe to the table.
And finally, if you’re planning a light detox dinner or a vegetarian day — this soup delivers 100%. Light yet filling, it satisfies without weighing you down.
How to tweak the recipe:
- Add cheese. A bit of shredded cheddar or Parmesan makes the soup even richer.
- Make it thicker. Toss in a little potato while cooking with the cauliflower.
- Boost the flavor. A pinch of turmeric, curry powder, or smoked paprika gives it a whole new vibe.
- Dress it up before serving. A drizzle of olive oil, some toasted seeds, or chopped parsley will freshen it up beautifully
8. Avocado Chicken Salad for Lunch

Chicken, avocado, a bit of crunch, a few spices — and in your bowl, you’ve got something truly satisfying, not just a rushed snack.
And yes, this is one of those lunches that actually leaves you feeling light and energized.
What you’ll need:
- 1 ½ cups cooked chicken, diced (about 200 g)
- 1 ripe avocado, diced
- 2 tablespoons Greek yogurt or light mayo
- 1 teaspoon Dijon mustard
- 1 tablespoon lemon juice
- ¼ cup green onion or regular onion, finely chopped
- ¼ cup celery, finely chopped
- Salt and pepper to taste
How to put it together:
- In a large bowl, gently mix the chicken, avocado, green onion, and celery.
- In a separate small bowl, whisk together the Greek yogurt, mustard, and lemon juice.
- Pour the dressing over the salad and mix gently.
- Season with salt and pepper to taste. That’s it!
Summer, heat, a million things to do — and the last thing you want is to spend hours by the stove.
You open the fridge, grab yesterday’s chicken and a couple of fresh veggies, and within five minutes you’ve got a lunch you’ll actually be happy to eat.
Where and how to serve Avocado Chicken Salad:
- Outdoors. Picnic, porch, backyard lunch — just pack a container and a couple of spoons.
- In pita or flatbread. Scoop some salad into a wrap — the perfect grab-and-go meal.
- Over a bed of greens. Toss a handful of arugula or mixed greens on a plate and pile the salad on top — looks almost restaurant-worthy.
- As meal prep. Keep it in a sealed container in the fridge — it stays great for up to two days.
For those curious about the health benefits:
According to UCLA Health, avocados help improve the absorption of antioxidants from other foods and support cardiovascular health.
9. Asian Peanut Noodles That Take 12 Minutes Flat
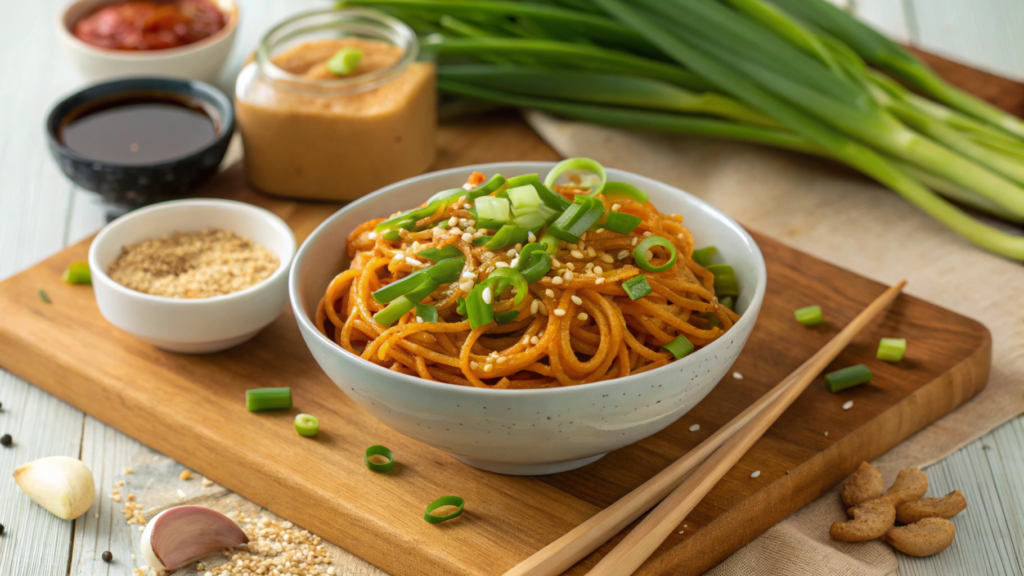
I love delicious noodles. And I love it even more when everything comes together super fast.
That’s exactly why we always have this peanut noodle recipe at home.
Seriously — from the moment you put water on to boil to the first forkful, it takes just about 12 minutes. Tried and tested many times!
What you’ll need:
- 8 oz (about 225 g) noodles (preferably rice noodles, but regular spaghetti works too)
- ¼ cup natural peanut butter (no sugar)
- 2 tablespoons soy sauce
- 1 tablespoon rice vinegar or apple cider vinegar
- 1 tablespoon honey or maple syrup
- 1 teaspoon sesame oil (optional)
- 1 clove garlic, minced
- ½ teaspoon ground ginger (or fresh)
- A little water for the sauce (1–2 tablespoons)
- Green onion, sesame seeds for garnish
How to make peanut noodles in 12 minutes:
- Put water on to boil and cook the noodles according to package instructions.
- While the noodles cook, in a small bowl mix together peanut butter, soy sauce, rice vinegar, honey, sesame oil, garlic, and ginger. Add a couple tablespoons of water to make the sauce creamy.
- Drain the noodles, keeping just a tiny bit of cooking water (about 2 tablespoons).
- Return the noodles to the pot, add the sauce, and mix well so every noodle gets coated in that aromatic cream.
- Serve immediately, topped with green onions and sesame seeds.
How to serve Asian Peanut Noodles:
- For a quick weeknight dinner. Fast, tasty, and minimal dishes to wash.
- For lunchboxes. Leftovers make a perfect lunch the next day — just pack it into a container.
- At parties. Serve the noodles in little bowls or cups — a cool and easy Asian-style appetizer.
A few extra tips:
- Love it spicy? Add a little sriracha or red pepper flakes to the sauce.
- Boost the meal. Toss in cooked chicken, tofu, or fresh veggies like shredded carrots and cucumber.
- Storage tip. Leftovers keep well in the fridge for up to 2 days — just give them a quick stir before serving.
And just so you know — according to the Cleveland Clinic, peanut butter, rich in monounsaturated fats, helps support heart health and maintain energy levels/
So a bowl of delicious peanut noodles isn’t just tasty — it’s good for you too!
10. Quick & Healthy Stuffed Bell Peppers

To be honest, for a long time I thought stuffed peppers were some fancy holiday-only dish.
But actually, with the right approach, it’s one of the quickest and easiest dinners you can throw together in just about half an hour.
What you’ll need:
- 4–5 large bell peppers
- 1 cup cooked brown rice (or quinoa)
- 1 lb (450 g) ground turkey or chicken
- 1 cup canned black or red beans, rinsed
- 1 cup corn (frozen or canned)
- ½ cup shredded cheese (cheddar or mozzarella)
- 1 small onion, finely chopped
- 2 cloves garlic, minced
- 1 teaspoon cumin
- 1 teaspoon paprika
- Salt and pepper to taste
- 1 can diced tomatoes (14 oz / about 400 g)
Use a baking dish with high sides so the peppers stay upright. I use this one — Cuisinart Chef’s Classic Bakeware on Amazon. Lightweight, durable, and doesn’t stick.
How to assemble quick stuffed peppers:
- Preheat the oven to 375°F (190°C).
- Carefully cut the tops off the peppers and remove the seeds.
- In a skillet, sauté onion and garlic until soft, then add the ground meat and cook halfway.
- In a bowl, mix the meat with rice, beans, corn, spices, and half the cheese.
- Stuff each pepper generously with the mixture.
- Place peppers into the baking dish, pour half the can of tomatoes around them, and drizzle the rest over the top.
- Cover with foil and bake for 25–30 minutes.
- Remove foil, sprinkle the peppers with the remaining cheese, and bake another 5 minutes until melted.
When we first harvested our own peppers from the garden, it was clear: we had to do something amazing with them. So I decided to try this version. We were amazed!
The ease of preparation, the rich flavor, and the look of that colorful pile of stuffed peppers — it was just too good for words!
A couple of tricks to make the recipe even better:
- Add some heat. Toss in fresh jalapeño or a few drops of hot sauce into the filling.
- Mix up the stuffing. Swap rice for quinoa, add some finely chopped spinach or shredded carrots.
Start With Just One Dish
I hope you found at least one recipe here that made you want to grab your skillet right now.
And if so — that’s already more than enough.
One new flavor, one new meal, one bowl of homemade food instead of a store-bought snack — and you’re already a little closer to the feeling we all really live for.
Cooking is simple. Taking good care of yourself is simple.
You can start with something as small as a bowl of peanut noodles or a banana oat pancake.
Leave a comment about which dish you liked best! I’ll be reading them with a cup of tea in hand, and genuinely smiling for you.