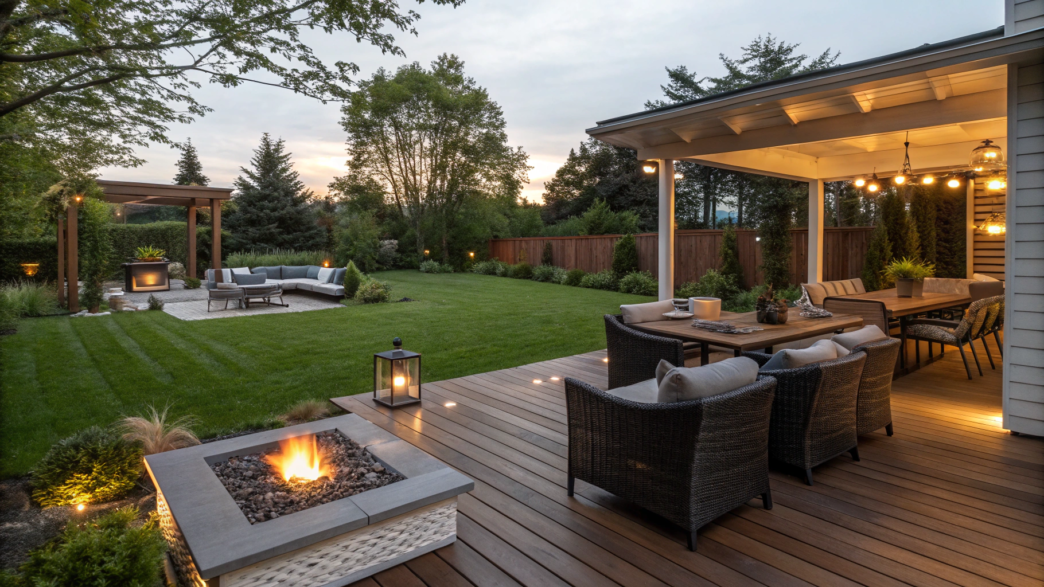
First, decide how you’re going to use your patio. Some people need a small table near the kitchen, others want loungers by the pool, while for someone else, a fire pit, hot tub, or covered area matters more.
You can fit furniture and plants beautifully even into a small space, while a large patio can easily be ruined by a dozen things placed wherever they happen to fit. If you have to move a planter or chair somewhere else just to sit down, something is already wrong with the layout.
Here, we’re going to talk about 10 different patio design ideas. For each one, we’ll look at what you’ll need and how to arrange the main elements so the space is actually comfortable to use afterward.
1. Small yard patio layout that feels spacious
In a small yard, free space disappears very quickly. First comes a table, then a few chairs, planters, a storage box — and at some point, there’s barely any room left between them. Even a patio that looks spacious at first can quickly start feeling cramped if you keep adding things without an overall plan.
From my own experience, I already know that a small patio is better planned not by starting with furniture placement, but with planning a clear walking path. First, you need to understand how you’ll move from the house into the garden, where you’ll sit, and what actually needs to stay on the patio all the time. Everything else can come later.
Think about what you actually need the patio for and define its main purpose. If it’s for morning coffee and relaxing in the evening, there’s no point trying to fit a large dining table, a sofa, and a separate fire pit area into the same space.
For a small yard, one main seating area is enough. For example, a round table for two with two chairs takes up much less room than a full dining set for six.
What you’ll need
- A compact round table about 24–30 inches (61–76 cm) in diameter. It has no corners constantly getting in the way.
- Two lightweight or folding chairs that can be moved quickly if you temporarily need the space for something else.
- A few planters with plants at different heights. One can hold ornamental grass, another flowering annuals or herbs. It’s better to create a few noticeable groupings than line the entire edge of the patio with pots.
- One tall plant or a support for a climbing plant. This could be clematis, jasmine, ornamental grass, or another plant suited to your climate.
- If needed, a small outdoor rug that visually separates the table and chairs from the rest of the yard without adding extra dividers.
How to make a small patio feel more spacious
1. Plan a clear path through the patio.
Arrange the furniture so the route from the door to the garden doesn’t cut through the middle of the table and chairs. If you have to walk around a chair or push it aside with your foot every time, there’s already too much furniture.
We’ve moved things around on our properties more than once for exactly this reason. On paper, a few extra planters looked perfectly fine. In reality, one of them always ended up exactly where I walked ten times a day.
2. Move the main seating area slightly toward the edge.
The table doesn’t need to sit in the middle of the patio. On a small patio, it’s better to keep the center open and place the furniture closer to the house wall, fence, or planting area. The more open space around the furniture, the larger the patio feels.
3. Use height instead of floor space.
One large planter with tall ornamental grass or a trellis with a climbing plant takes up much less room than five small pots spread around the entire perimeter.
You can create a simple arrangement with two or three planters. Put ornamental grass or a compact shrub in the tallest one, a flowering plant in the medium one, and basil, thyme, or another herb that’s useful to keep near the house in the smallest one. This way, the plants become part of the patio instead of just being objects placed around the furniture.
4. Don’t close off every edge completely.
A small group of plants on one side can help define the seating area, but a tall, dense border all the way around can make a small space feel even tighter. So it’s better to leave part of the patio open toward the garden.
5. Measure everything before buying furniture.
Mark out the future table and chairs directly on the ground with chalk, painter’s tape, or a garden hose. Then walk around the area a few times, open the door, carry something out from the house, and try pulling a chair back.
It may look a little funny, but it costs zero dollars and very quickly shows whether the set you picked actually fits the space.
While setting up our small patio, every free foot had to be used carefully. A space often benefits more from removing a few things than from adding new furniture or decor. A few comfortable places to sit, plants nearby, and a clear path give you much more than trying to fill every empty corner.
2. Covered deck designs for all-weather relaxation
There was a time when our open deck seemed like a great idea, right up until the days when the sun started beating down first thing in the morning or rain suddenly rolled in. Now, in our new house, I look at things differently and understand that a roof over the deck greatly increases the number of days when you actually use the space, instead of just looking at it through the window.
Lindy especially loves sitting outside when it rains. Not in the rain, of course! But when there’s a proper roof overhead, plants nearby, and you can hear the rain tapping somewhere beyond the edge of the deck, you really don’t want to go back inside.
To create this kind of deck, it’s enough to cover the main seating area, keep the sides open for airflow, and arrange the furniture so the wind doesn’t blow rain straight onto the cushions.
What you’ll need
- A roof or canopy over the seating area. If the deck is already built, you can install a permanent canopy or a retractable awning. The structure needs to be able to handle the wind, rain, and snow in your area.
- An outdoor sofa or two deep chairs with cushions made specifically for outdoor use.
- A small table for a cup, book, or plate.
- A storage box for cushions and blankets. Even under a roof, the wind can still blow in some rain, so closed storage is always useful.
- Two or three planters with plants. For a spot under a canopy, choose plants that do well in partial shade or filtered light. On the shadier side, you can use ferns, hostas, or other plants suited to your climate and growing conditions.
- Outdoor lights. One light source near the seating area is often enough without flooding the entire deck with light.
How to set up a covered deck
1. Cover the main seating area.
You don’t have to build a roof over the entire deck. The main goal is to keep the sofa, chairs, and table dry. Part of the deck can stay open to the sun and be used for planters or extra chairs when the weather is dry.
2. Check where the rainwater goes.
The roof should direct water away from the seating area instead of creating a stream near the steps or edge of the deck. Water also shouldn’t sit under plant containers for long periods. It’s better to raise the pots slightly above the wooden decking so air can circulate underneath and the surface can dry out.
3. Don’t fill the sides with furniture.
A covered deck already has a visual boundary overhead, so extra walls made from cabinets, tall chairs, and dozens of pots can quickly make it feel cramped. A sofa or a pair of chairs, a small table, and a few plants usually leave enough open space to move around comfortably.
4. Plan for closed storage near the seating area.
Cushions, a small blanket, board games, and other little things are convenient to keep nearby. Instead of carrying everything back into the house every time, you can store them in a closed outdoor storage box.
5. Place plants around the edges of the seating area.
A large planter can go in an open corner of the deck where it won’t block the way. One or two smaller ones can sit near a canopy post or along the sides of the sofa.
This way, the plants frame the seating area without ending up between the door, furniture, and steps. There’s usually less light directly under the roof, so plants that handle partial shade work better there. If the edge of the deck gets a few hours of direct sun, place sun-loving plants there instead.
A covered deck becomes part of everyday life when you don’t have to move things around, wipe everything down, or carry things out from the house before using it. Lindy can step outside with a cup of coffee, I sometimes sit there with my laptop, and on a rainy day the space doesn’t suddenly stop being usable just because the weather changed.
3. Concrete slab patio with built-in fire pit
A concrete patio and a built-in fire pit work really well together, especially if you want a permanent place for evening hangouts instead of pulling a portable fire bowl out of the shed every time.
But it’s better to plan the fire pit before pouring the slab. That way, you can place it exactly where it needs to go and leave enough open space around it.
On our property, fire always draws people in. Even if there’s a table nearby, somehow all the chairs end up around the fire pit sooner or later. Lindy brings out a blanket, I usually stay longer than I planned, and suddenly the evening stretches for another hour.
Just don’t assume concrete is automatically a safe base for any kind of fire. Intense heat in one spot can damage the surface, so a permanent fire pit should use a structure and inner insert specifically designed to handle high temperatures, and you should always check the manufacturer’s requirements and local fire safety rules before starting.
What you’ll need
- A concrete patio with the fire pit location chosen in advance.
- A ready-made metal fire pit insert designed to sit inside a stone or block surround.
- Heat-resistant materials for the inside of the fire pit, based on the insert manufacturer’s instructions.
- Stone or concrete blocks for the outer wall.
- Four to six outdoor chairs, depending on the size of the patio.
- Small side tables for drinks and plates.
For a built-in setup, it’s convenient to use a ready-made metal insert and then size the base around the specific model. For example, a round fire pit insert → Breeo Zentro Stainless Steel Smokeless Fire Pit Insert on Amazon. It’s designed to be installed inside a stone, block, or other non-combustible surround.
How to set up a patio with a fire pit
1. Choose the fire pit location first.
It shouldn’t be placed close to the house wall, a wooden fence, low branches, or other combustible materials. Required clearances depend on the type of fire pit, the fuel it uses, and local regulations, so check them before marking out the patio.
2. Make the fire pit part of the layout.
On a rectangular concrete patio, a round fire pit works well slightly off the main walking route. This leaves a separate seating area around it, while the path from the house into the yard doesn’t cut between people and the fire.
3. Don’t put the fire directly on ordinary concrete.
A built-in fire pit should use the base and inner materials specified for the system you choose. This helps protect the concrete slab from constant high heat that can lead to cracking or surface damage.
4. Arrange the chairs in a semicircle or circle.
Leave enough space between them so people can get in and out of the seating area without moving furniture around. The fire pit is already the center of the setup, so extra furniture usually isn’t necessary.
5. Leave part of the concrete patio open.
There’s no need to surround the fire pit with planters, lanterns, and more furniture. Open space around a live fire matters both visually and for safety.
We often end up gathering around the fire pit. You sit down for ten minutes after working in the garden, then Lindy brings out a blanket, and suddenly the rest of the evening happens outside. The fire pit ends up becoming a regular part of our evenings, especially during the cooler months when it’s hard to sit outside for long without a fire.
And don’t forget that the fire pit should be kept away from combustible materials, and you should always follow the manufacturer’s instructions and local fire safety rules.
4. Pergola patio ideas for shade and style
I think a pergola is almost essential for a patio that stays exposed to the sun for most of the day. It doesn’t completely cover the space like a solid roof, but it provides shade over the table or seating area while also defining this part of the yard.
You can leave the pergola with just the overhead beams or add a fabric canopy for denser shade. Another option is to grow climbing plants over the structure, as long as it’s designed to support their weight. The main thing is to decide in advance whether you want light, filtered shade or more complete coverage.
What you’ll need
- A wooden or metal pergola sized for the patio.
- An outdoor table with chairs or a seating area with armchairs, depending on how you use the patio.
- An outdoor fabric canopy if the pergola beams don’t provide enough protection from the sun.
- Large planters with plants near the posts.
- Climbing plants, if the structure can support them. Clematis, grapevines, or climbing roses can work, depending on your climate and the amount of sun.
- Outdoor string lights for evening lighting. For example, outdoor string lights Brightever LED Outdoor String Lights on Amazon.
How to set up a patio with a pergola
1. Place the pergola over the main part of the patio.
You can put a dining table underneath, a sofa with chairs, or both if the space is large enough. The main thing is to keep the furniture from blocking walkways and leave enough open space around it.
2. Decide how much shade you need.
Open overhead beams provide only partial shade. If the patio gets direct sun for several hours, you can attach an outdoor fabric canopy above. Choose the size to fit the inside of the pergola so the fabric doesn’t hang far beyond the edges of the structure.
3. Keep the spaces between the posts clear.
Chairs, large planters, and the table shouldn’t block the entrances to the pergola. This is especially noticeable on a small patio, where four posts already take up part of the usable space.
4. Plant around one or two posts.
You can put a climbing plant in a large planter at the base and train it up the post. You don’t have to cover the entire pergola with greenery. Sometimes one side is enough to provide extra shade while keeping the other sides open. Before planting, check that the specific pergola is designed to handle the additional weight of mature plants.
5. Plan the lighting under the pergola.
For evenings, warm outdoor string lights work well when attached along the overhead beams or around the inside perimeter of the structure. If you have both a table and chairs under the pergola, spread the light across the whole area instead of concentrating it in one spot.
The string lights should be rated for outdoor use, and the cord and connections shouldn’t be left where they can get wet or be easily snagged. If the pergola is large, you can complement the string lights with one outdoor wall-mounted or pendant light near the dining area.
A pergola doesn’t turn the patio into another room. You can still see the sky, plants, and garden around you, but in the middle of a hot day, you no longer have to keep moving your chair to follow the shade. You can leave the table and chairs in one place, have lunch outside, read or work there during the day, then turn on the string lights in the evening and stay out until dark.
5. Budget-friendly backyard patio transformations
I think you probably know the situation when the old patio itself is still perfectly fine, but everything around it looks tired — the furniture, planters, lighting, the edge of the flower bed, old cushions.
On our first property, we definitely didn’t have money for endless makeovers. So a lot of things changed gradually. Sometimes it was enough to move the furniture around, sometimes repaint an old table, and somewhere else remove a few random items and add proper planting around the patio.
For a budget-friendly update, it helps to look at the patio as a whole instead of focusing on individual things. What actually makes it look worse? Worn furniture? Bare concrete? Too many small pots? Once you figure that out, it’s much easier to spend money exactly where the difference will be noticeable.
What you’ll need
- Outdoor furniture paint if the table or chairs are still sturdy but look worn.
- New covers or cushions for the furniture instead of buying a whole new set.
- A few large planters with plants instead of lots of small pots.
- String lights or a pair of outdoor lights for evening lighting.
- Gravel, mulch, or edging to tidy up the edge of the patio.
- If needed, an outdoor rug if the patio surface is still in good condition but looks too bare.
How to update a patio without spending a lot
1. Keep only the furniture you actually use.
An old set often looks worse simply because random items gradually collect around the table and chairs — another armchair, a small table, a folding chair, a storage box. Remove everything extra and keep only what you actually use every day.
2. Refresh what can still be saved.
A sturdy table doesn’t need to be replaced just because the surface has faded. The same goes for metal chairs, a wooden bench, or a small storage cabinet. Cleaning, sanding, and the right outdoor finish can often give them a few more seasons of use.
3. Group plants into a few larger arrangements.
Five or six small plastic pots scattered around rarely make the patio look better. Two or three larger containers around the edges usually look much better. In larger planters, you can grow ornamental grasses, petunias, geraniums, lavender, or rosemary, depending on how much sun the patio gets.
4. Tidy up the edges of the patio.
The edges are often the first part to start looking neglected — grass creeps onto the concrete or pavers, soil spills out, and individual plants spread wherever they want. You can clear the edge and make a narrow strip of gravel, mulch, or low-growing plants. If there’s already a flower bed nearby, it may be enough to tidy it up and repeat a few plants along the patio. You’ll see that even this small job makes the edge of the patio look much neater.
5. Plan the evening lighting.
For a small patio, one practical solution is usually enough — string lights over the table or chairs, or a pair of small lights near the steps and the edge of the patio. The light should go where you actually walk and sit in the evening instead of just lighting up the whole yard.
So, as you’ve probably figured out by now, the most budget-friendly makeovers almost never start with buying new furniture. First, you remove what you don’t need, and then it becomes clear what actually needs replacing. Sometimes that cuts the shopping list in half — and that’s always a nice part of the project, isn’t it?
6. Attached-to-house patio for seamless indoor-outdoor flow
If the patio sits right next to the house, it’s a very practical setup. You don’t have to walk across the whole yard carrying plates, cushions, or a cup of coffee. Open the door — and you’re already outside. For us, that matters a lot because in summer, part of everyday life is constantly moving from the kitchen to the yard and back again.
Lindy can bring food straight out from the kitchen, I come over with my laptop or a basket of greens from the garden, and there’s no need to make a whole trip across the property every time I forget something.
The main thing here is to connect the patio directly to the house exit, instead of simply placing a paved area against the wall.
What you’ll need
- A concrete, stone, or paver surface directly next to the house.
- A table and chairs or a small seating area, depending on how you use the space.
- Lighting near the door and over the main patio area.
- A few planters with plants around the outer edge of the patio.
- If needed, an awning or permanent canopy over part of the patio.
- An outdoor mat near the door if you often come inside from the yard with dirt on your shoes.
How to set up a patio next to the house
1. Make the house exit part of the patio.
The patio starts right outside the door, so it’s important to get the height and slope right. The surface shouldn’t direct rainwater toward the house, and if there’s a step between the door and the patio, it should be comfortable and not too high. It’s also better for the surface to continue outward from the house without narrow strips or random changes in level.
2. Place the dining area near the kitchen.
If the nearest door leads from the kitchen or dining room, this part of the patio is a great place for the dining table. You don’t have to carry food, dishes, and drinks across the yard, so in summer this area actually gets used for breakfast and regular family dinners.
3. Keep the outer edge more open.
The wall of the house already creates one solid boundary, so it’s better not to close off the opposite side with a continuous row of furniture and tall plants. A few planters can go in the corners or be grouped along one side.
4. Plan for shade.
If this side of the house gets very hot during the day, you can install an awning or permanent canopy over the table or chairs. Before installation, check how it needs to be attached to the wall and choose a structure designed for the wind and snow loads in your area.
5. Organize the lighting.
A wall light near the door can light the entrance and part of the patio, while a separate, softer light can go over the table or seating area. For a small patio, that’s usually enough, and there’s no need to turn the whole side of the house into a row of lights.
The best part of this kind of patio is that it visually extends the house outside. From the room, you can see the table, plants, and chairs, with the garden just beyond them. In summer, that boundary becomes almost optional because the door stays open, someone is sitting outside, someone else stays inside, but everyone is still almost in the same space.
7. Poolside patio layout inspiration
A patio next to the pool needs a particularly clear and simple layout. You need loungers, a table, an umbrella, a place for towels, and plants, while still leaving enough open space around the water. So it makes sense to separate the seating area from the main walkways and the pool itself.
After swimming, you usually want to sit or lie down right away, so it’s better to keep towels and loungers close to the pool, but not right at the edge. Lindy usually chooses the spot closer to the shade, and I settle in next to her, so our two loungers stay together in one area. This keeps the seating area in one place and leaves the rest of the patio open for walking.
What you’ll need
- Two to four loungers, depending on the size of the patio. Adjustable loungers are practical because you can lay them flat or raise the backrest.
- A small table next to the seating area.
- A large outdoor umbrella or another source of shade.
- A basket or storage box for towels in a dry part of the patio.
- A few large planters with plants around the outer edge of the space.
- A slip-resistant surface suitable for use around a pool.
How to set up a poolside patio
1. Keep the space around the water open.
Move loungers, small tables, and large planters away from the immediate edge of the pool. You need a clear strip where you can walk with wet feet, get out of the water, or reach the ladder. The fewer things sitting right next to the edge, the easier it is to use the pool and clean the area.
2. Group the loungers in one area.
Instead of spreading them around different sides of the pool, it’s more practical to place two or four loungers together. You can keep a small table between them for water, sunglasses, or a book. If the sun shifts during the day, choose a side where the seating area gets at least some shade for part of the day.
3. Create shade next to the seating area.
Position a large umbrella so it actually covers the loungers during the hottest hours instead of just standing somewhere nearby. The base needs to be heavy enough for the size of the umbrella. If the patio is large, two separate umbrellas can sometimes work better than one oversized one.
4. Keep towels in a dry spot.
A closed basket or small storage box near the house wall, fence, or far side of the patio keeps towels close by but outside the main splash zone. You can also keep sunscreen, spare swim goggles, and other small pool essentials there.
5. Place plants around the outer edge.
Large planters work best behind the loungers, in the corners, or along the far edge of the patio. That way, they don’t narrow the walkway around the pool. For this area, it’s more practical to choose plants that don’t constantly drop lots of petals, berries, or tiny leaves into the water. Tall planters can also provide some partial screening from neighbors or another part of the yard.
Around the pool, you can tell pretty quickly whether the furniture is arranged well. If you have to walk around a lounger, step over a bag, or move a small table after swimming, the patio is already too crowded. When the main furniture is grouped in one place and there’s open space around the water, the whole area is much easier and more comfortable to use.
8. Hot tub corner patio setup
A hot tub works better in a separate corner of the patio than in the middle of the space. That makes it easier to leave room for steps, towels, and maintenance, while keeping the rest of the patio open for regular furniture.
It also makes sense to separate this area a little from the rest of the yard and give it some privacy from outside views. Lindy would definitely choose privacy over a nice view of the neighbor’s fence.
Before installation, check the requirements for your specific hot tub model. A hot tub filled with water is very heavy, so it needs a level, strong base that can handle the load. The electrical connection also needs to follow the manufacturer’s instructions and local codes, usually with ground-fault protection.
What you’ll need
- A hot tub that fits the selected corner of the patio.
- A strong, level base made from a material approved by the manufacturer of your specific model.
- Steps for getting in and out comfortably.
- A privacy screen, trellis, or planting for partial privacy.
- Hooks or a small towel rack near the hot tub.
- A slip-resistant surface near the entry point.
- Low outdoor lighting rated for use near a wet area.
How to set up a hot tub corner
1. Start with the base.
The area needs to be level, stable, and strong enough to support the weight of the filled hot tub plus the people using it. You can’t judge this by the size of the tub alone. Before preparing the area, check the manufacturer’s requirements for the base and total load.
2. Leave access to the equipment.
Don’t place the hot tub tight against walls, built-in benches, or other structures. During maintenance, a technician may need to remove a side panel and reach the pump, heater, and other components. The manual for your specific model will tell you how much clearance to leave on the service-panel side, so check this before installation.
3. Screen the most exposed side.
If the hot tub is clearly visible to neighbors or from another part of the yard, you can place a wooden trellis, privacy screen, or tall plants on that side. It’s better not to close off the other sides completely so there’s still enough open space around the water.
4. Plan a spot for towels.
You can place a small rack near the steps or add a few hooks. Choose a spot that stays out of the splash zone so the towels remain dry and are easy to reach when you get out of the hot tub.
5. Plan the lighting around the tub.
Bright light directly over the water usually isn’t necessary. It makes more sense to light the steps, the edge of the patio, and the place where you keep the towels. Electrical fixtures and lighting should meet the requirements for this kind of wet area and be installed at the distances required by the manufacturer and local electrical codes.
For this kind of setup, the most important things are privacy, easy access to the water, and enough space around the hot tub itself. Towels, steps, and lighting support that basic setup. For Lindy, and for me too, a hot tub session often turns into half the evening, so you notice pretty quickly how well everything around it has been arranged.
9. Modern patio furniture and lighting ideas
A modern patio usually comes down to simple furniture, clean shapes, and well-planned lighting. You don’t need complicated furniture sets or a lot of decor. A sofa or a pair of deep chairs, a low table, a few large plants, and lighting that doesn’t glare at you in the evening are enough.
Our outdoor furniture always has to pass a pretty simple test. If a chair looks great but isn’t comfortable for more than ten minutes, we don’t need it. Lindy has absolutely no mercy with things like that. And she’s right.
What you’ll need
- A sofa or a pair of deep chairs with outdoor cushions.
- A low table in front of the seating area.
- One or two side tables if the patio is large enough.
- An outdoor floor or wall light.
- String lights for softer general lighting.
- A few large planters with plants for the corners of the patio or next to the seating area.
How to style a modern patio
1. Limit the amount of furniture.
On a small patio, a sofa and two chairs are often enough. If the space is even smaller, you can keep a pair of comfortable chairs and a small table. Leave enough room between the furniture to walk around freely without bumping into anything.
2. Choose simple shapes.
Straight armrests, low tables, and furniture without bulky decorative details usually take up less visual space. This is especially noticeable on a small patio, where heavy furniture can quickly dominate the whole area.
3. Light the main areas.
Near the exit from the house, you need a separate outdoor light. Over the dining table, use lighting that properly lights the tabletop, and for steps, use dedicated outdoor step lights so the edges and changes in height are clearly visible in the evening.
4. Use string lights as additional lighting.
You can hang them above the sofa and chairs, along a pergola, canopy, or on separate posts around the patio. For outdoor use, choose only string lights and extension cords that are rated for exterior use and protected from moisture. Here, the string lights are meant to create softer evening light, not replace the main lighting.
5. Place large plants around the edges of the patio.
Containers with ornamental grasses, such as miscanthus or switchgrass, work well near the sofa. On the sunny side, you can use lavender or rosemary, while hostas or ferns work better in shadier spots. One or two large planters usually look cleaner than lots of small pots scattered between chairs and tables.
In the end, the modern look comes from a clear, well-planned setup. The furniture sits where it’s comfortable to use, the lighting doesn’t glare in your eyes at night, and the plants still feel like part of the garden rather than decor placed between the chairs. This is the kind of patio you don’t have to rearrange every season.
10. DIY patio upgrades that boost curb appeal
On an older patio, the things that stand out most are usually dirty surfaces, overgrown edges, loose pavers, faded furniture, and randomly placed pots.
Unfortunately, these kinds of jobs were always making their way onto our weekend list. Not the most exciting projects, but you can see the difference right away. Lindy usually handled the plants, while I could spend half the day fixing up the edge of the patio or working on old furniture.
What you’ll need
- A stiff-bristle brush and a cleaner suitable for your patio material.
- Outdoor paint or protective finish if the furniture is still sturdy.
- Edging stones or restraints if the edge of the pavers has started shifting.
- Jointing sand suitable for your specific type of pavers.
- Two or three large planters with plants.
- Low-voltage outdoor lights for the edge of the walkway or patio.
How to update a patio yourself
1. Start with the surface itself.
First, remove the furniture and planters, sweep the area thoroughly, and wash the surface using a method that suits the specific material. Concrete, stone, and pavers can all have different requirements, so it’s better not to use harsh cleaning products without checking first. After a proper cleaning, the surface often looks much better than you expected.
2. Tidy up the edges of the patio.
If grass is creeping over the pavers or the edge of the patio has lost its shape, you can clear it again and install edging. For stone edging, you make a shallow trench, level the base, and set the pieces evenly. Edging also helps keep mulch in place and separates planting areas from the patio surface.
3. Check the joints between the pavers. If the sand has washed out and some of the pavers have started moving, the joints need to be refilled with the right material. Polymeric sand is applied only to a dry surface, worked into the joints, and carefully swept off the face of the pavers before adding water. Otherwise, a light residue can be left behind. Always follow the instructions for the specific product.
4. Refresh old furniture.
A table or metal chairs with a faded finish should first be cleaned, with peeling paint and rust removed, then sanded and coated with a finish made for outdoor use. If the frame is already loose, the wood is rotten, or the metal is badly rusted, then of course paint alone isn’t going to fix the problem.
5. Use plants around the edges of the patio.
In sunny spots, you can grow lavender, rosemary, sage, or ornamental grasses in containers. In partial shade, hostas, ferns, and heucheras grow well. It’s better to place a few large containers in the corners or along one edge of the patio than scatter small pots all over the space.
6. Light the edge of the patio.
Small outdoor lights can go along the walkway, near steps, or around the outer edge of the patio. In the evening, they help show where the paved surface ends and make the whole area look more finished. If you don’t want to deal with wiring, you can choose solar garden lights and place them directly in the ground next to the patio.
As you can see, sometimes it’s enough to tidy up the surface, patio edges, furniture, and a few planting areas to make the whole patio look completely different. Most of these jobs don’t require a full renovation or a big budget. You start with one problem area, and then it becomes much easier to see what really needs fixing and what can stay as it is.
Are you happy with your patio?
Some of the ideas in this roundup will take more work, while others can be done in just a couple of hours.
I’m always interested in seeing how differently people use the same kind of outdoor space. For some, the main spot is the table near the kitchen, for others it’s the chairs around the fire, and some people spend almost the entire summer by the pool.
Tell me in the comments what your patio looks like right now and what you’d like to change. And if you’ve already updated the space yourself, share what turned out to be genuinely useful and what ended up being a waste of time or money. Those stories are much more interesting to read than photos of perfectly staged yards.