Homemade sliders almost always turn out very different in flavor and texture. Sometimes the main role comes from hot melted cheese, sometimes from slightly sweet buns, and sometimes the whole recipe depends on a good sauce or a toasted crust on top.
I’ve collected a whole collection of recipes like this from friends and neighbors. Some of them we make very often, while others much more rarely.
A few of these ideas actually came from trying to use leftovers from the fridge that unexpectedly turned out tastier than half of the appetizers served in restaurants. We make a few of them regularly, while others only make an appearance from time to time.
This article includes different options, and I think everyone will choose their own favorites.
1. Hawaiian Roll Kalua Pork Sliders with Five-Minute Pineapple Glaze
In these kalua pork sliders with pineapple glaze, the combination of sweet and slightly salty flavors comes together really well. Soft Hawaiian rolls soak up the juices from the meat, a light caramelized crust appears on top, and the quick pineapple glaze makes the flavor much more interesting without long cooking.
For baking, it’s very convenient to use a deep sheet pan like the Nordic Ware Naturals Baker’s Half Sheet.
Ingredients
For the sliders:
- 12 Hawaiian rolls
- 3 cups prepared shredded kalua pork (about 700–750 g)
- 6 slices mozzarella or Monterey Jack cheese
- 2 tbsp butter (30 g)
- 1 tsp garlic powder
- 1 tsp sesame seeds
- a little green onion for serving
For the pineapple glaze:
- 1 cup pineapple juice (240 ml)
- 2 tbsp brown sugar
- 1 tbsp soy sauce
- 1 tsp apple cider vinegar
- 1/2 tsp smoked paprika
How to Make It
- Make the glaze first. In a small saucepan, combine the pineapple juice, brown sugar, soy sauce, vinegar, and smoked paprika. Place over medium heat and cook for about 5–7 minutes after it starts simmering.
- Slice the rolls horizontally in one whole slab. Do not separate them into individual buns. Place the bottom half into a baking dish.
- Spread the warm shredded kalua pork evenly over the rolls. Pour part of the pineapple glaze directly over the meat so it becomes juicier.
- Add the cheese slices on top. Cover with the top half of the rolls.
- Mix the melted butter with garlic powder. Brush the tops of the buns and sprinkle with sesame seeds.
- Cover the baking dish with foil and bake at 350°F (175°C) for about 12 minutes. Then remove the foil and cook another 5–7 minutes until the top becomes golden and the cheese fully melts.
- Before serving, drizzle with the remaining glaze and sprinkle with green onion.
Lindy noticed that dishes with this kind of flavor combination disappear first. When the meat is slightly salty, the buns are soft and sweet, and there’s still warm pineapple glaze on top — it really is hard to stop.
And at the same time, the recipe itself is very simple. No smoker, no complicated marinades, and no huge amount of time spent standing at the stove.
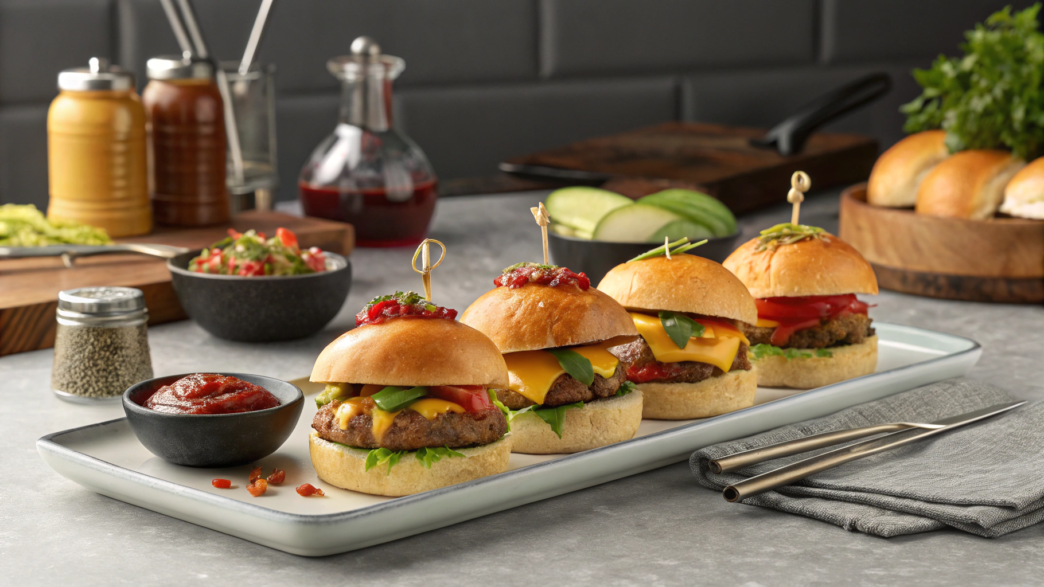
2. Sheet-Pan Cheeseburger Sliders for a Crowd in Under 30 Minutes
Here, you don’t need to stand at the stove frying tiny patties in batches. One large meat layer, one sheet pan, the oven — and half an hour later you already have hot homemade cheeseburger sliders with melted cheese and toasted buns on the table. It’s a slightly old-school style cheeseburger. Juicy, lightly salty, with a soft bun and warm cheese. Simple and quick to make.
Ingredients
- 12 soft slider buns
- 2 lb 80/20 ground beef (about 900 g)
- 1 small onion, finely chopped
- 1 tsp salt
- 1/2 tsp black pepper
- 1 tsp garlic powder
- 8 slices cheddar cheese
- 2 tbsp butter (30 g)
- 1 tsp sesame seeds
- 2 tbsp ketchup
- 1 tbsp mustard
- a few pickles for serving
How to Make It
- Preheat the oven to 400°F (200°C). While the oven heats up, combine the ground beef with onion, salt, pepper, and garlic powder. Don’t overmix it. If the meat gets packed too tightly, the texture will turn dense later.
- Line a sheet pan with parchment paper and spread the meat into an even layer. This is much faster than shaping separate patties. And yes, the sliders also end up looking neater this way.
- Bake the meat layer for about 15 minutes. If a little juice appears on top, that’s completely normal. Just carefully drain the excess.
- While the meat cooks, slice the buns horizontally in one whole slab. Place the bottom half into a baking dish or onto another sheet pan.
- Carefully transfer the meat layer onto the bottom buns. The easiest way is to use two wide spatulas. And don’t worry if the meat cracks a little around the edges — there will be cheese on top anyway, and after slicing nobody will even notice. Then spread a thin layer of ketchup and mustard over the meat and cover with slices of cheese.
- Add the top buns, brush with melted butter, and sprinkle with sesame seeds.
- Return the sliders to the oven for another 6–8 minutes. The buns should become golden and the cheese inside should fully melt.
- Before serving, add the pickles. They make the flavor fresher and slightly balance the richness of the meat and cheese.
We started making these hot cheeseburger sliders for a crowd after one autumn evening when neighbors unexpectedly came over to help us move raised beds before the rain started. Nobody planned to stay for dinner. But the smell from the kitchen completely pulled everyone in. In the end, people were sitting on the terrace steps with paper towels instead of plates, talking about why homemade cheeseburgers almost always taste better than restaurant ones.
Probably because nobody saves money on cheese or meat here. And because they’re eaten hot, straight from the sheet pan.
3. Cold Deli Club Sliders with No-Cook Herbed Cream Cheese Spread
We usually make these cold deli club sliders when the weather gets so hot that even thinking about turning on the oven feels annoying. Nothing here needs to be baked or fried.
The herbed cream cheese adds freshness, a light creamy texture, and ties all the other ingredients together. And after a couple of hours in the fridge, the chilled buns somehow taste even better.
Ingredients
- 12 soft slider buns
- 1/2 lb deli-style turkey, thinly sliced (225 g)
- 1/2 lb deli-style ham (225 g)
- 6 slices provolone or Swiss cheese
- 1 cup cream cheese (225 g)
- 2 tbsp sour cream
- 1 tbsp fresh dill
- 1 tbsp green onion
- 1 tsp lemon juice
- salt and black pepper to taste
- lettuce leaves
- thinly sliced tomatoes
- a few cucumber slices
How to Make It
- Make the herbed cream cheese spread. In a bowl, combine the cream cheese, sour cream, dill, green onion, and lemon juice. Add a little salt and black pepper. The spread should turn out soft and easy to spread over the buns. If the cream cheese is too cold, leave it at room temperature for 10–15 minutes first.
- Slice the buns horizontally in one whole slab without separating them from each other. This makes the sliders much faster to assemble, and the filling spreads more evenly later.
- Generously spread the herbed cream cheese over the bottom half of the buns. Don’t make the layer too thin. This spread gives the sliders most of their flavor and keeps the buns from drying out in the fridge.
- Layer the deli meat and cheese. Start with the turkey, then the ham, then the cheese slices. Don’t try to make perfectly flat layers. When the meat folds slightly in waves, the texture turns out much nicer.
- Add the vegetables. Lightly pat the lettuce dry with a paper towel before assembling so extra moisture doesn’t build up inside. Add the tomatoes and a few thin cucumber slices on top.
- Cover with the top half of the buns and gently press with your hands. Don’t press too hard — the buns should stay soft.
- Place the sliders in the fridge for at least 20–30 minutes before serving. During this time, the creamy spread slightly soaks into the bread, and the flavor becomes richer and more balanced.
I usually make these cold club sliders in the summer after a long day outside, when there’s no energy left to cook anything. You pull them out of the fridge, slice them into small squares — and dinner is ready.
After a couple of hours in the fridge, they somehow taste even better. The buns lightly soak up the creamy spread, the meat and cheese chill down properly, and the flavor becomes richer and more complete.
4. Kid-Approved Pizza Sliders with Hidden Veggie Sauce
Kids often instantly “scan” food with their eyes and start picking out anything green before even taking the first bite. But this sauce actually has real vegetables in it. Nobody treats it like a “healthy sauce,” though. For everyone, it’s simply a rich, thick, and tasty pizza sauce with cheese and pepperoni. Sometimes recipes like this are especially valuable because of how unnoticed they are.
Ingredients
For the sliders:
- 12 soft slider buns
- 1 1/2 cups shredded mozzarella cheese (170 g)
- 20–24 slices pepperoni
- 2 tbsp butter (30 g)
- 1/2 tsp garlic powder
- 1/2 tsp Italian seasoning
For the hidden veggie sauce:
- 1 cup tomato sauce (240 ml)
- 1/2 cup finely grated zucchini
- 1/3 cup finely grated carrot
- 2 tbsp finely chopped sweet pepper
- 1 tsp olive oil
- 1/2 tsp dried oregano
- a pinch of salt
How to Make It
- Make the veggie sauce. Heat a small skillet with olive oil and add the zucchini, carrot, and sweet pepper. Cook for about 4–5 minutes over medium heat until the vegetables soften. Then add the tomato sauce, oregano, and a little salt. The sauce should become thick, and the vegetables should almost “disappear” inside it.
- Slice the buns horizontally in one whole slab and place the bottom half into a baking dish. This makes assembly much faster, especially when making a big batch.
- Spread the veggie sauce over the buns. Don’t make the layer too thick so the bread doesn’t become soggy.
- Add the cheese and pepperoni. Start with the mozzarella, then add the pepperoni slices. For a more “pizzeria-style” flavor, you can add a little extra cheese on top.
- Cover with the top half of the buns. Mix the melted butter with garlic powder and Italian seasoning, then brush the tops of the buns.
- Bake at 350°F (175°C) for about 12–15 minutes. The tops should become lightly golden, and the cheese inside should fully melt.
- Before serving, let the sliders sit for 3–4 minutes. This helps the cheese settle a little so the filling doesn’t slide out immediately after the first bite.
I noticed that kids usually eat food with familiar flavors much more willingly, even when new ingredients appear inside.
That’s why these pizza sliders with hidden veggie sauce often become a really good compromise: adults know there’s something more полезное than regular ketchup inside, while kids are simply happy about the hot cheese, soft buns, and the smell of fresh pizza filling the whole house.
5. One-Bowl Chicken Parm Sliders with Pantry Marinara Hack
One evening after working outside, Lindy and I were so tired that the idea of cooking a full dinner sounded like a bad joke. There was some ground chicken in the fridge, a little cheese, and a pack of buns that already needed to be used. After that, everything somehow came together on its own. And surprisingly, it turned out really good.
The most interesting part of this recipe is the quick marinara sauce with a flavor that tastes like the thick sauce served with baked chicken in old family-style Italian restaurants.
Ingredients
For the chicken filling:
- 1 lb ground chicken (450 g)
- 1/2 cup breadcrumbs
- 1 egg
- 1/3 cup grated parmesan cheese
- 1 tsp garlic powder
- 1 tsp Italian seasoning
- 1/2 tsp salt
- 1/2 tsp black pepper
For the quick marinara sauce:
- 1 can tomato sauce, 15 oz (425 g)
- 1 tbsp tomato paste
- 1 tsp olive oil
- 1 tsp dried basil
- 1/2 tsp garlic powder
- a pinch of sugar
- a pinch of salt
Additional ingredients:
- 12 soft slider buns
- 1 1/2 cups shredded mozzarella (170 g)
- 2 tbsp butter (30 g)
- a little parsley or basil for serving
How to Make It
- Mix all the ingredients for the chicken filling in one bowl. Ground chicken, egg, breadcrumbs, parmesan, spices — everything goes in at once. You can already see it: minimum dishes, minimum hassle.
- Spread the chicken mixture into an even layer on a sheet pan or baking dish. Don’t press it down too hard. That helps the meat stay softer after baking.
- Bake the chicken layer at 400°F (200°C) for about 15 minutes. The top should become lightly golden, and the meat inside should be fully cooked.
- While the chicken cooks, make the quick marinara sauce. Simply combine the tomato sauce, tomato paste, olive oil, basil, garlic powder, sugar, and salt in a small saucepan. Warm it over medium heat for 5–7 minutes. The sauce will become thicker and richer in flavor.
- Slice the buns horizontally in one whole slab and place the bottom half into a baking dish.
- Transfer the baked chicken layer onto the buns. The easiest way is to use two wide spatulas. Spread the marinara sauce over the top and sprinkle with mozzarella. Don’t use too much sauce, otherwise the buns will start getting soggy underneath.
- Cover with the top half of the buns, brush with melted butter, and return to the oven for another 6–8 minutes.
- Before serving, sprinkle with fresh herbs. A small amount of parsley or basil makes the flavor fresher and slightly lifts the whole recipe.
These chicken parm sliders stay delicious even after reheating. The chicken inside stays soft because of the cheese and sauce, the tops of the buns become lightly toasted, and the quick marinara sauce gives the flavor more depth without long cooking times.
6. Vegetarian Black Bean Queso Sliders with Crispy Tortilla Crust
For a long time, we honestly doubted that vegetarian black bean sliders could actually feel filling. Especially when everyone at home is used to hot meat-heavy food with melted cheese and crispy edges.
These sliders get a crispy tortilla layer on the outside, while inside there’s a warm filling made with black beans, spices, and queso sauce. In the end, it tastes like something between a hot Mexican sandwich and a baked quesadilla.
Ingredients
For the filling:
- 2 cups black beans, rinsed and dried (about 340 g)
- 1/2 cup finely chopped sweet pepper
- 1/3 cup finely chopped onion
- 1 tsp ground cumin
- 1/2 tsp smoked paprika
- 1/2 tsp garlic powder
- salt and black pepper to taste
- 1 tbsp olive oil
For the queso layer:
- 1 cup shredded cheddar cheese (about 110 g)
- 1/2 cup cream or milk (120 ml)
- 1 tsp cornstarch
Additional ingredients:
- 12 slider buns
- 2 small flour tortillas
- 2 tbsp butter (30 g)
- a little cilantro or green onion for serving
How to Make It
- Cook the vegetables for the filling. Heat olive oil in a skillet and cook the onion and sweet pepper for about 5 minutes. The vegetables should become softer and slightly sweeter.
- Add the black beans and spices. Add the cumin, paprika, garlic powder, salt, and pepper. Lightly mash part of the beans directly in the skillet with a fork. This helps the filling become thicker and keeps it from falling out of the buns later.
- Make the quick queso sauce. Combine the cheddar, milk, and cornstarch in a small saucepan. Heat over low heat while stirring constantly. The sauce should become smooth and stretchy.
- Prepare the crispy tortilla crust. Cut the flour tortillas into thin strips or small pieces. Lightly brush them with melted butter.
- Slice the buns horizontally in one whole slab and place the bottom half into a baking dish.
- Spread the black bean filling over the buns, then pour the queso sauce on top. Add the tortilla pieces over everything. During baking, they become golden and lightly crispy.
- Cover with the top half of the buns and bake at 375°F (190°C) for about 10–12 minutes.
- Before serving, add a little fresh cilantro or green onion. It gives the sliders a fresher flavor and slightly balances the cheesy filling.
After these vegetarian queso sliders, it really feels like a proper filling dinner. The black beans add protein and fiber, while the melted cheese and crispy tortilla topping make the whole recipe feel much more satisfying.
Especially when they’re served hot straight from the oven while the cheese still stretches inside.
7. Turkey Cranberry Stuffing Sliders Inspired by New England Diners
This recipe came to me after a conversation with Aunt Mary. She lived for many years in a small town in Maine and constantly talked about local diners where even a simple turkey sandwich looked like a full holiday dinner. Homemade in the best way possible, with lots of filling, warm bread, thick sauce, and that feeling like someone is about to send you to sleep under a heavy blanket somewhere near a fireplace.
And these turkey cranberry sliders really remind me of that kind of food. They have everything: soft turkey, a slightly sweet cranberry layer, herby stuffing, and toasted buns on top. But the whole thing comes together very quickly.
I especially like using leftover roasted turkey for these sliders. The flavor of that meat is much deeper than regular deli slices. But if there are no leftovers, store-bought roasted turkey works too.
For sliders like these, a baking dish like the Pyrex Deep Glass Baking Dish works really well.
Ingredients
- 12 soft slider buns
- 3 cups cooked turkey, sliced or shredded into pieces (about 700 g)
- 1 cup stuffing mix or prepared bread stuffing (150 g)
- 1/2 cup chicken broth (120 ml)
- 1/2 cup cranberry sauce (120 ml)
- 6 slices Swiss cheese
- 2 tbsp butter (30 g)
- 1/2 tsp dried thyme
- 1/2 tsp garlic powder
- a little parsley for serving
How to Make It
- Prepare the stuffing first. If you’re using a dry stuffing mix, pour warm chicken broth over it and let it sit for a few minutes. The stuffing should become soft, but not wet. Too much liquid later will ruin the texture of the sliders.
- Slice the buns horizontally in one whole slab and place the bottom half into a baking dish. This is much easier than assembling every slider separately.
- Spread the turkey over the buns. Try not to arrange the meat in a perfectly flat layer. When the pieces sit a little looser, there’s more air inside and the filling feels lighter.
- Add the stuffing and cranberry sauce. Distribute the stuffing in small portions and gently spread the cranberry sauce over the top with a spoon.
- Add the cheese slices and cover with the top half of the buns.
- Brush the tops with butter and spices. Simply mix the butter with thyme and garlic powder, then brush it over the buns. During baking, the tops become golden and aromatic.
- Bake at 350°F (175°C) for about 12–15 minutes. The cheese inside should fully melt, and the edges of the buns should lightly brown.
- Before serving, add a little parsley for freshness and let the sliders rest for a couple of minutes after they come out of the oven. That way the filling inside won’t immediately fall apart.
These turkey cranberry sliders are especially convenient to make the day after a big family dinner, when there’s leftover turkey and a little stuffing sitting in the fridge.
Instead of another plate of reheated leftovers, you get something completely different — hot, filling, and really delicious. Especially when the sliders are served straight from the oven while the cheese is still soft and the buns are warm on top.
8. Breakfast Egg and Cheese Sliders Baked on Maple Hawaiian Rolls
Our friend Kevin has a habit of showing up way too early. Usually right at the moment when you’re still standing in the kitchen with a cup of coffee trying to understand whether you’re actually awake yet or not. And one morning he came over to help us repair a fence after a windy night. Hungry, of course.
That morning, I made these breakfast sliders with egg and cheese on maple Hawaiian rolls. They taste like something between a homemade breakfast and a really good breakfast sandwich from a small roadside diner.
Ingredients
- 12 maple Hawaiian rolls
- 8 large eggs
- 1/4 cup milk (60 ml)
- 1 1/2 cups shredded cheddar cheese (about 170 g)
- 8 slices cooked bacon or turkey bacon
- 2 tbsp butter (30 g)
- 1/2 tsp garlic powder
- 1/2 tsp black pepper
- salt to taste
- a little green onion for serving
How to Make It
- Whisk the eggs with milk, salt, and pepper. There’s no need to create perfect foam. Just mix everything well enough for the yolks and whites to fully combine.
- Cook the soft egg layer. Pour the eggs into a skillet with a small amount of oil and cook over medium heat, stirring constantly with a spatula. The eggs should stay slightly soft and moist. They will continue cooking more in the oven later.
- Slice the maple Hawaiian rolls horizontally in one whole slab and place the bottom half into a baking dish.
- Spread the eggs over the buns, then add the bacon and cheddar cheese. It’s better to distribute the cheese all the way to the edges so every slider turns out equally cheesy.
- Cover with the top half of the buns. Mix the melted butter with garlic powder and brush the tops with it.
- Bake at 350°F (175°C) for about 10–12 minutes. The tops of the buns should become lightly golden, and the cheese inside should fully melt.
- Before serving, sprinkle with green onion and let the sliders rest for 2 minutes. That way the cheese inside thickens slightly and the filling won’t immediately slide out.
The maple buns add a light sweetness that makes the eggs, bacon, and cheese taste completely different. And after baking, the tops become warm, slightly toasted, and buttery, so the whole recipe starts feeling more like breakfast from a small family diner instead of regular quick sandwiches.
9. Five-Ingredient BBQ Chicken Sliders with Cola Reduction Shortcut
A few years ago, our neighbor Jeremy showed us a very simple trick using cola in BBQ sauce. At first, it sounded like something from an old magazine clipping from the ’90s. But once the sweet soda cooks down together with the sauce, the flavor becomes deeper, thicker, and slightly more caramelized. No long smoking process and no giant list of spices.
That’s why these BBQ chicken sliders still show up at our house from time to time, especially on days when nobody feels like spending hours cooking.
Ingredients
- 12 soft slider buns
- 3 cups prepared shredded chicken (about 700 g)
- 1 cup BBQ sauce (240 ml)
- 1/2 cup cola (120 ml)
- 1 1/2 cups shredded cheddar cheese (about 170 g)
How to Make It
- Combine the BBQ sauce and cola in a small saucepan. Place over medium heat and cook for about 8–10 minutes, stirring occasionally. The sauce will slowly become thicker and darker. A light caramel smell starts showing up as it cooks.
- Add the shredded chicken to the sauce and mix well. The chicken should become fully coated in the glaze. If the mixture feels too thick, add just a couple spoonfuls of water.
- Slice the buns horizontally in one whole slab and place the bottom half into a baking dish. This method is faster and much easier, especially when making a larger batch.
- Spread the BBQ chicken evenly over the buns. Try to distribute the filling all the way to the edges so the outer sliders don’t end up “empty.”
- Add the cheddar cheese on top. While the sliders are still hot from the oven, the cheese slightly blends into the sauce and becomes almost creamy inside.
- Cover with the top half of the buns and place the baking dish into the oven at 350°F (175°C) for about 8–10 minutes. The tops of the buns should become lightly golden.
- Before serving, let the sliders rest for a couple of minutes. The sauce inside will thicken slightly and won’t immediately run out after the first bite.
Five ingredients, one saucepan, and the oven — and the BBQ chicken sliders are ready. The flavor still turns out really good. Especially when they’re served hot, while the buns are still soft and the melted cheddar stretches together with the thick BBQ sauce inside.
10. Make-Ahead Italian Sub Sliders That Taste Better Straight from the Fridge
Some foods actually become better after spending time in the fridge. And these Italian sub sliders are exactly that kind of recipe.
The bread lightly absorbs the dressing, the cheese becomes firmer and more flavorful, the meat settles down a little, and in the end every layer tastes more complete together.
One of my mom’s friends owned a small deli shop in Connecticut, and she always used to say: “A good Italian sandwich doesn’t like being rushed.” Back then I laughed at that. Now I completely understand what she meant.
Ingredients
- 12 soft slider buns
- 1/2 lb salami, thinly sliced (about 225 g)
- 1/2 lb ham, thinly sliced (about 225 g)
- 1/2 lb pepperoni or capicola (about 225 g)
- 6 slices provolone cheese
- 1 cup shredded lettuce
- 1/2 cup thinly sliced tomatoes
- 1/4 cup sliced banana peppers
- 2 tbsp mayonnaise
- 1 tbsp red wine vinegar
- 1 tsp Italian seasoning
- 1 tbsp olive oil
- salt and black pepper to taste
How to Make It
- Make the simple deli dressing. In a small bowl, combine the mayonnaise, red wine vinegar, olive oil, Italian seasoning, and a little salt and pepper. The dressing should stay light, not thick like a regular spread.
- Slice the buns horizontally in one whole slab and place the bottom half on a board or in a container. This makes it much easier later to cut the sliders into even squares.
- Spread the dressing over the buns. Don’t pour on too much at once. The bread should lightly absorb the dressing, not become wet.
- Layer the meats. Start with the ham, then the salami, then the pepperoni or capicola. Don’t press the layers down too tightly. When the meat sits a little looser, the texture feels much better.
- Add the provolone cheese and vegetables. It’s better to lightly pat the lettuce dry with a paper towel before assembling so extra moisture doesn’t build up inside.
- Cover with the top half of the buns and gently press with your hands. Not too aggressively. This isn’t a panini.
- Place the sliders in the fridge for at least 2 hours. Overnight is even better. That’s when the flavor becomes richer and much more deli-style.
- Before serving, slice the sliders with a sharp knife and let them sit at room temperature for about 10 minutes. That way the cheese and meat won’t feel too cold.
I really like that these Italian sub sliders can be made ahead of time and completely take dinner off your mind later in the evening. They hold up really well in the fridge without losing texture, and after a few hours the flavor somehow becomes even more interesting. Especially around the edges, where the bread slightly absorbs the dressing but still stays soft inside.
Your Favorite Slider Recipes
After all these recipes, I now have only one problem left: it’s impossible to choose a favorite. Some days I want hot BBQ chicken sliders with sticky sauce, other days cold Italian sliders straight from the fridge win, and sometimes simple breakfast sliders with eggs and cheese end up taking first place.
What would you make first? Or maybe your house already has some strange family sauce, unexpected filling, or combination that sounded questionable at first but later became everyone’s favorite?
Write about it in the comments — I’d honestly love to know.
Good luck and enjoy your meal!